Boiling & Cooling
Homebrewers employ a variety of equipment to boil their worts, ranging from pots on a kitchen stovetop to modified commercial kegs heated by propane burners. Most homebrew setups involve a “simple” kettle — one with no internal structures for heating or circulation — heated by an external heating source.
Concentrated vs. Full Wort Boils
Most extract brewers perform concentrated wort boils. A “thick” wort is boiled then diluted with water to working strength prior to fermentation. The smaller the volume of wort boiled, the higher the specific gravity of that wort in the kettle. For example, 7 lbs. (3 kg) of liquid malt extract (LME) dissolved in 5 gallons (19 L) of water yields a specific gravity of 1.051. The same amount of LME in 3 gallons (11 L) yields a specific gravity of 1.086. To calculate your boiling gravity, multiply your target original gravity (OG) times your batch size divided by the amount of wort you are boiling. For example, if you make a 5-gallon (19 L) batch of porter with a target OG of 1.060 and boil 3 gallons (11 L) your boiling gravity is 60(5/3) = 100 (a specific gravity of 1.100).
In a full-wort boil, the entire wort is boiled at working strength. At the beginning of the boil, the volume of wort is greater than the batch size and more dilute. Boiling condenses and concentrates the wort to working volume and concentration. A 5-gallon (19-L) brewer will typically start with 5.5 gallons (21 L) of wort and boil it down to just over 5 gallons (19 L). After cooling, they can transfer 5 gallons (19 L) of wort to the fermenter, leaving the trub and hop debris in the kettle.
Hop utilization increases in full wort boils compared to boiling a concentrated wort. In other words, you get more bitterness out of your hops as your wort gets thinner. The table to the left shows a typical hop utilization vs. specific gravity curve.
A full-wort boil also leads to less wort darkening. The more concentrated the sugars are, the more likely they are to react with each other or amino acids in the wort.
A full-wort boil also promotes better break formation. When heated, proteins, carbohydrates and tannins in the wort react and form what brewers call break material. Some of this break material appears as solids while the wort is boiling. This is called hot break (or hot trub). Other break material only becomes insoluble in cold wort and is called the cold break (or cold trub). If proteins or lipids don’t get formed into break, they can carry over into the finished beer and cause problems with chill haze and invite bacterial growth.
The advantage of a concentrated wort boil is the convenience while the advantages of a full-wort boil relate to beer quality. Extract brewers should therefore seek to boil as much wort as the size of their brewpot, power of their stove and time constraints allow. Many extract recipes give specific amounts of liquid to boil the malt extract in. These recipes are meant to be quick and simple to brew and the recommended wort volume reflects this. Boil larger volumes if you can.
Boil Times
All brewers must decide how long to boil their wort. These days, many homebrew recipes call for a one-hour boil. However, an even longer boil may help improve beer clarity and stability.
The longer that wort is boiled, the more break material is formed. More break material removed from your wort will ultimately yield clearer beer. Also, your beer will be more stable. So, if you have the time on brewing day, try extending your boil times and see if that makes a difference in your final beer. Note that you will need a larger initial volume if you are boiling for 90 minutes. For 5 gallons (19 L) of beer, you should start with 6.5 gallons (25 L) of wort compared to 6 gallons (23 L) for a 60 minute boil. You can add 0.25–0.33 gallons (1–1.2 L) to that to account for the hops and trub that settles to the bottom of the kettle. Traditionally some of the lightest-colored beers were boiled the longest.
For extract brewers, there is one further variable to consider. Many liquid malt extracts are already boiled. So, when making beer from LME, you can boil for as little as 15 minutes, just long enough to sterilize the wort. Beers made from dried malt extract (DME) still need to be boiled for at least 45 minutes.
What Happens During the Boil?
A lot happens during the boil, even though brewers don’t do much during this period. Let’s tour the boil and find out what’s going on and what, if anything, we can do.
Wort Expansion: Wort expands when heated. A five-gallon (19 L) brewer is unlikely to notice this, but larger-volume homebrewers may notice the volume shrinkage upon cooling. At 68 °F (20 °C), ale fermentation temperature, wort occupies about 4% less volume than it did at boiling (~215 °F/102 °C for most worts). For a 5-gallon (19-L) batch, this amounts to just over two “lost” (12 oz./355 mL) beers.
Evaporation of Water: When wort boils, water evaporates from it. One consequence is that the wort volume will shrink. This shrinking more than counteracts the expansion due to heating, which stops once boiling starts and the temperature is no longer rising.
One way to determine the vigor of your boil is to measure the evaporation rate. To calculate this, measure your wort volume at the beginning of the boil and again at the end of the boil. Your evaporation rate is calculated as:
Evaporation percent = 100 –(post-boil volume x 100 ÷ pre-boil volume)
For example: Say you collect 5.5 gallons of wort and boil it down to 5 gallons. This would be 100 – (500 ÷ 5.5), or 100 – 90.9, which equals an evaporation rate of 9.1 percent.
For most homebrews, a 10% evaporation rate is a good wort vigor. Anything less than this and your hop extraction and break formation suffers. Greater evaporation can yield too much darkening.
Another consequence of evaporation is that the concentration of sugars will increase in the wort. You can estimate how the gravity of your wort will change by using the formula C1V1 = C2V2. In the equation, C1 is the concentration of wort at the beginning of the boil and V1 is the volume at the beginning of the boil and C2 is the unknown concentration of wort at the end of boil, when the wort will have a volume of V2.
Let’s say that you have 6 gallons (23 L) of wort at a specific gravity of 1.040 and plan to boil it down to 5 gallons (19 L). Substituting the numbers into the equation, we get 6(40) = 5(X), where X is our unknown specific gravity. (Notice that you only use the decimal portion of specific gravity — i.e. 1.040 becomes 40.) Solving for X, we get 6(40)/5 = 240/5 = 48. So our expected specific gravity would be 1.048.
This formula will, however, consistently overestimate your final gravity. Your early reading of specific gravity will be inflated by soluble proteins and other molecules in the wort. These will cause your hydrometer to float higher. Late in the boil, these substances will have precipitated out and will not affect the gravity. My estimate is usually off by three or four gravity points when I use this formula.
A third consequence of the evaporation of water is that color-bearing molecules will become more concentrated, darkening the wort.
Wort darkens for two reasons. Primarily, the wort gets darker because it is getting more concentrated and secondarily because chemical reactions are forming colored molecules from colorless precursors. The caramelization of sugars is one example of this type of reaction. Maillard reactions are another.
Caramelization occurs when (colorless) sugars react with other sugars and form color-bearing polymers. Maillard reactions occur between sugars and amino acids. If you want to differentiate between the effect of wort concentration and direct color development in your wort, try this experiment. Take a sample of wort immediately after the hot break then take a second sample at the end of your boil. You can compare the two to see the extent of wort darkening. To estimate how much of the darkening was due to color-developing reactions, dilute your final wort back to the concentration it was when you took the first sample. Comparing the early and late worts, corrected for loss of water, should show you how much wort color comes from Maillard reactions and sugar caramelization.
Other things that affect color are going on as well, including the effect of the precipitated break material. However, this is a good, quick check for extract brewers whose beers are too red. You can check if the color is developing during the boil or if your extract was simply carrying too much color to begin with.
Evaporation of DMS: Other volatile chemicals, including dimethyl sulfide (DMS), are also evaporated during the boil. DMS is a molecule that leads to a cooked corn smell in the beer. Precursors to DMS are found in lightly kilned malts. A good, rolling boil — followed by fast wort cooling — will minimize DMS.
Chemical reactions: Wort is a complex mix of water and biochemical molecules, including carbohydrates, proteins, lipids and other molecules. When you heat this mixture, many chemical reactions occur. I’ve already mentioned two important reactions — those that form Maillard products and those that form break material.
The chemical reactions involving hops and their bittering compounds are of interest to brewers. In the boil, alpha acids in hops are converted via heat to iso-alpha acids. Alpha acids are insoluble in wort and are not bitter. Iso-alpha acids, however, are both soluble and bitter. The amount of alpha acids converted to iso-alpha acids depends on how long the wort is boiled and the specific gravity of the wort. Most brewers boil their bittering hops for at least one hour. On average, a homebrewer will convert 25% of the alpha acids in their hops to iso-alpha hops in a one-hour boil.
In the boil, calcium ions in the water and phosphates derived from the grain react and drop out of solution. This results in a drop in pH. The wort should drop from a pH of 5.4–5.6 to a pH around 5.2. If your wort pH is too high, the resulting beer may taste dull and lifeless. Adding a small amount of calcium — about 1⁄4 tsp. gypsum or calcium chloride per 5 gallons (19 L) — can help the pH get to the right point.
Convection currents: Wort is not heated evenly. When temperature differences within a volume of liquid exist, convection currents result. In commercial kettles, the shape of the kettle — and the presence and placing of internal heating elements — are designed to induce currents in the kettle. Convection currents help mix the wort and help with break formation. Homebrewers don’t need to worry about convection currents. Stirring the wort a few times during the boil should ensure adequate mixing.
Cessation of biological activity: Boiling will kill bacteria and yeasts. Some bacteria and fungi can form spores and survive a boil, but there are no common wort or beer spoilers that do this. Boiling will also inactivate the enzymes you utilized in the mash.
Kettle additions: The boil is also a time for kettle additions such as Irish moss, which helps clear break material, and yeast nutrients.
Cooling your Wort
Once you’ve boiled your wort, you need to cool it. Wort cooling is a procedure that is conceptually simple, yet very important to beer quality. Unfortunately, since wort cooling is straightforward and comes near the end of the brewday, many homebrewers pay little attention to this step.
Reasons to Chill Wort
After the boil, wort needs to be chilled for a variety of reasons. The wort needs to be cool enough for the yeast to survive and perform well at making beer. Most ale yeasts work best between 68–72° F (20–22° C); most lager yeasts work best at 45–57° F (7–14° C). In addition, to prevent shock from a rapid change in temperature, the temperature difference between your yeast culture and wort should be less than 10° F (-12° C) at pitching.
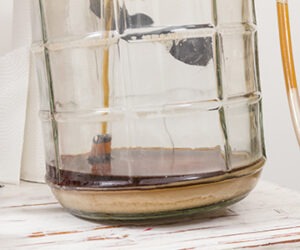
There are reasons other than yeast health for wort chilling. Wort cooling causes solids, called the cold break, to form and fall out of solution. When wort is transferred from the kettle to the fermenter, this break material is left behind.
Wort cooling also slows DMS production. DMS is a volatile substance produced in some worts, mostly those made from lager malts. DMS smells like cooked corn and is usually considered a beer fault, although it is noticeable and intentional in some commercial beers.
Quickly cooling the wort also slows growth of some wort contaminants. Once the wort drops below 160 °F (71 °C) or so, there are many bacteria — known as wort spoilers — that can quickly grow and produce off flavors in wort. Quickly moving the wort to fermentation temperature and pitching the yeast minimizes the impact of these bacteria on your beer.
Starting Warm
Some homebrewers start their fermentations “warm.” Instead of cooling the wort all the way down to fermentation temperature, they stop cooling 5 to 10 °F (3 to 6 °C) short of the target temperature and then pitch their yeast. The usual reason given is that a warm wort provides for a fast start, which will help the yeast colonize the wort faster and crowd out any stray bacteria. When deciding whether to start warm or not, there are a couple things you should consider.
Warm wort will lead to a faster start for the yeast, but it will also propel bacterial contaminants to grow faster as well. Bacteria can divide faster than yeast, so you really aren’t gaining leverage by starting warm. Many flavor-active molecules are produced early in the fermentation while the yeast are multiplying. These molecules are produced in much smaller numbers later when the yeast cells have reached their maximum density and are fermenting, but not dividing. Thus, starting a fermentation warm can lead to more fermentation by-products in your wort. If you are striving to make a “clean” tasting beer, starting at fermentation temperature is more advisable. Starting warm also means that more potential cold break material remains dissolved in the wort. This material can contribute to chill haze in your finished beer.
Topping Up With Cold Water
Extract brewers typically boil a concentrated wort, a wort smaller than the volume of the batch. After the boil, water is added to make the batch full-size. For example, the brewer may boil three gallons (11 L) of wort, then add two gallons (7.6 L) of water to make a 5-gallon (19 L) batch of beer.
The water used for topping up can absorb a good deal of heat. To increase the “cooling power” of this water, it can be refrigerated overnight. Make sure the water containers are clean and sanitized and that the containers can be sealed. Water stored in a refrigerator can pick up flavors from food if it is not in a sealed container.
Before mixing this water with your wort, aerate the water thoroughly. You can do this by vigorously shaking the container for 45–60 seconds, or you can use a fish-pump aeration device or oxygen tank. Cold liquids can hold more gas than warm liquids, so aerating your cold topping-up water can help greatly with over-all aeration.
When mixing cold water and hot wort, add the cold water to your fermenter first, then slowly add the hot wort. Stir the wort with a clean, sanitized spoon as you mix the two. Never add hot wort to a carboy before the cold water, as the heat can crack the carboy.
One of the disadvantages of transferring hot wort into cold water without chilling it first is that you carry all the potential cold break into the fermenter. If you want to get rid of this break material, you can initially transfer the wort to cold water in a sanitized bucket and wait for 15 minutes or so for the break material to settle out. After that, you can siphon the clear wort over to your primary fermenter.
In the Sink
A five-gallon (19 L) or smaller wort can easily be cooled by submerging your brewpot in a sink. This transfers heat from your wort to the water. To do this, put a cover on the brewpot after the boil, place the pot in a sink and fill the sink with cold water. To speed cooling, swirl the water in the sink every couple of minutes and change the water in the sink every five to seven minutes. Also, stir the wort with a clean, sanitized spoon every time you change the water. These two things will keep cold water next to the outside of the pot and hot wort next to the inside of the pot.
Once the brewpot has cooled to the point where you can comfortably touch it for a few seconds, put some ice in the sink and fill it with water. The exact amount of ice you need depends on how cold your wort is when you begin icing it. Keep changing the cooling water and adding more ice every time the ice melts. Begin checking the temperature of your wort — with a clean, sanitized thermometer — once the brewpot is cool to the touch. Once the wort is cooled to your target temperature, transfer it to your fermenter.
Even if you add some cold topping-up water to your wort, cooling the brewpot in a sink or tub is a good idea. If hot wort is splashed around, it can darken significantly. This can occur even if you are pouring the hot wort into cold water, especially if you’re pouring it through a funnel. Whatever you do, don’t pour hot wort through a strainer — this will definitely darken the wort and leave your beer prone to quick staling. And finally, hot wort can cause scalding — so anytime you cool it before moving it anywhere, the better off you will be.
I always cool any wort — even the wort I make for yeast starters — before transferring it. This ensures that my light-colored worts (or starter worts) stay light-colored and I don’t risk scalding myself. Cooling the wort before transferring also allows you to separate the wort from some of the cold break material.
If you are cooling your wort in the sink plus adding topping-up water, you don’t need to cool the wort all the way down to fermentation temperature. Simply cool the wort to the point where you can touch the brewpot for a few seconds, then transfer the wort to your fermenter.
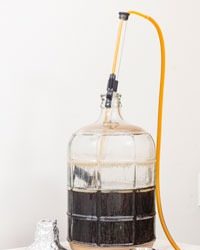
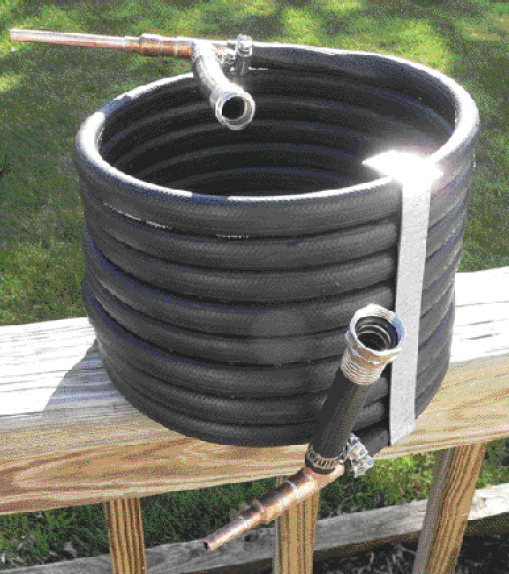
Immersion Wort Chiller
It’s possible to cool 5 gallons (19 L) or more of wort in a sink or bathtub, but it would take awhile. Plus, you would need to carry the wort to the water and this could be dangerous. Luckily, homebrewers have an effective way of cooling a wort without having to move it — with an immersion chiller.
An immersion chiller is a metal coil — usually copper — that is placed in hot wort. It has tubing or hoses running from both ends. Water running through the coils absorbs heat and carries it out of the wort. When used correctly, an immersion chiller will cool your wort much faster than cooling the brewpot in a kitchen sink.
To use an immersion chiller, place the clean chiller in your wort about 15 minutes before the boil is done. The heat from the wort will sanitize it. Hook one end of the chiller tubing to your water source and place the other end anywhere that can accept hot water. You may need to weigh down the “out” end so it stays put.
After the boil, turn on the water to the chiller. Using a clean pot holder or barbecue mitt, grab the top of the chiller and swirl it through the wort a few times to start the wort circulating. The circulating wort will flow past the chiller coils and keep cold wort from collecting around them. Swirl the wort every five minutes or so. Putting a lid on the kettle slows the cooling slightly, but it prevents airborne contaminants from falling into your wort. Once the outside of the kettle is cool to the touch, take the temperature of the wort every five minutes or so with a sanitized thermometer. When your wort is cooled, transfer the wort to your fermenter.
Counter-Flow Chiller
Another way to cool your wort is with a counter-flow chiller. A counter-flow chiller is essentially a tube within a tube. Hot wort flows into the chiller and travels through the inner tube. Cold water flows in the opposite direction through the outer tube.
As the wort moves through the chiller, it encounters ever-colder water and continually transfers heat to this water. Counter-flow chillers are commonly attached to a valve on the kettle. After the boil, the water is turned on and the valve is opened. Hot, clear wort flows into the chiller and cooled, cloudy wort exits the other end. A counter-flow chiller will quickly cool your wort down to pitching temperature, but the wort that comes from it will be cloudy. The wort is cloudy because it contains all the precipitated cold break solids. To get rid of this, you can direct your wort from the chiller to a sanitized bucket first. Once the break material settles to the bottom of the bucket,transfer the wort to a fermenter and pitch the yeast.
The temperature of the wort exiting the chiller depends on a number of factors. Colder water temperatures, longer chiller lengths, more turbulence within the chiller and a slower flow rate of the wort increase the “chilling power” of the chiller. If you measure your wort temperature as it exits the chiller, you can change the wort flow rate with a tubing clamp to hit your target temperature.
One concern with counter-flow chillers is that you cannot see the inside of the chiller to see if it’s clean. Running hot water through the wort line of the chiller immediately after use will help keep it clean. Follow the hot water with a cleaning solution. To sanitize, you can run sanitizing solution through the wort line or boil the entire chiller. If you boil, fill the chiller with water first, place it in your kettle and heat the water to boiling.
Following cooling, you will need to aerate your wort and pitch your yeast. Some brewers have built aeration stones into the wort outflow tubing on their chillers for aeration. Quick wort chilling — followed by cold break separation, if needed — will give your yeast cool, clear wort to live, grow and ferment in.
Immersion wort chiller

An immersion wort chiller is a metal coil — usually copper — that uses cold water running through the tubing to cool.
Counterflow wort chiller
A counterflow wort chiller has one tube inside a second tube. Hot wort travels one way in the inner tube. Cold water travels the opposite direction in the outer tube.