Brew in a Bag All-Grain Techniques
 Brew-in-a-bag (BIAB) is the easiest and most economical way for an extract brewer to step-up into all-grain brewing. What makes this method (which was made popular by Australian homebrewers) unique is that you can basically do with one kettle what traditional all-grain brewers do with three separate and distinct vessels. With a single-large brew kettle, and the help of an inexpensive grain bag, you have the equipment that’s needed to brew your first all-grain masterpiece.
I began brewing BIAB out of necessity when I had a brew session planned, but my local homebrew supply didn’t have all the extract I needed in stock for my recipe. The homebrew shop staff calculated how much in grains I would need for a partial mash to substitute for the missing extract, and gave me a couple of food-grade 5-gallon (19-L) buckets. They also told me to look in The Complete Joy of Homebrewing on how to make a Zapap lauter-tun.
With my drill in hand, ready to make a whole bunch of holes in the bottom of one of the buckets, I decided that this might be the perfect time to try brew-in-a-bag instead. So I ran up to my local home center, went to the paint aisle, and grabbed a 5-gallon (19-L) paint strainer bag.
In my 5-gallon (19-L) kettle, I basically steeped 6 lbs. (2.7 kg) of crushed grains (as you would with specialty grains) in 3 gallons (11 L) of water for about an hour, pulled the bag out and continued the normal extract brewing process. I really wasn’t following any written procedure, but at the time, it seemed to do the job.

Why Would You Want To Brew BIAB Anyway?
If you are considering BIAB, there are a few reasons why it is a good option.
1. You want to get into all-grain brewing, but at a lower cost.
2. You don’t have enough space for the additional vessels required for a full all-grain set-up.
3. You want to have more control of your ingredients right from the start.
4. You don’t want to clean much more equipment than you already do with extract brewing.
The Cons of BIAB:
1. You’ll need a larger kettle than you most likely have for extract brewing, to brew a standard 5-gallon batch.
2. That kettle’s going to need a valve to move your cooled wort into your fermenter. You will be transferring about 5.5 gallons (21 L), so either invest in a health club membership or just install a ball valve on your kettle instead.
3. It takes more time to create your own wort rather than opening a couple containers of extract. About three more hours will be added to the brew day.
4. Compared to traditional all-grain brewing, your pre-boil efficiency can be lower. Extract brewers don’t calculate pre-boil efficiency since they don’t start their process from the grain. But when you do, you want a measurement of how well you did in extracting what sugars were available to you, from those grains, and what you actually collected in your wort. This will help you become more consistent from batch-to-batch.
Some BIAB brewers compensate by adding more grains to the grain bill, having their grains double-crushed, mashing longer, performing a mashout to aid in efficiency, or a combination of these. Currently, I have my grains double-crushed, mash for 90 minutes, and perform a mashout for 10 minutes at 170 °F (77 °C).
Additional Equipment Needed For BIAB
Large Brew Kettle
This one single vessel is going to act as the hot liquor tank (HLT), mash/lauter tun, and brew kettle from a traditional all-grain system. If you are going to brew a typical 5-gallon (19-liter) batch, you’re going to need a good sized kettle and a way to heat a lot of water.
In extract brewing, you’re typically working with 2 to 3 gallons (7.5 to 11 L) of water in your kettle and adding the concentrated wort to your fermenter, where it’s diluted with additional water to reach your 5-gallon (19-L) batch size. This is very manageable with a 5-gallon (19-L) pot and most kitchen stoves, although a larger pot will give you more space.
With BIAB, we need to have the full volume of water required to mash the grains, boil the wort, fill our fermenter with about 5.5 (21 L) gallons of wort, and account for all the loss along the way, so we can package our target 5-gallons (19 L) of beer. Depending on your grain bill, that’s going to require a 10+ gallon (38+ L) kettle and a burner with plenty of BTUs. The larger your kettle, the larger the grain bill or batch size you’ll be able to accommodate. But if you go too big, brewing indoors on a stovetop will not be an option, and you’ll need a large burner with not only enough BTUs but also a sturdy frame to support all the weight.
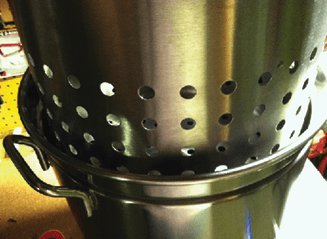
My brew kettle was converted from a steam stockpot that’s 44-quarts (11 gallons/42 L). It has a removable stainless-steel basket that keeps the grain bag off the bottom of the kettle during heating, and also provides additional support to the bag when it’s time to remove the spent grains from the wort (see photo above). Some BIAB brewers use the steam baskets with simple hoists to raise the bag out of the wort and let it hang over the kettle while it drains off.
If you occasionally want the flexibility and have the capacity to brew indoors, then you won’t want to be much bigger than a 10- to 11-gallon (38- to 42-L) kettle, depending on the burners on your stove. I successfully brew 13-lb. (5.9-kg) grain bills with about 8 gallons (30 L) of water, indoors, on our natural gas cook-top with a 17,000 BTU burner. It takes longer to get to temperature, and the boil isn’t as vigorous as my propane burner is outside, but it beats brewing only when weather permits. It’s a very tight fit as well, but works in a pinch. That extra gallon (3.8 L) of head-space from the 11th gallon is nice to have too.
Large Grain Bag
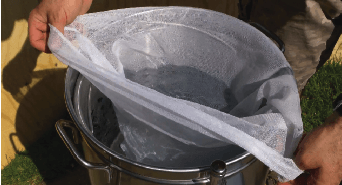
This is what makes it all happen, and you have a few options to choose from (see photo, left). You can buy these pre-made from any homebrew supply, custom higher quality bags from online sources, or simply make your own. Most are coarse mesh, made of nylon, and can be had for less than $8.00. They are typically 24-in. x 24-in. (61-cm x 61-cm) or 24-in. x 36-in. (61-cm x 91-cm) in size.
If you’re looking for a higher quality-long lasting bag, you can get a handmade polyester bag with reinforced seams, proper stitching, special thread, and sewn-in handles for easier lifting. These are available online for about $35.00 and may be a great option if the other bags just aren’t cutting it.
If you’re careful not to snag or overload your bag, either choice should do. The less expensive bags aren’t going to last a lifetime but will last longer if you use a steam basket in your rig. I’ve used them multiple times without issue.
Water Requirements
It is important to calculate the correct amount of water required to get through the entire process from the mash to the finished beer. This was probably the most difficult part for me to get right when I first started using BIAB because your equipment will directly impact the calculations. Most common brewing software now incorporates BIAB in their calculations, which can help a great deal, but you’ll still need to know a bit about your individual setup to get it perfected, and that will take some trial and error.
You certainly can use almost any brewing software of your choice that has a BIAB or single-infusion mash option, or one of the many free calculators available online. We will be using a BIAB water calculator that’s easy, accurate and free. It can be found, along with links to other great calculators and software, under “Brew Day Prep” at http://BiabBrewing.com.
To get started with calculating our water requirements, you’ll need the following basic information to enter into the BiabBrewing.com calculator:
• Finished batch size (gal.)
• Total weight of the grain bill (lbs.)
• Total weight of the hops (oz.)
• Boil time (minutes)
• Equipment boil off rate (gal/hour)
• Expected fermentation trub loss (gal)
• Grain absorption rate (default=0.125 gal./lbs.)
• Hop absorption rate (default=0.0365 gal./oz.)
• Grain temperature (°F)
• Mash temperature (°F)
• Interior kettle diameter (inches)
If you use software like BeerSmith, Brewer’s Friend, etc., be sure to set-up your equipment profile properly by editing the default values that most closely match your set-up, or by using more accurate information that you may already have. We’re going to use the profile information that I use with my BIAB setup for this example session. Yours will most likely be different, but these figures will get you started.
Information You Need From a Beer Recipe
There is a list of specific information you will need to brew an all-grain recipe with BIAB. To explain this, we’re going to look at Northern Brewer’s American Wheat Beer all-grain recipe. This recipe calls for a single infusion mash schedule and a mashout. Here’s what you’ll need to gather from the recipe:
Add Up the Total Grain Bill
4 lbs. (1.8 kg) Rahr white wheat malt
4 lbs. (1.8 kg) 2-row pale malt
= 8 lbs. (3.6 kg) total
Add Up the Total Amount of Hops
1 oz. (28 g) Willamette
1 oz. (28 g) Cascade
= 2.0 oz. (57 g) total
Boil Time
60 minutes
Mash Temperature
152 °F/67 °C
Equipment and Other Information You’ll Need
Equipment Boil-Off Rate
You’ll have to estimate this number your first time and adjust as you brew each batch. You could get a more accurate starting point by filling your kettle with a measured amount of water, like 5 gallons (19 L). Once it reaches a rolling boil, set your timer for 60 minutes. After the water cools, measure what’s left. The difference is your boil-off rate per hour. This should give you a good baseline to start from. For reference and for the calculations in this story, my setup is 0.5 gal./hr.
Finished Batch Size You Want to Bottle or Keg
This is what we want to package, not what’s going into the primary. In the case of this recipe, it is 5 gallons (19 L).
Expected Fermentation Trub Loss
This could vary from recipe to recipe, but I usually keep it constant. 0.5 gallons (1.9 L) is what I typically use.
Grain Absorption Rate (gal./lbs.)
This is the amount of water soaked-up by the mashed grains. I typically use 0.125 gallons (0.5 L), but this number is affected by squeezing the grain bag. (Read more about squeezing the grain bag on page 46.)
Hop Absorption Rate (gal./oz.)
This is the amount of water soaked-up by the hops and hop bags. I use 0.0365 gallons/oz., but like the grain bags I just mentioned, this is affected by squeezing the hop bags.
Grain Temperature
Grab your temperature probe and stick it into your bag of crushed grains to get a measurement on brew day. This will help calculate what temperature to heat the strike water to, so when you add the cooler grains, you’ll be close to your mash temperature. For example, when I brewed for this story, my temperature was 71.2 °F (22 °C).
Interior Kettle Diameter
This is great if you have a symmetrical, flat-bottomed kettle and want an easy way to measure your volumes. If you measure your kettle’s interior diameter and enter its value, the BiabBrewing.com calculator will give you the strike water depth (in inches), and how many inches each gallon is in your kettle. You can use a stainless steel ruler, yard stick, or I use stainless steel hose clamps secured on the handle of a long mixing paddle adjusted to these measurements. My interior diameter is 13.625 inches (35 cm).
After you calculate your results, you are ready to brew. Now comes the easy part.
Brew Day
Brew-in-a-bag is very simple once you get the math out of the way. The only difference between this method and brewing with extract is what we do before the boil begins. Get your ingredients and equipment together to begin the mash.
Here is what you will need before you start:
1. Brew kettle
2. Large grain bag
3. Thermometer
4. Burner or heat source
5. Mash paddle or long-handled spoon
6. Long stainless steel ruler
7. Five or more binder clips
8. Blankets or other brewpot insulator
9. Kitchen timer
10. False bottom, stainless steel or aluminum colander or basket strainer (to place on the bottom of the kettle to protect the bag from direct heat)
11. Double crushed grains (This will allow us to keep our grain bill as stated in the recipe without adding any extra to increase efficiency. If you order your grains online, put a note in the order form, otherwise have your local homebrew supply do it or mill them yourself. I’ve never been charged extra for double-crushed grains.)
12. All other ingredients needed to complete your brew day
 Step 1 – Add Strike Water and Heat
 Step 1 – Add Strike Water and Heat
Per our calculated results, we need to fill our kettle with about 7 gallons (26 L) of strike water and heat it to about 156.6 °F (69 °C). If you decided to go with the measured route, just fill your kettle to that point (11.2 inches/28.4 cm in this example), otherwise measure your volume with another method. Be as accurate as you can, but don’t worry too much about it. Remember, it will be heavy, so it may be best to fill it right on the burner.
Step 2 – Insert Bag
 Step 2 – Insert Bag
Once we reach the strike temperature of 156.6 °F (69 °C), insert whatever you’re going to use as a false bottom to keep your bag away from direct heat. This can simply be a metal kitchen colander placed upside down in the bottom of the kettle. Next, place your large grain bag into the kettle and secure it to the edge of the pot with the binder clips.
 Step 3 – Add Grains
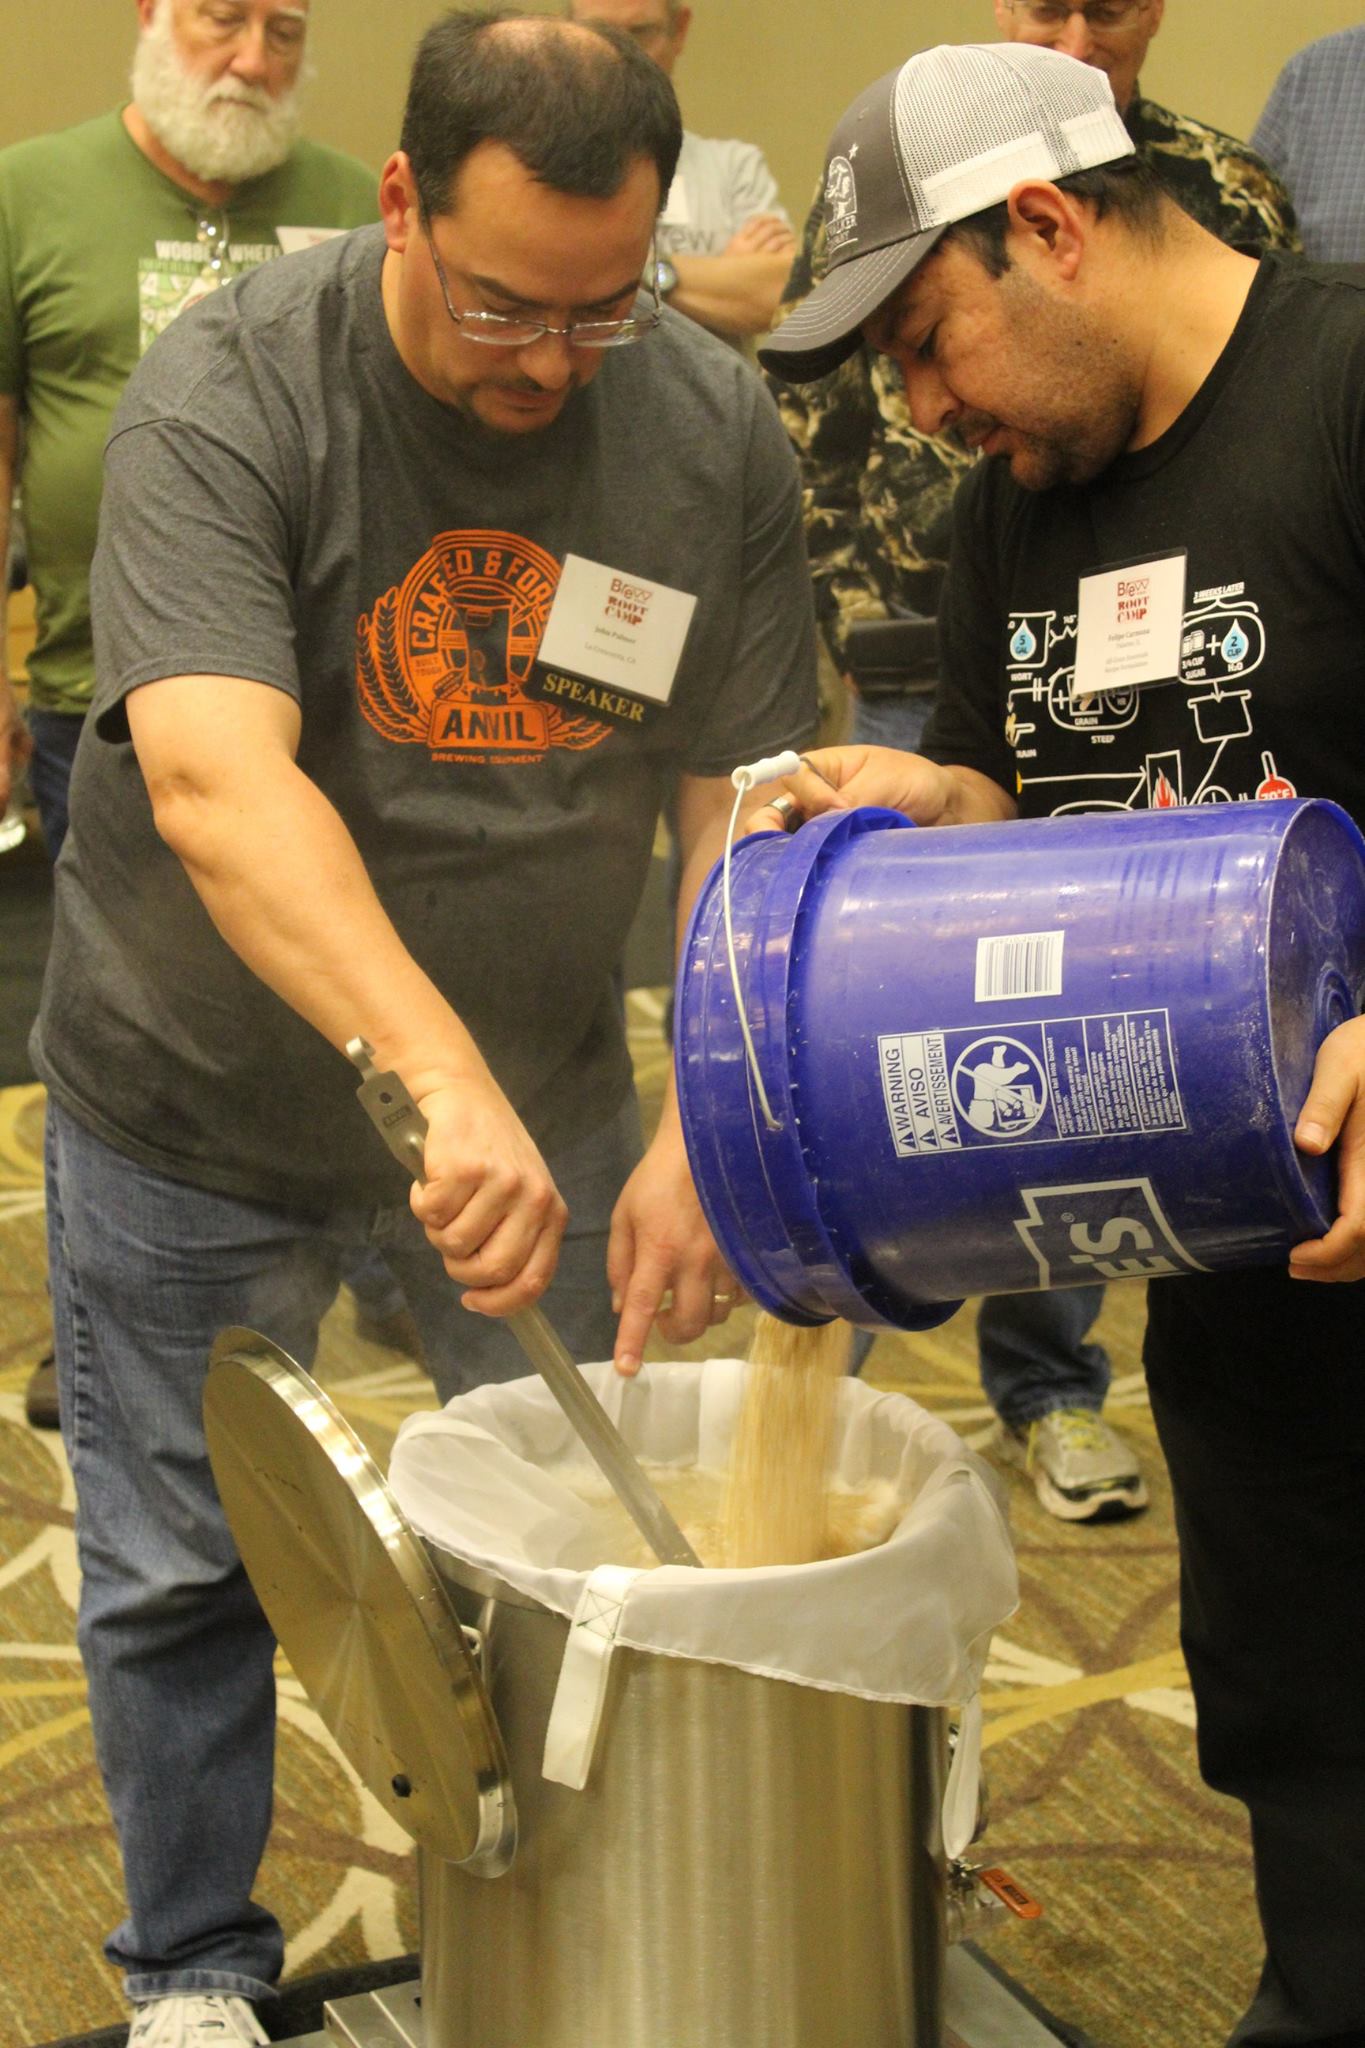
Slowly pour your grains into the bag (see photo at start of the story). If you can, stir as you pour to keep the grains from clumping. If a helper is available, then one person can pour while the other stirs. Once all the grains are in, give it a good stir to be sure there are no clumps. Reach to the bottom of the bag so you can mix it thoroughly, being careful not to snag the bag.
 Step 4 – Mash For 90 Minutes
Check the temperature and cover the kettle. Per our recipe, we should be mashing at 152 °F (67 °C). Add a little heat, if needed, to get to the mash temperature. Once there, cut the heat and either place some folded blankets on top of the kettle, or put an old winter coat around it for added insulation (see bottom photo at left). Be sure to remove any insulators before turning on your burner.
The recipe calls for a 60-minute mash, but always mash for 90 minutes when using BIAB to increase efficiency, being sure to set your timer. You are now officially brewing all-grain!
 Step 5 – Check Temperature and Stir
Periodically check your temperature to be sure you’re maintaining the mash temperature as consistently as you can. This is where it’s nice to have a thermometer on the outside of the kettle so you don’t have to keep removing the lid and losing heat while checking temps.
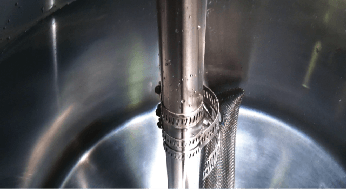
Whenever you remove the lid, give your mash a good stir. This will help to evenly distribute the heat and help with the conversion process (see top photo above). It will take practice to know how much heat to add and when to cut it. You’ll be +/- a couple of degrees throughout the process, and that’s OK. As you gain more experience you’ll become more consistent.
Step 6 – Mashout
Remove any blankets or other insulators and raise the temperature to 170 °F (77 °C). Once you reach temperature cut the heat and give the mash a good stir, then cover for 10 minutes. We are performing this step to help increase our efficiency.
 Step 7 – Remove The Grain Bag
Remove the cover and give the mash one last stir, then remove the binder clips. Slowly lift the bag out of the wort, allowing the wort to drain from the bag. It’s going to be hot, so wear some rubber gloves to help protect your hands. After most of the bag has drained, you can set the bag on a large colander and place it over a bucket to allow it to drain further. Once it’s drained off, simply add it to the boil. Also, be sure to fish-out the colander you may have used as a false bottom before you start the boil.
If your kettle happens to have a steam basket then you can lift the steam basket with the bag out of the kettle and set it on top (partially on its side) of the brew kettle so it’s supported by the rim of the kettle itself. Then you can let the bag drain directly into the kettle.
Once you have finished that process, you can properly dispose of your spent grains, record your pre-boil volume, and collect your pre-boil gravity sample. Next, prepare for your boil by following your recipe, as you normally would. When you have a moment, be sure to rinse your bag clean and hang it to dry for next time if you plan to use it again.
To Squeeze or Not to Squeeze, That is the Question
 To Squeeze or Not to Squeeze, That is the Question
There’s a lot of discussion as to how much, if any, you should squeeze the grain bag to get every possible ounce of sweet wort out of your mash. Tannins, which are found in the husks of the grains, can cause beer haze. So if you over-squeeze your bag, you could introduce more tannins into your beer. Squeezing can also introduce more extra particles, or trub. When brewing a regular (not BIAB) batch of all-grain, brewers tend to recirculate the wort back through the mash a few times until the wort starts to run clear. With BIAB, there is no recirculating, so what you squeeze from the bag stays in the wort unless you use finings during brewing. I do squeeze my brewing bags (pressing the bag against the bottom of the steam basket that I use with my setup, using a small lid from another pot works great) and don’t have much issue with clarity, but I also use finings when I brew. In my experience, I have not had to adjust my water volumes due to how much I squeeze my bag. You’ll need to experiment to find out what works best with your particular set-up. Try a batch of the same beer a few times — squeezing the bag for one, not squeezing for the other — and compare the difference between the two finished beers. If you like the beer with the squeezed bag, go ahead and squeeze next time. If not, you know what not to do next time!
Final Thoughts
As you can see, once you’ve prepared your water calculations, the steps for BIAB are pretty simple. When people ask, I tell them that brewing beer is pretty easy and very forgiving, as long as you keep things clean and sanitized. But brewing great beer is a bit more difficult and time consuming. Brew-in-a-bag can help get you on the road to brewing great beer more easily.

Top: Two large grain bags suitable for BIAB. You can buy these bags from many homebrew suppliers for around $8.00 each.
Bottom: A steam basket that fits in your kettle is very convenient as both a false bottom as well as for removing the grain bag.