Brewing No-Boil NEIPA
Brewing at its most basic is the transformation of starch into ethanol. An extremely simplistic look at the brewing process begins as the maltster malts the grain, unlocking diastatic enzymes. Brewers then must mash the grain, where the combination of water, heat, and enzymes break down the starch into simpler sugars. The process concludes with yeast fermenting these sugars into alcohol. Malting, mashing, and fermenting: The core processes of making beer. This, of course, leaves out one major step in the brewing process that every brewer will immediately recognize: Boiling the wort.
However, boiling wort plays no role in converting starch into ethanol, and historically boiling wasn’t always part of brewing practices in different cultures. Traditional breweries in diverse regions of the world still keep up the old ways with styles such as Sahti in Finland, Kornol in Norway, Koduolu in Estonia, and Kaimiskas in Lithuania, all of which are all still being brewed without a boil.
At the most basic level, these styles are largely made in the same way as contemporary styles: Grain is malted, malt is mashed and sparged, and the wort is then collected and cooled prior to yeast being pitched (or in some cases fermentation is spontaneous, relying on wild yeast). They are the same basic steps modern brewers know, minus the boil. However, some of these styles then diverge further from most contemporary beers as most eschew hops altogether and many are flavored with juniper infusions. This ingredient substitution and divergence in process used in these unique beers are what often ties no-boil brewing together in the minds of many, and it has made them somewhat of a niche pursuit
amongst homebrewers.
There are, however, a growing number of homebrewers that are using the no-boil technique to make modern styles of beer. The No Boil Raw Beer homebrewing group on Facebook has over 2,000 members, many of them taking the traditional Nordic brewing process and applying it to modern styles. Popular among them is one of the most ubiquitous craft beer styles at the moment: The New England IPA (NEIPA). Intrigued, I recently undertook the challenge of learning more about this process and brewing a no-boil NEIPA of my own.
Advantages of No-Boil Brewing
The first question many will ask is “why?” Why would we take the no-boil process and adapt it to styles it was never designed for?
I was interested in no-boil brewing (sometimes called raw brewing) because of time. Like many homebrewers, I lead a busy life: I have a 9-5, do a decent amount of freelance writing for magazines as a side gig, and have a family and three dogs; I fit homebrewing in wherever I can, but my free time is limited. Brewing a typical three-vessel, full-grain brew takes me about 7–8 hours from prep to clean up. I can either set the better part of a day aside or brew into the early hours of the morning. With a no-boil brew I’m done in half the time; I can fit a brew in after I eat dinner and still get to bed at a reasonable time or only use my Saturday morning and still have the afternoon to spend with my family. Simply put, no-boil brewing means I can homebrew more and don’t have to sacrifice a whole day for the hobby.
Another reason is cost. I never used to worry about boiling my wort for an hour but since the price of natural gas and electricity has risen dramatically in the past 18 months (especially so in Europe, where I live), my home energy bill has tripled and so I am increasingly conscious of the cost of my homebrewing. Cutting out the 80–90 minutes I’m heating the wort is no longer an insignificant cost saving. It also significantly cuts down on the carbon footprint of making your homebrew.
So there are time-saving, money-saving, and sustainability reasons why we may look at no-boil brewing, but what are the drawbacks? Although not required, boiling wort does serve several purposes. Brewing by A. Chaston Chapman (Cambridge University Press, 1912) lists the five key objectives of boiling wort as:
1. Sterilization of the wort.
2. Arresting of the action of the diastase.
3. Extracting the flavor and preservative constituents of the hops.
4. Precipitation of undesirable protein matters.
5. Concentrating the wort to the requisite point.
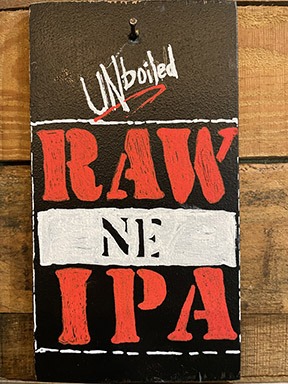
How do we still achieve these goals without a boil? Are there some of these things that don’t actually need to happen? To help me understand how we can adapt a homebrew process to the no-boil method, I reached out to Ghost Monkey Brewery in South Carolina, which had made a commercial no-boil NEIPA called UNboiled (see the clone recipe below), and spoke to their Head Brewer Khoi Nguyen about how they got around these issues.
Sterilization
Malt is absolutely covered in bacteria, wild yeasts, and molds. So it is thought necessary to boil the wort after the mash to pasteurize it and remove these microbes. However, 212 °F (100 °C) is not a magic number; bacteria are destroyed at much lower temperatures. The World Health Organization completed a study showing that 99.99% of a bacterial population are killed after exposure to 158 °F (70 °C) for one minute.1 The industry standard for milk pasteurization in the U.K. is to heat the milk to 161.1 °F (71.7 °C) for at least 15 seconds before rapidly cooling it.2
In most Nordic no-boil brews this sterilization is done with a near-boiling sparge as the wort goes straight from mash tun to fermenter. Khoi said for UNboiled they added whirlpool hops anyway, so he just ensured that the wort temperature was raised to a high enough temperature for long enough during the whirlpool to pasteurize the wort at that stage.
Stopping Diastase
The purpose of mashing malt is to allow enzymes to break down starch into simpler sugars. Given enough time the enzymes will convert the vast majority of the starch into sugar. Boiling wort denatures (destroys) the enzymes, meaning any remaining starch and longer chain sugars that yeast can’t break down will remain in the beer, which gives some styles their necessary body and mouthfeel. If we were to follow our normal brewing process for a no-boil brew, we would end up with a very dry finishing beer.
Luckily, enzymes denature at much lower temperatures than boiling, so if you’re doing a very hot sparge, or whirlpooling in the case of UNboiled, you’ll still denature the enzymes. So, similar to the previous point about pasteurization, boil temperatures are not necessary here.
Extracting Hop Flavor
While boiling hops in the wort is the most common way to extract hop flavor and bitterness, there are several other ways of extracting this that most homebrewers will find familiar. The most obvious is dry hopping post-fermentation, but we can also whirlpool hops, putting them in the hot wort after running off from the mash and stirring them for a time before cooling the wort. Hot wort at nearly 160–170 °F (71–77 °C) is still going to extract flavor and bitterness, although to a lower degree than boiling.
The recipe for UNboiled takes advantage of exactly this. Khoi told me he wanted UNboiled to have a fairly high level of bitterness for a NEIPA and for the beer to sit between a West and East Coast IPA, so the whirlpool addition is enough to extract a decent amount of bitterness.
Some of the traditional no-boil brewers will brew a hop tea separate from the brew and will then add this extremely bitter hop tea to their wort in the fermenter. Khoi told me this technique may add some astringency and since NEIPA is a very hoppy style he prefers to extract the necessary bitterness from the whirlpool. If brewing a style with less pronounced hop aroma, a hop tea may be the way to go. Another option is liquid hop extract that you can add during the whirlpool stage.
Removing Proteins
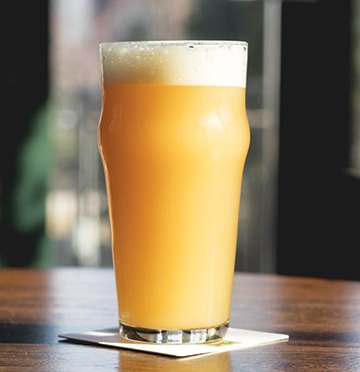
Boiling wort causes soluble proteins to coagulate and drop out of the solution as a solid mass that can then be filtered. During a boil this is referred to as “hot break” and will manifest as foam forming on the top of the wort. This clears haze out of a beer, which for most styles makes the beer look true to style. Haze for a NEIPA, though, is actually desirable.
Khoi agreed with me that it’s almost paradoxical to build a grain bill full of protein to then boil it out. Part of his reason for brewing UNboiled was not being happy with the haze he’d got in previous brews. Because a no-boil beer retains more protein haze, Khoi had been able to scale back high protein grains to about 30% for UNboiled and still get a fantastic haze and not worry so much about a stuck mash.
Concentrating the Wort
Boiling creates steam, therefore a certain percentage of water from the wort is removed by the boil and the gravity of the wort increases. This is why the pre-boil gravity reading is always lower than the reading as the wort goes into the fermenter. So, if you follow the same recipe in a no-boil batch as a batch that is boiled you’ll end up with a lower gravity and thus a lower ABV than you aimed for. You’d also have more wort than may fit into your fermenter. Of the five reasons to boil wort, I think this is the least worrisome as brewers can simply compensate for this in recipe development by building in more grain and reducing the sparge water.
Dimethyl Sulfide
Another worry I had with no-boil beers was Dimethyl Sulfide (DMS), a substance that causes a distinct off-flavor of creamed corn or cabbage in a finished beer. DMS is produced from the precursor chemical S-Methyl Methionine (SMM).
Khoi assured me he’d had no such issues with UNboiled. I’d spoken to Lars Garshol, author of Historical Brewing Techniques, about no-boil brewing before embarking on this article and he told me that the issue of DMS in no-boil beers is largely a myth. DMS is only formed in significant amounts at 185 °F (85 °C); if you’re keeping your whirlpool temperature below this it shouldn’t be an issue.
Khoi also designed the grain bill to mitigate any risk of DMS. SMM is created during the malting process, but a significant amount is eliminated in kilning — the higher the kilning temperature the lower the SMM. This means Pilsner malt, with its lower kilning temperature, has a higher risk of DMS, while higher temperature kilned pale malts have a much lower risk of DMS character.3 UNboiled uses standard 2-row pale malt, but Maris Otter and Golden Promise would both be great choices too. Using a Vienna or Munich malt as your base would lower the risk even further, but perhaps be too dark for a NEIPA to remain to style.
References:
1 World Health Organization. “Boil Water,” 2015. https://apps.who.int/iris/handle/10665/155821
2 Dairy Council, Northern Ireland. “Pasteurisation.” www.dairycouncil.co.uk/who-we-are/ni-dairy/field-to-fridge/pasteurisation
3 Mallett, John. Malt: A Practical Guide from Field to Brewhouse. Brewers Publications, 2014.
Ghost Monkey Brewery’s UNBoiled clone
(5 gallons/19 L, all-grain)
OG = 1.069 FG = 1.012
IBU = 57 SRM = 4 ABV = 7.1%
The recipe pulls together all the lessons discussed in this article. Pasteurization and diastase arrestation is achieved through a 20-minute whirlpool, but with the temperature kept low enough that it doesn’t form DMS (Dimethyl Sulfide). The haze from the flaked wheat and oats are not boiled out through a hot break. Assertive hop flavor and bitterness are obtained through a huge whirlpool addition, supported by dry hopping. When I brewed this recipe at home it took me about four hours and saved about an hour of energy from not boiling. It’s got all the hop brightness you’d want from a NEIPA with a little nod to West Coast IPAs with its bitterness and slight notes of pine.
Ingredients
10 lbs. (4.5 kg) North American 2-row pale malt
2.5 lbs. (1.1 kg) flaked wheat
1.25 lbs. (0.6 kg) flaked oats
10 oz. (280 g) Carapils® malt
3.2 oz. (90 g) melanoidin malt
1.6 oz. (45 g) acidulated malt
2.4 oz. (68 g) Columbus hops (hopstand)
2 oz. (57 g) Citra® hops (hopstand)
2 oz. (57 g) Galaxy® hops (hopstand)
2 oz. (57 g) Amarillo® hops (hopstand)
1.2 oz (34 g) Mosaic® hops (hopstand)
0.8 oz. (23 g) Mosaic® hops (dry hop #1)
1.6 oz. (45 g) Amarillo® hops (dry hop #2)
1.6 oz. (45 g) Galaxy® hops (dry hop #2)
LalBrew New England, White Labs WLP095 (Burlington Ale), or Imperial A04 (Barbarian) yeast
2⁄3 cup corn sugar (if priming)
Step by Step
Clean and sanitize all brewing equipment. Mash at 152 °F (67 °C) and hold for one hour. Sparge at 175 °F (80 °C), using half a gallon/1.9 L (or whatever your standard boiloff would be) less water than you would normally. Run off into your brewing kettle, then bring wort up to 182 °F (83 °C). Add the hopstand additions and maintain this temperature for 20 minutes.
Cool wort to 68 °F (20 °C) and pitch yeast. Once vigorous fermentation is detected, add the first dry hop addition. Once final gravity is reached add second dry hop addition. Leave to condition for at least three days and then rack as normal. Keg and force carbonate to 2.3 v/v or prime and bottle.
Partial mash option: Replace 8 lbs. (3.6 kg) of the pale malt, the flaked wheat, and acidulated malt with 3 lbs. (1.4 kg) extra light dried malt extract, 3 lbs. (1.4 kg) Bavarian wheat dried malt extract, and a 1⁄4 tsp. 88% lactic acid. Place the crushed grains in a muslin bag and submerge in 2 gallons (7.6 L) at 152 °F (67 °C). Add the lactic acid and hold for one hour. Remove grains, place in a colander and wash with 1 gallon (3.8 L) hot water. Off of heat, stir in the dried malt extracts, and add hot water until there is 5.5 gallons (21 L) in the brew kettle. Bring the wort up 182 °F (83 °C). Add hopstand additions and maintain this temperature for 20 minutes. Follow the remainder of the all-grain recipe for the fermentation instructions.