Brewing a Partial Mash Beer
In the chapter on extract with grains brewing, you learned how to alter a malt extract wort by steeping specialty grains and boiling pellet hops. In this chapter, we’ll show you how to create a wort with flavors and a substantial percentage of its fermentables from malted grains.
Making a partial mash of base grains allows you to add the characteristics of some base grains — such as pale malt, Pilsner malt, Munich malt, Vienna malt or wheat malt — to an extract beer. The base malts also contribute fermentable sugars to your wort and also give you greater flexibility in determining the fermentability of your wort.
In this chapter, we’ll also introduce the procedure of a full-wort boil, give the instructions for making a yeast starter and show you how to use an aquarium pump and aeration stone to aerate your wort more thoroughly. For the full wort boil, you’ll need a few new pieces of equipment — a bigger brew kettle to hold the entire volume of wort and a wort chiller to quickly chill your hot wort to pitching temperature.
In this chapter, we’ll focus on brewing a Belgian ale (a dubbel) and a German weissbier (wheat beer) similar to the hefeweizens made by Paulaner, Weihenstephan or Franziskaner.

Mashing & Partial Mashing
In order to brew a full mash (or all-grain) beer, you will need special vessels — called mash and lauter tuns, or a combination mash and lauter tun — to make your wort. For a partial mash beer, however, all you need is a large grain steeping bag.
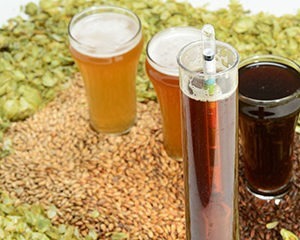
In our recipes (found on page 27), approximately two-thirds of the fermentable sugars will come from malt extract. The remaining one third will come from malted grains. Mashing is a simple process, but one that is often made to seem overly complex in some homebrewing texts. The essence of mashing is simply soaking crushed grains in water. As the grains soak, the hot water dissolves the starch in them. Enzymes from the grain attack the starch and chop it up into its building blocks. Once the starch is fully converted, the sugars are rinsed from the spent grains.
The mix of water, sugars and other substances extracted from the grains is wort (or unfermented beer).
As far as starch-conversion goes, a partial mash works exactly like a full mash. However, since less grain is used in a partial mash, handling the soaking and rinsing of the grains is simpler and requires no special equipment beyond a mesh grain bag and a measuring cup. Performing a small partial mash is thus very similar to steeping specialty grains. Gaining some experience with partial mashing often encourages brewers to go on to try making an all-grain beer.
Performing a Partial Mash
In a partial mash, you want to steep the grains in a volume of water sufficient to cover them completely, but not leave a lot of excess volume. In general, you can mash grains in 1.0–2.0 quarts (~1.0–1.9 L) of water for every pound (0.45 kg) of grain. The ratio of 1.25 qts. (1.18 L) of water per pound (0.45 kg) of grain is a commonly used consistency for homebrew full mashes. For our recipes, we’ll steep 3.0 lbs. (11 kg) of grains in 1.5 gallons (5.7 L) of water. This is on the thin end of the scale with regards to mash thickness, but it works well when doing a partial mash.
To begin the partial mash, gather the crushed grains and place them in the nylon steeping bag. Tie the bag off very loosely and give the grains plenty of room to swell when they absorb water. The consistency of the crush is more important when mashing than when steeping, so you should get your grains crushed at your homebrew shop if you don’t own a grain mill. Crushing your malts with a rolling pin or heavy can works when crushing grains to be steeped, but the results are too variable to be useful when mashing (partial or otherwise).
In a full mash, the mash is usually held at a relatively steady temperature somewhere between 148–162 °F (64–72 °C) during the starch conversion step (or saccharification rest). The temperature may drop a few degrees during this rest, but generally not more than this.
In a stovetop partial mash, you should expect the temperature to vary quite a bit during this step as the volume of the mash is fairly small and contained in an uninsulated pot on your stove. If you keep your mash temperature within a 5 °F (2.8 °C) window during your partial mash, you will be doing a good job.
In a single infusion mash, the temperature of the mash determines the fermentability of the resulting wort. High mash temperatures, 156–162 °F (69–72 °C), yield a less fermentable wort, resulting in a more full-bodied beer. Low mash temperatures 148– 152 °F (~65 °C), yield a more fermen-table wort, resulting in a drier beer.
For our recipes, we will try to hold the temperature of the mash at 155° F (68 °C). So, we will initially need to heat the water to 166 °F (74 °C) because the temperature of the mash will drop once the grains — which are at room temperature — are added to the liquid. When you add the grain bag to your partial mashing pot, take a clean spoon and poke around at the bag a bit to ensure that all the grains come in contact with water. Break up any dry clumps that are sticking together. Once the grain bag has been submerged for a couple minutes take the temperature of the water in the pot. As with the steeped specialty grains, you should shut the bag and tie it to the handles of your brew pot.
Try to hold the temperature between 150–155 °F (66–68 °C) for 45 minutes. To adjust the temperature of the partial mash, add heat in short (~45 second to 1 minute) bursts of heat from your stove. Then stir and retake the temperature. It’s easy to overshoot your temperature mark, especially when heating, so don’t rush.
As you heat a pot, it takes time for the heat to travel through the metal and equilibrate. Thus, if you heat the mash continuously until the thermometer reads 150 °F (66 °C), then turn off the burner, the temperature will keep rising as heat from the pot is transferred to its contents. To avoid this, heat in short bursts, stir while heating, and wait a couple of minutes before checking the temperature again. It’s not going to hurt the beer if it takes you a little while to adjust the temperature, so be patient.
Rinsing the Grains
After the partial mash period has elapsed, take a large kitchen strainer and lift the grain bag out of the water. Let the liquid drain into your partial mashing pot. This liquid is wort, just like reconstituted malt extract is. Unlike wort from malt extract, however, it probably has little “floaties” in it — bits of husk and other solids.
By simply letting the partial mash “drip dry” into the partial mashing pot, you are leaving some of the sugars in the grains behind. However, attempting to rinse them from a “dry” grain bed could lead to tannin extraction. One way to strain out the floaties and safely rinse a few more sugars from the grains is to add some water (amounts given below) to your partial mash wort and pour the whole mixture through the grain bag.
To do this, move the large strainer holding the grain bag to a position over your brew kettle. Slowly pour your diluted partial mash wort through the grains. The grains will act as a filter bed and will strain out most the solids from your wort. And, because you thinned out the wort a bit with some water, you’ll be able to gently rinse a few extra sugars from your grains. You don’t want to thin out your partial mash wort too much, however. You can extract tannins if you pour very thin wort — or plain hot water — through the grain bag.
It’s best to use about half the volume of your partial mash wort as a water addition. For example, in our recipes we’ll add 0.75 gallons (2.8 L) of water — half the volume of our “steeping” water — to our wort, then pour it through the grain bag. Once you are finished, discard the grains and proceed with brewing as you did before. (The grain bag will be hot; you may want to let it cool awhile before dealing with it.)
Full-Wort Boil
In your large brewpot — it should hold at least 8 gallons (30 L) of liquid —add water to your partial mash wort to make 5.5–5.75 gallons (21–22 L) of wort. Bring this to a boil, then add the malt extract. Although we are trying to make 5 gallons (19 L) of wort, we need more wort initially because some liquid will evaporate during the one-hour boil. The amount that evaporates is dependent on the amount of heat applied to the kettle. If you’re boiling on the kitchen stove, the evaporation may be minimal; if you’re using a propane burner outdoors, it may be considerably more.
Boiling 5 gallons (19 L) of wort is a large task for most home stoves. A gas stove can probably bring this volume of wort to a rolling boil. An electric stove may have problems developing more than a sustained simmer. Also, the amount of time it takes for the wort to come to a boil may be quite long. You may wish to begin heating your brewing water while you are performing the partial mash. If your kitchen stove is having trouble boiling this volume, close the lid partially. Another option is to move your homebrewery outside and use a propane burner for the boil.
Once the wort comes to a boil, it will likely foam for a few minutes. Once the foam subsides, add your bittering hops and begin timing the boil. In our recipes, the wort is boiled for 60 minutes. Add the hops, Irish moss and yeast nutrients at the times specified in the recipes.
Two benefits of boiling the entire wort are increased hop utilization and less wort darkening compared to boiling a concentrated wort. When brewing a beer using a full-wort boil, you need to add fewer hops to get the same level of hop bitterness. This is because more hop bitterness is extracted in more dilute worts. With a full-wort boil, you can also brew beers that are much lighter in color than beers brewed from a concentrated wort. In thicker worts, the sugars caramelize much easier, darkening the wort and sometimes contributing burnt flavors.
Cooling Your Wort
Another change that a full-wort boil will bring is the need for a wort chiller. Cooling 5 gallons (19 L) of wort in a sink (or bathtub), even with ice, is a lengthy process. Also, since you’ve boiled the full volume of wort, there’s no diluting the wort with cold water in the fermenter to bring the temperature down.
Most homebrewers who perform full wort boils use a submersible wort chiller to cool their wort. A submersible wort chiller is a spiral of copper tubing connected to tubing on both ends. The chiller is submerged in hot wort and cold water is run through it (the tubing usually has hose attachments on it). Heat from the wort transfers to the cold water being run through the chiller and is carried out. Cooling speed depends on the temperature of the cooling water and how fast it is run through the chiller.
You can speed chilling by gently whirlpooling the wort. If the immersion wort chiller is left undisturbed, the wort next to the copper coils will quickly cool. However, the wort farther away from the coils will cool much more slowly. But, starting a whirlpool will greatly enhance the amount of hot wort passing by the copper coils and greatly enhance your cooling rate.
If you move your immersion wort chiller in a circular motion, you will start the wort moving. As the wort moves by the cool chiller, it cools. Induce a slow, steady swirling motion by moving the wort chiller in a circle. Repeat this motion every five minutes. Keep in mind that the tubing on the side of the chiller where the hot water is exiting is very hot. Handle the chiller by the “cold side” (where the cooling water is entering the chiller) only.
The wort chiller is usually sterilized by submersing it in the wort for the final 15 minutes of the boil. During this time, there is no water flowing through it. Don’t connect the tubing until after you have turned off the heat to the kettle. Note: Connecting the tubing to your sink faucet will probably require an adapter, since most wort chillers are threaded to screw onto a garden hose connector.
Aerating the Wort
In the previous chapters, we aerated the wort by letting the cooled wort and dilution water splash around when we added it to our fermenter. This works, but there are much better ways to get oxygen into your wort. The more oxygen the yeast have (before fermentation begins), the better they will perform in the fermenter.
One of the simplest ways to aerate cooled wort is by using an aeration stone attached to an aquarium pump.
Making a Yeast Starter
You need to plan ahead when you use liquid yeast. There are not enough yeast cells in liquid yeast containers to pitch directly into 5 gallons (19 L) of beer. So, you must build a yeast starter. A yeast starter is essentially a little batch of beer used to grow up yeast for your big batch of beer.
Bottling by Priming with Sugar
After your beer ferments for a week or so in your primary fermenter, and then settles for another week in your secondary fermenter, it’s time to bottle. We’ll try a new bottling procedure this time. Instead of priming each bottle individually, we’ll use batch priming in a bottling bucket.
To bottle this way, you need to siphon your wort from your secondary fermenter into a sanitized bucket. Try to minimize the amount of splashing when you transfer the beer. You don’t want to oxidize it.
For 5 gallons (19 L) of beer, use a sanitized spoon to stir a solution of sugar water into your beer. Make the sugar water by boiling 3⁄4 cup of corn sugar in 2 cups of water. (You can add more or less sugar — from 1⁄2 cup to
11⁄4 cups — to vary the amount of carbonation.) Boil for 15 minutes, then cool the solution to about room temperature and stir it into the beer. Now, siphon the beer into bottles and cap them as before.
The sugar provides a new source of fermentable sugar, which causes fermentation in the bottle and creates carbon dioxide. After a week at room temperature, put the bottles in the fridge for a week. Then, invite some friends over and impress them with the beer you made with your new brewing skills.
So that’s how to make a partial mash. In the final techniques chapter, we’ll move up to full mashing and brew an all-grain beer. A full mash works just like a partial mash, but you will need get some added equipment and learn a few new skills to handle the larger volume of grains required.
Steeping or Mashing, What’s the Difference?
Steeping is the process of soaking grains in hot water to extract flavor and color components. In mashing, color and flavor extraction also occurs but, in addition, starches in the grains (if present) are converted into sugars. Grains that can be steeped can also be mashed (along with base grains). However, grains that need to be mashed cannot be steeped. Steeping and mashing are similar, of course, but mashing requires tighter control over the temperature and volume of the mash.
Whether or not a grain can be steeped depends on how it was malted. Grains that can be steeped are ones that have been stewed during malting until the starches are converted to sugar inside the grain hull. Depending on how long this lasts, and at what temperature, some or all of the sugars will be caramelized. The extent of the caramelization, and any toasting of the hull, determines the color rating of the malt (typically given in degrees Lovibond). The most commonly steeped malts are the crystal malts (also called caramel malts).
Other grains are kilned at higher temperatures or for longer periods and the sugars in these roasted malts end up charred instead of caramelized. Roasted malts tend to be darker than crystal malts and give a sharper flavor.
Malts that are not stewed or kilned enough to convert the starches must be mashed. These malts are typically called base malts. Base malts require mashing to convert their starches to simpler sugars. The bulk of the fermentables in a beer come — directly, or indirectly through malt extract — from the base grains. If these grains are not mashed, unconverted starches are released into the wort and eventually wind up in the beer. The result is excessive haze and the potential for a “starchy” flavor.
Specialty Grains — Steep Me!
Maltsters have already converted the starches in these grains to sugars. Steep them to dissolve the sugars and add color to your brew.
Crystal malt (10–120 °L)
Crystal malts are malts that have been malted and then stewed — a process in which the malt is initially kilned without drying it. Crystal malts lend a reddish color to beer as well as a caramel flavor. For this reason, they are sometimes called caramel malt.
The color of crystal malts are described in degrees Lovibond (°L). The rating of most crystal malts falls in the 10–120 °L range).
Of all the specialty malts, crystal malt is probably the most frequently used. They give the red or amber colors in most pale ales. They are also frequently used in combination with other malts in darker beers. In these beers, they often comprise between 5 and 15% of the grain bill.
Special B malt (180 °L)
Special B is a very dark type of crystal malt. It can be used in many types of beers, but shows up most frequently in certain Belgian styles.
Chocolate malt (~300–350 °L)
Chocolate malt is a dark roasted grain. It is kilned dry, not wet as in the stewed crystal malts. Chocolate is the lightest of the commonly used roasted malts. Chocolate can be used in a wide variety of beer styles, where it lends a brown color and somewhat chocolate-like flavor. Many porters feature chocolate malt prominently. As with crystal malt, they can be comprise up to 15% of the grain bill.
Roasted barley (300–500 °L)
Roasted barley is a specialty grain that is not a malt (i.e., the barley is roasted without first being malted). It can be found in a rather wide range of colors. Roasted barley is sometimes used in very small amounts simply to add a little color to a beer. This is common in Scottish ales. In larger quantities, it makes a beer that is very dark and has a distinct roasted quality. This can be coffee-like and may have a burned edge to it. The flavor of roasted barley is featured prominently in stouts, where it may comprise up to 10% of the grain bill.
Black malt (500 °L)
Black malt is another very dark malt. It is very similar to the darker versions of roasted barley, but is made from malted barley. Because black malt lends a somewhat bitter, drying character, it is typically not used in over 5% of the grain bill. Black malt is sometimes called black patent malt.
Base Grains — Mash Me!
These grains are malted such that they, unlike specialty malt, still contain large amounts of starch. It is this starch that, once converted to sugar in the mash, gives beer the bulk of its fermentable sugars. Because starch renders beer hazy and less biologically stable, these grains should not be used unless they are mashed (including partial mashing procedures).
2-row pale malt (~2 °L)
A lightly kilned base grain made from 2-row barley. If it is mashed without any specialty grains added for color, it makes a very light colored beer. 2-row pale malt makes up the bulk of the grain bill in many different beer styles.
2-row pale ale malt (~3 °L)
A base grain made from 2-row barley, that is kilned to a slightly higher color than pale malt. It gives a little more color and malt flavor to beer and is frequently used in British-style ales, especially — as the name implies — pale ales.
6-row pale malt (1.8 °L)
This is a base grain made in a manner very similar to 2-row pale malt, only it is made from 6-row barley. The use of 6-row malts is more common in brewing in the United States than elsewhere. 6-row has smaller kernels, but more enzymatic power than 2-row malts. It is frequently used when large amounts of corn or rice are used in the mash. The flavor is similar to
2-row pale malt but, because 6-row has proportionally more husk, it is slightly “grainier.”
Pilsner malt (1.0–1.6 °L)
A very light-colored base malt. Pilsner malt is the base malt in many German lagers, including — as the name suggests — Pilsners. It is also the base malt, sometimes the only malt, used in making a Munich-style helles. Pilsner malt is also used in many Belgian beers.
Wheat malt (2–2.5 °L)
Wheat malt is malt made from either red or white wheat. It is used at 30–70% of the grain bill for many styles of wheat beer including German hefeweizens, Belgian wits and lambics. It is often added in smaller amounts — around 5–10% — to add head retention in other beer styles.
Munich malt (10–20 °L)
Munich malt is a more highly kilned malt that adds a malty character to beers in many German lagers. It is also used somewhat frequently to add a malty element in India pale ales.
Vienna malt (~6 °L)
Vienna is similar to Munich, but lighter.