Calling Dr. Science
Maybe you’ve heard this comparison: Each beer, to a passionate homebrewer, is like a child. The brewer has raised the beer from nothing. He’s nurtured it. He’s eagerly monitored its progress. And when it turns out well, he’s justifiably proud.
Well, professional brewers sometimes feel that way, too. But a pro’s beers are less like children and more like patients. The pro creates the beer and nurtures it just as the homebrewer does. But a commercial brewer also has to know every detail of his beer’s health. He tests the water used to make the beer to be sure it’s just right. He tests for unwanted organisms that could contaminate the beer. He tests the amount of yeast to be added, the pH of the mash, the amount of carbon dioxide in the beer, even the amount of air in the bottle after it’s filled.
A commercial beer must be consistent, it must be stable, and it must have a relatively long shelf life. So the professional brewer uses scientific methods to be sure his brew is perfect every time.
All of this work takes place in the brewery lab. Peek through the door at a brewery lab and you’ll see lots of equipment, from Bunsen burners to pressure cookers. You’ll also likely see a brewer busy testing beer, wort, mash liquor, or any of the beer’s components: malt, hops, yeast, or water.

Counting Yeast
Yeast is scarce in filtered beers. However, its fermentation by-products are the key to making beer taste like beer. The yeast presents a tricky problem in beer production because, by the nature of the fungus, yeast is difficult to sanitize. What this means is that whatever is with the yeast when it is inoculated into the wort goes into the wort as well. This has led microbreweries to create labs that are outfitted to evaluate the bacterial contamination of pitching yeast, the viability of pitching yeast, and the amount — the actual number — of yeast being pitched.
Typically, only one strain of yeast, and no bacteria, is welcomed into the wort and beer by the brewer. Selective growth media are used to detect any intruders, which are best described as contaminants rather than infections.
By stabbing test tubes full of Hsu’s lactobacillus and pediococcus media with samples of pitching yeast, the brewer detects the presence of these bacteria. Lactobacillus and pediococcus are prime spoilage organisms in wort and beer, and they are viciously indiscriminate. The growth medium is simply a solution that provokes these specific organisms to multiply, making them easier to detect.
Another nasty contaminant is “wild” yeast. Wild yeast other than the saccharomyces species (the species that brewers use) can be detected with another experiment. A petri dish is filled with lysine medium. Next, a small amount of the pitching yeast is picked up on a sterile loop and streaked onto the medium. Then the dish is incubated for two or three days at 80° F. Saccharomyces won’t grow, but other species do. If there are unwanted yeast types present, they soon become painfully apparent.
Yeast also must be tested for unwanted strains of the saccharomyces species. This is a bit more difficult but fortunately, non-brewing strains of the species tend to be more resistant to an antibiotic called Actidione (or cyclohexamide) than are brewing strains. The test starts with a growth medium called universal beer agar. It consists of beer mixed with a jelling agent, agar, that is made from seaweed. Actidione is mixed with the universal beer agar at a concentration of 20 parts per million.
The yeast sample is then plated on a petri dish containing this medium and incubated. If there is any yeast growth, it will be unwanted strains.
It’s Alive!
Yeast will not make beer if they are dead, so it’s important to make sure the yeast being pitched has some life in it. To do that, the brewer stains a sample of pitching yeast with methylene blue dye, five pH, and observes it under a microscope at a magnification of at least 400 times. Living cells will appear colorless, while dead cells will appear blue.
A good way to figure out how many yeast cells are in a slurry while conducting a viability test is to put the sample on a hemocytometer. A hemocytometer is just a special slide with grids on it. It has an exact capacity of 0.0001 ml of liquid used for counting blood cells. By counting the number of cells in the grids and multiplying by 10,000, the brewer can determine the concentration of pitching yeast in a slurry. Once the total number of live cells per given volume is known, the brewer can properly and consistently pitch his or her wort.
The best idea for the homebrewer is to keep everything very clean and use fresh yeast — not yeast that has been sitting around doing nothing but dying for a long time. Also, be sure to make up a starter at least three days in advance to get the yeast reproducing and vigorously fermenting before you pitch your precious wort.
Water
Water makes up 90 to 97 percent of finished beer. As the primary ingredient in beer, water should be evaluated prior to its use in brewing. First of all, it should be potable. In other words a person shouldn’t become sick from drinking it. Brewing water should be relatively free of chlorine and have a pH no higher than about eight. Professional brewers use either a pH meter or some litmus paper to determine the acidity or basicity of the water. The common swimming pool tester kit can be used to measure chlorine.
Certainly no more than one part per million free chlorine should be present, as it can react with phenolic compounds in the wort to produce chlorophenols in the finished product. Chlorophenols taste medicinal and do not make for a good beer.
Another important aspect of the water to determine is the concentration of various ions. This information is available through the local water department. Different styles of beer can be enhanced by different water compositions. Homebrewers should begin by brewing with the tap water from home and see how it does. Then, if there is a problem, tackle some water evaluation.
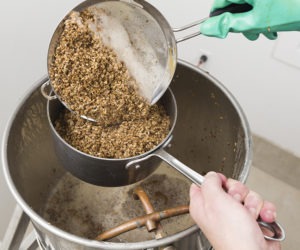
Weighing in on Mashing
The mash is a most important step in whole-grain brewing and needs to be evaluated as such. Standard specifications to record include the temperature of the mash at its different rests as well as any increase in temperature over a given time.
The ratio of water to grist (the grain being mashed) is recorded and should be between two and three pounds of water to one pound of grist. The pH of the mash is recorded using either a pH meter or litmus paper. The reason for having fairly neutral water is to assure that the buffering compounds in the malt are able to reduce the pH of the mash to between 5.2 and 5.4. If the pH of mash liquor is determined at room temperature, it should be 5.6 to 5.8. This pH range is optimal for the amylases, enzymes that help convert starch to sugar and also reduce the extraction of astringent phenolic compounds from the malt.
Another helpful practice is to measure the specific gravity of the wort at specified intervals during the lauter. This is done simply by removing a sample of the wort and either taking a reading with a refractometer or hydrometer. A refractometer measures the refraction of light through liquid. Thus, it tells the brewer the amount of dissolved solids in the wort. A drop of wort is placed between two pieces of glass. The soluble solid content of the wort is determined by measuring the difference in the refraction of the glass and the wort.
Specific gravity provides a similar measure, but as much as 300 ml of wort is required for a hydrometer reading. The wort is poured into a graduated cylinder or similar piece of equipment and the hydrometer is floated in the wort. The soluble solid content can be read off of a scale on the hydrometer, and a slight correction is then made due to the temperature of the wort. Information on wort fractions allows the brewer to compare one lauter with the next.
One final useful bit of information on the mash is the completion of the conversion of the starch to fermentable sugars and dextrins. This can be determined by mixing a drop of iodine with a drop of mash liquor. If a purple color appears, starch is still present and the mash should be continued. Lack of purple color indicates full
conversion and time to lauter.
Mash Tests for Homebrewers
When brewing at home, temperature is of utmost importance during mashing and should be monitored. If a properly dilute mash is allowed one hour at 150° to 156° F, full conversion will occur. As for the mash pH, try brewing with your tap water first. If it does not yield a satisfactory result, alter your strike and sparge water as needed by using food-grade phosphoric acid.
To correct the acidity, simply measure the initial mash pH and then mix in 15 ml of the acid. Take another reading of the mash and, if necessary, repeat until the desired pH is achieved.
Wort
When the boil is done, bitter wort is the result of all the work. Forced attenuation (conversion of sugar to alcohol) and a test for wort spoilage organisms are two commonly used methods for evaluating wort.
Forced attenuation provides a simple method to determine the final gravity of the beer before the full-scale fermentation is complete. To force the attenuation of the wort, the brewer pitches half an ounce of active yeast with 10 ounces of cooled bitter wort in a clean 20-ounce jar. The jar is placed in the incubator at 80° F and swirled every couple of hours to provide ample oxygen in the medium.
When fermentation ceases, within approximately 24 to 36 hours, a gravity reading is taken. This is the terminal gravity of the entire batch.
Another test determines the microbial stability of bitter wort — in other words, the potential that unwanted organisms will grow in it and spoil it. This test starts with a 10-ounce sample of the wort, taken using sanitary methods and placed in a sanitary jar. The wort should be taken after it has been cooled and before yeast is introduced. The jar is then held at room temperature and monitored for microbial activity. If there is none within 48 hours, chances are the wort is quite stable. This test yields information on how sanitary the heat exchange and wort transfer processes are.
Neither of these tests is particularly useful for homebrewers for one very simple reason: After the wort has been cooled it is very vulnerable to spoilage. The more that it is tampered with, the better the chance of spoiling the batch.
It’s Beer!
Beer, the result of all the work and worry, is evaluated by the small-scale brewer for consistency between batches and shelf life. In three commonly performed tests brewers measure the CO2 content before packaging and the air content of the bottled product and perform a sensory evaluation.
The amount of carbon dioxide in the beer is measured using the ideal gas law — the product of pressure and volume are proportional to the temperature of the gas (PV = nRT). Brewers measure CO2 volume to keep it constant between batchs. They use a device that holds a sample of the carbonated beer in a closed container. The CO2 is forced out of the solution by shaking the container vigorously. The volume of CO2 is then determined by reading the temperature of the beer and the pressure of the container.
The air content of a bottle is measured to determine how well the filling system evacuates the air and how quickly the beer may oxidize. Air is measured by bubbling all of the gas content of the bottle through a burette filled with a strong solution of sodium or potassium hydroxide. The C02, a gas, is converted to bicarbonate, a solid. When the air is the only gas remaining, it can be easily read from the graduations on the burette. Because homebrewers typically bottle condition, the CO2 content should be consistent if the same amount of sugar and yeast is used each time a particular beer is made. Furthermore, bottle conditioning scavenges any oxygen that may be present in the bottle.
Follow Your Nose
By far the most important test done on the beer is the organoleptic one. The beer should look the same as it always does, it should form and hold its usual head, it should smell and taste the same, and it should feel the same in your mouth. And of course, all of these attributes should be pleasing.
A good brewer should do a sensory evaluation of each batch made to continually improve the quality and consistency of the product.
The brewer’s lab is an extremely interesting place. It provides the ability to objectively evaluate beer and place numbers on many of its properties. However, it’s important to remember that the object of a beer lab isn’t to compile data. It’s to aid in making the best beer possible.