Can LED Light Skunk Beer? Step Mashing Efficiency and Blending Wine in Beer
Q I work at a grocery store chain that features a beer and wine bar. Recently a customer asked why every non-alcoholic (NA) beer he’d had tasted skunked, including the one I’d just opened for him. I examined our “singles” beer section and found three brands, all of which were in clear or green glass and illuminated under white LED (light-emitting diodes) lighting. As a BJCP (Beer Judge Certification Program) judge, I knew that only brown glass protects beers from the light wavelength responsible for converting normal hop components to the chemical known for the skunk character. I suggested that the customer try to find a non-alcoholic offering in brown glass or a can. For his next selection, he located an NA beer in a can. We found that it was not skunked. I’m guessing that white LED lights can skunk beer just like fluorescent lighting. What do you say?
Todd Wenzel
Raleigh, North Carolina
A Before I jump into this great question, I want to confess that I am feeling a bit skunky for being a bit behind on this column because I have been traveling too much and writing too little! I am feeling so skunky, in fact, that I ducked into Mariano’s Market in Chicago, Illinois, to lay down some copy while enjoying a cold pint beneath the bright LED and fluorescent lights inside of this beautiful store located down the street from the Siebel Institute where I just wrapped a full day of malt talk.
LED lights are, literally, cool devices; they can produce a broad range of colors while consuming a fraction of the energy, for a much longer time, and producing minimal heat output in comparison to incandescent and fluorescent lights. It’s truly staggering that lighting accounts for about 20% of all electricity consumption and 6% of global CO2 emissions. This is why Shuji Nakamura, Hiroshi Amano, and Isamu Akasaki were awarded the Nobel Prize in Physics in 2014 for developing a bright-blue LED light. Since that time, incandescent and fluorescent lights have all but vanished from new light fixtures across the globe. And in the process, the task of changing bulbs, the cost of buying replacement bulbs, and the investment in removing heat from homes, offices, grocery stores, and breweries caused by fluorescent and incandescent lights has plummeted. But concerns about skunky beer remain!

LED lights have become common. The question is if they skunk beer like traditional lighting. Photo courtesy of Shutterstock.com
OK, that was a total dive into a rabbit hole that has nothing to do with skunky beer and fluorescent lighting. Beer lovers have a love-hate relationship with fluorescents. We love them because they illuminate many a beer store and help us beer lovers shop for beer. Seriously, who wants to shop for beer in the dark? But we hate fluorescents for producing UV light that catalyzes the reaction between iso-alpha acids and sulfur compounds in beer turning beer skunky. The question of the day is, “Do LEDs do the same thing?” And the short answer is yes; LED lights do cause beer to turn skunky.
If one were to set about optimizing beer skunking, choosing UV-transmissible glass and a light source transmitting lots of light with wavelengths less than 400 nm (ultraviolet light) wins the race. The bad news is that most LED lights used for space illumination emit light in the 365 to 405 nm range and carry the skunky-torch handed off by fluorescent lights. Beer bottled in green glass is only slightly better than clear glass when it comes to absorbing UV light. Just to be clear, clear glass absorbs no light and exposes beer to whatever is bouncing about in the atmosphere. Shine sunlight, fluorescent, or LED light on beer in a clear bottle and skunk will soon follow.
Searching for beer sans skunk? Follow the great advice you offered the customer and look no further than beer packaged into cans, brown bottles, or kegs. The one downer about NA beers is that draft dispense is something currently not embraced by commercial brewers of all sizes because of the very real concern about the growth of pathogenic microorganisms in non-alcohol (<0.5% ABV) and low-alcohol (<3.5% ABV) beers. That’s a discussion for another day!
Q I recently started omitting a protein rest from my mashing procedures since I have read that it is not necessary with our modern well-modified malts and it can detrimentally affect head retention. I have noticed that my original gravity (OG) is consistently 10 gravity points lower than when I include a protein rest. I measure OG with a refractometer and brew with a single-vessel system. I have noticed this with both German-style lagers as well as pale ales, which are the styles I mostly brew. My base malts are American 2-row or Maris Otter. Is there an explanation for this?
John Henderson
Yakima, Washington
A I have a solid explanation of what may be causing your problem but must admit that what follows includes one very big assumption. And that assumption is that your mashes typically drop in temperature over time. Even if you are using an all-in-one system where wort is heated either in the lower section of the mash tun/brew kettle or externally before it is returned to the mash, mash temperature often drops because these systems are not well-insulated.
Over the last three years I have brewed what I consider to be great beers using an all-in-one system. During this time of exploration, I have noticed things that are very different to what I became accustomed to during my 26 years of commercial brewing using mash mixers in a wide range of sizes. When a steam-heated mash mixer is used, mash temperature is uniform with a slow drop in temperature during rests. And when the temperature eventually drops below about 1 °F (1⁄2 °C) from the set point, mash is automatically stirred and heated back to the set-point. As cooking processes go, these temperature changes are slow to occur and tightly controlled.
My guesstimate about what is happening with your brews is that you mash-in at some temperature between 149–158 °F (65–70 °C) and hold for about 60 minutes before commencing wort recirculation. During your mash rest, you don’t stir and may or may not heat. And even if you do heat using an all-in-one brewing system, your system is measuring the wort temperature in the bottom of the mash/kettle and controlling the temperature to the set point. I want to put that on hold because you may not be using this sort of system.
It’s critical for yield for alpha amylase to be active in the mash where it reduces mash viscosity and increases starch solubility.
Let’s assume you are mashing in a non-heated vessel like an insulated cooler and performing a protein rest versus a single-temperature mash. With the protein rest, you mash in at about 122 °F (50 °C) and rest for about 30 minutes. Now it’s time to heat, and you add heat while stirring. The heat may come from hot water, hot mash if you are decocting, or external heat from a flame or electric element. Whatever you are doing, you are probably stirring your mash to keep the temperature uniform. And you are also exposing the starch being solubilized during the protein rest to beta and amylase enzymes.
The same basic process is different when you skip the protein rest because you probably do not stir your mash during your mash rest. Simply stirring the mash increases extract dissolution. And stirring the mash during heating steps helps to maintain temperature uniformity; something that all-in-one systems don’t do very well. Without jumping down a very deep rabbit hole, I have a few suggestions.
For starters, if you have an all-in-one system, measure the mash temperature and compare it to your set point. If there is a big difference, which I have seen in my own experience, determine the offset and increase your target temperature to provide enough heat from wort to make up for the mash heat losses to the environment. It’s critical for yield for alpha amylase to be active in the mash where it reduces mash viscosity and increases starch solubility.
If you are not experiencing much heat loss during mashing, extend your mash time to account for the time reduction when you dropped the protein rest. While you’re at it, give your mash periodic stirs to help move starch from your malt into wort. My gut tells me these details are the root of your issues. But because I work for a malting company, I would be remiss not to suggest checking your mill gap/malt crush, mash thickness (thinner mashes improve yield), and thermometer calibrations as part of this troubleshooting exercise. Hopefully this answer points you in the right direction in searching for those lost extract points!
Q I bottle condition all my homebrewed beers, which are typically sours and Belgian styles. We also make wine and have several plum and cherry trees and a Siberian kiwi vine. To bulk process fruit during harvest season, I will often ferment the fruit in a 5-gallon (19-L) bucket with a champagne and sour yeast, such as Lallemand Philly Sour, and then bottle it. I then age it. It is good as is, but I would like to blend it with other beers and was thinking to pour some into bottles when I am bottling another batch. But I wasn’t sure if there is a better way. Some of the fermented plum bottles are several years old and have really developed a neat flavor.
Spencer Howard
Chattanooga, Tennessee
A Sounds like you have access to some great stuff! Love the idea of blending fruit wine into beer and hope to give you some ideas on how to make this practical. Perhaps the easiest thing to do given the volume of fruit wine you seem to produce would be to use glass carboys to store and age your collection of blending wines for later use in brewing and bottling what you don’t use. I can see how this idea may not be as flexible as using bottled product when you decide to use it, but it would reduce the complexity of “unbottling” and less prone to oxidation compared to pouring bottles of fruit wine into beer during blending. If this sounds like something practical, there is a lot written about how wine in carboys is used to top up barrels during aging and how to protect wine in glass from oxidation during this process.
I do like your idea of grabbing bottles of sour plum, sweet cherry, and dry cherry-kiwi fruit wine, for example, and blending into something like a Russian imperial stout before bottling. A relatively easy method to move your wine from glass to beer is to use a counter-pressure bottle filler in reverse. Assuming you have determined the blend and are ready to start the process, begin by racking your base beer, the Russian imperial stout in this example, into a bottle container. Cornelius kegs are really the ideal vessel for the task.
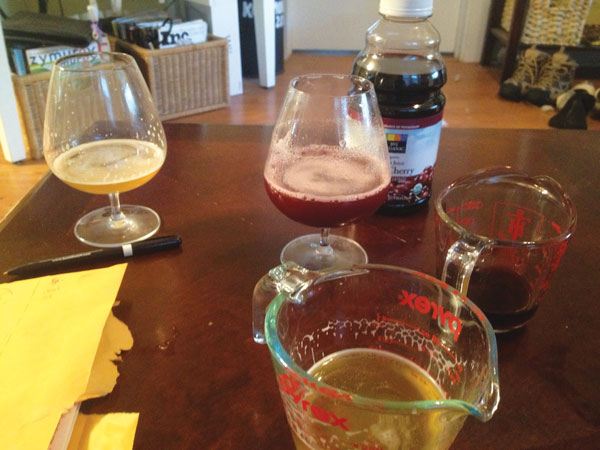
Blending beer with fruit juices and wine can yield amazing results. The key to doing it right is through blending trials to find the best ratios of each. Photo by Kyle Kohlmorgen
Begin by filling a Corny keg with a no-rinse sanitizer like Star San, push the sanitizer out of your keg with carbon dioxide, and rack your beer into the keg through the “out” connection on the keg while venting the gas out of the keg through the pressure relief valve. Now you’re ready for the wine addition. Because kegs are not clear, it’s important to know that there is sufficient headspace in the keg to accommodate the volume of wine that follows. Call me Mr. Obvious, but this detail should not be overlooked! Another important detail is to open the keg’s pressure relief valve and leave it open until the next step of the process is complete.
Reverse filling a bottle, aka dispensing like a beer keg, is simple if you have the right sort of filler. Simply connect the fill tube of your bottle filler to the “in” post on your keg and the filler’s carbon dioxide tube to a CO2 regulator set to about 2 psi, as if you are preparing to fill. Open one of the bottles destined for the base beer, insert the fill tube into the bottle, open the gas valve on the filler as if you were planning to pressurize before filling, and you are now pushing wine out of the bottle and into the keg of beer with a nice CO2 headspace. Except in this scenario, the gas valve remains open until the CO2 has displaced the wine into the beer.
Now what?
I have assumed that the blend was determined before the mixing process above occurred. But this does not mean that tasting is not needed. At this stage of the game, close the pressure relief valve on your keg, add enough CO2 pressure to seal the lid, invert a couple of times to mix, and take a small sample. If the blend tastes as expected, you have a few options. Depending on what you are producing, you could force carbonate and put the beer on tap, force carbonate and counter-pressure fill into bottles, or add some priming sugar and a fresh dose of priming yeast prior to bottling. Thank you for the fun question!