Dry Hopping Techniques

If there is one characteristic that stands out in US craft and homebrewing it is the constant quest to introduce yet more hop flavor and aroma into beer. Common practices are additions of hops during the boil (continually in the case of Dogfish 60-minute and 90-minute for example), at the end of the boil, and passing the hot wort through a hop-back containing fresh hops. Dogfish Head’s Sam Calagione even invented the Randall so beer can be served by drawing through a packed column of fresh hops. And then there’s dry hopping.
But there is nothing new about dry hopping, for it is a technique that has been employed in Europe since not long after hops were added to beer. We think of hops as being a source of various flavors and aromas, but their main appeal to brewers, for many centuries, was their preservative power when added during boiling. Once this became obvious to the brewer, the next step was to add a handful or two of fresh hops as the cask was bunged down for storage in the cellar. Eventually, someone realized that this added something to the flavor of the beer and they started to dry-hop for flavor rather than for preserving the beer. This became common practice in England even when the beer was no longer stored for any length of time, and the dry hops were added to the cask as it was shipped out to the pub. I’ve seen one or two publicans with hops in their hair when they carelessly broached an unusually lively beer! And have you ever wondered where the idea of “hop plugs” came from? They were made that way so that it was easy for the cellar man to stuff the dry hops into the cask as he was racking the beer.
A little science
But why should we consider dry hopping you ask? Isn’t late hopping just as effective and less work for the homebrewer? Well, here we come down to chemistry, and what it is in hops that give us all those wonderful flavors and aromas. Bitterness, as we all know, comes from the alpha acids contained in the hop resins, but flavor and aroma come from the hop essential oils. The chemistry of the oils is quite complex, and the flavor effects of different constituents are not completely understood. Without getting too complicated, hop oils are made up of two fractions, hydrocarbons and oxygenated compounds. The former, of which the principal constituents are humulene, myrcene and caryophyllene, are all very volatile in steam, and consequently are not present in wort when the hops are added during the boil, and will likely be completely removed if added to hot wort as a “late addition.”
The oxygenated fraction, which includes geraniol and linalool, substances both thought to give floral characters to the beer, are much less volatile than the hydrocarbons, and at least some proportion will survive a late boil addition. These compounds are thought to be the main source of hop aroma when added in this way, but can also undergo further reactions during fermentation. The broad result of this is that although it is possible to get significant aroma and flavor by late- or post-boil hopping (which is why many of us practice it), this flavor and aroma will come from only a part of the hop oil. In particular, the aroma will be different from that from the raw hop cone itself.
In the case of dry hopping, we are trying to remedy this by adding the hops at a point where very little of the original constituents of the oil are lost or changed. In other words, done effectively, dry hopping is going to give a flavor and aroma unlike that of late hopping, and an aroma closer to that of the hop prior to processing. In short, it is a process that is going to give us a quite different effect from that obtained by other hopping methods. It gives us a different colored thread to weave into the tapestry of the flavor/aroma spectrum of our beers.
Dry hopping is not a substitute for late kettle hopping, but a different method giving different results. However, it is not always easy for the homebrewer to get much hop flavor out of late hopping because of the volatility of the oils and the high surface-to-volume ratio in our small-scale equipment. On that basis, of course, the professional brewer has a distinct advantage for even a 7-barrel kettle (in most cases the smallest capacity kettle used in the industry) has something like thirty times less surface area per unit volume than the average kettle used by the homebrewer. Yet even the commercial system can result in significant loss of volatile oil components from late hop additions. That is because the hops sit in hot wort for some time before being cooled on the way to the fermenter. For example, at BruRm@BAR (in New Haven, Connecticut), we generally allow a 10-minute rest after knock-out, followed by ten minutes whirlpooling, then a further 10-minute rest before running it through the wort chiller to the fermenter. Oil volatiles may be lost in this time, and also during the time it takes to complete the pump-over, which generally takes 40–45 minutes.
If you use an immersion coil to cool the wort, you might be tempted to think that you could get good results by making your aroma hops addition to the cooled wort. It might seem that this an effective way to dry hop the beer, without the possible inconvenience of doing so in the fermenter or the keg. Not so, first because most of the volatiles will be scrubbed out by the vigorous primary fermentation. Second, it takes a matter of days for the wort to take up a significant amount of oil, and you definitely do not want cooled wort sitting around that long before you add your yeast.
A little more science
The possibility of contaminating the beer by direct addition of hops may be a deterrent to some brewers. But hops appear to carry virtually nothing in the way of beer-spoilage organisms — remember they were first used in beer because of their antiseptic properties. Also, dry hopping in unpasteurized beers is very widely practiced without detrimental effects.
Another concern about dry hopping is adding more bitterness to the beer than you really want. Well, you are adding more alpha-acids, but in a beer at room temperature or less, no significant conversion of these will occur, so there will be no increase in IBU. But IBU is not all there is to perceived bitterness, so it is conceivable that a dry-hopped beer will taste a little more bitter than a similar beer that has not been treated in this way. In fact, Will Meyers of Cambridge Brewing Company offers a 4.5% ABV “Belgo-American Single”-style beer, which is not hopped in the boil, but is dry hopped with almost 1.5 lb. (0.68 kg) of hops per barrel. That works out to about 3 oz. (85 g) of hops per 5 gallons (19 L) of beer, much more than is normally used for this purpose, and the beer does indeed taste somewhat bitter, rather like a mildly-hopped pale ale. However, it is brewed with a Belgian yeast strain, which may very well have something to do with its unusual flavor.
When to dry hop
I think I have made it clear that dry hopping must be done after primary fermentation. This means that the hops must be added in the primary when fermentation has either ceased or is very gentle, with little CO2 evolution occurring. Or, even better, during the secondary fermentation stage, especially if you are going to bottle the beer. If you are going to serve it on draught from a keg, then the hops can be added to the keg as the beer is racked into it. Professional brewers most commonly dry hop their beers either in the primary, or in the conditioning tanks prior to filtration. Dry hopping in kegs is more problematic because of the dispense system (read on for more information on this), but it can be accomplished in cask where dispense is via a beer engine, since the cask faucet incorporates a hop strainer, to prevent blockage in the lines.
I dry hop in the primary after about four to five days, when the specific gravity is about 4 degrees of SG (1 °P) above finishing gravity. I have to do this because we have no conditioning tanks. Beer goes straight from the primary to filtration and into the serving tanks in the pub. We try to allow seven to ten days after dry-hop addition before filtering, and five to ten days is a common time for this process. Todd Mott, of The Portsmouth Brewery in Portsmouth, New Hampshire (also a brewpub) likes to allow at least seven days, while Mitch Steele of Stone Brewing Company finds five to seven days most suitable. Steele also thinks that the less yeast in suspension the better, as yeast can adsorb much of the oil on its surface. All these brewers agree that dry hopping is best done in “warm” beer, that is, beer that is at around fermentation temperatures of 60–65 °F (15.6–18.3 °C).
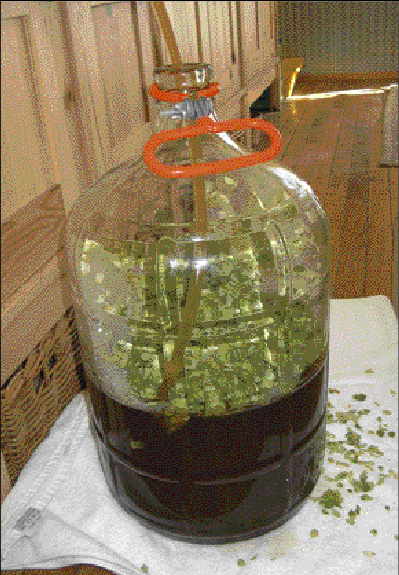
For the homebrewer, I would recommend dry hopping in the secondary, or in the keg, as adding such hops in the primary in the late stages of fermentation is generally impractical. In either case, you do not want to use loose hops as racking canes or dispense taps are likely to become clogged; even if you filter your beer line blockage is likely to be a problem. The simple technique of using a sanitized muslin or nylon bag works well. For best results the bag should be weighted down with a sanitized weight attached to it or inside it. I use a Teflon coated bar, which works very well and worth looking for, but I am not sure if these are still available on the homebrewing market. I dry hop in the keg, since I generally do not use a secondary fermenter, but this means that the hops can be in contact with the beer for a very short or a very long time depending upon how long it takes to drink the beer. In the case of addition in the secondary, you have better control on the residence time in the beer, which is important if you want to compare the effects of different varieties of hop. You can use either cone hops or pellets for dry hopping; the latter I consider better, simply because they are more homogeneous which makes for better extraction of the oil than is the case with cone hops.
Of course, whether you dry-hop or not depends upon the style of beer you are brewing. Mostly it is a technique used for bitter, pale ale, and IPA, rather than for dark beers, or beers where malt is meant to dominate the palate, such as Scotch ales or Bock beers. That does not mean you cannot try it with a dry stout if you so wish, only that the flavor and aroma is best appreciated in a pale, dry beer. And what variety of hop you use is up to you also; I very much like Amarillo in an IPA, others like Nugget, or Cascades, and so on. A single variety may be used, but it is quite common to use two or more varieties. For example, you may want to finish an English pale ale with Fuggles and Goldings, or an American IPA with Centennial and Columbus, or Amarillo and Fuggles (as we used at BAR for Hitting 70 IPA). Really there is no limit to the variations you can try — if the fresh hop smells good to you it will probably work well in dry hopping. And that is the golden rule about dry hopping — use the very freshest hops you can find!
Similarly, you have a lot of options available when it comes to the quantity of dry hops you use. It is probably best to limit the amount to 1 oz. (28 g) in 5 gallons (19 L) for beers starting below OG 1.050, 2-3 oz. (56–85 g) if the OG is 1.050–1.070, 3–4 oz. (85–113 g) for beers above OG 1.070. That will also depend upon the variety; you’ll probably want to use more of your milder hops such as Goldings than you would of something more pungent, such as Cascades or Columbus. Let your nose (and your taste) be your guide!
Finally, remember that dry hopping produces an effect that cannot be achieved in other ways, so experimentation is a must. After all, as I pointed out earlier, this is a traditional technique, yet one that modern craft brewers have taken to another level. Dry hopping is an excellent means for adding something extra to what you thought was already perfect!