Easy-Drinking Fermented Beverages
Bacteria is often a dirty word in both the food and beer worlds. Bacteria spoil beer and food, and are responsible for a wide range of illnesses in food. However, good bacteria provide great benefits to both worlds by turning otherwise ordinary foods and beers into magical ones. Lactobacillus is one such bacteria, and it powers the fermentation in a lot of the fermented foods we enjoy. As homebrewers, we can use Lactobacillus as another tool in our kit to make some amazing drinks. So I pulled together three fermented drinks that use Lactobacillus to transform everyday grocery items into phenomenal low-ABV beverages, all with a fizzy finish!

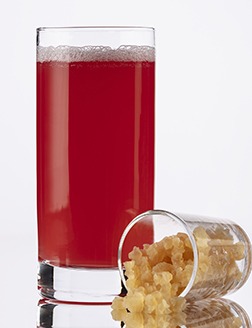
Tepache

Tepache was one of the first videos I made on my home fermentation YouTube channel, TheBruSho, and since I hit the publish button it has consistently been one of the most watched videos each month. That speaks to the interest and excitement that surrounds this fermented drink. Tepache has a relatively low ABV, usually under 2% depending on fermentation time. And best of all it’s a dead-simple drink to make. It all starts with a pineapple, and with the addition of some sugar, spice, and water you’ve got all of the ingredients you need.
Tepache originally hails from the pre-Columbian Nahua people of Mexico. Their version used corn, but over time it adapted to include the succulent juice of pineapple. These days it’s more of a street cart beverage enjoyed by locals looking for a refreshing thirst quencher.
What really makes tepache taste so good is the transformation through fermentation, all powered through natural bacteria found on the skin of the pineapple. In fact, all you really need from the pineapple are the skins (and feel free to add the core, too), which makes this a zero-waste fermentation project. If you are buying a whole pineapple to eat, then why not make this with the leftover bits?
The skins not only add the Lactobacillus, but the main flavor and a lot of the sugars needed for fermentation. Although additional sugars are also typically added in the form of piloncillo, a dense, dark-brown sugar often shaped into a cone-like form that you can find at any Mexican or Latin grocery store. Piloncillo has a rich and robust flavor with notes of molasses, toffee, and caramel that make it much more interesting than plain brown sugar, although that can be used in a pinch.
The last thing you need is cinnamon. I prefer the taste of cinnamon sticks, but powdered cinnamon works as well. This adds a beautiful warm note to the finished drink, giving it some complexity.
To make tepache, add into a fermenter the skins of one pineapple, one 8-oz. (225-g) piloncillo cone, and one or two cinnamon sticks. Top with water, up to one gallon (3.8 L). Cover with a loose lid, napkin and rubber band, or an airlock. Let it ferment on your counter out of direct sunlight for three to five days, tasting as it goes. You can tweak the final product to your taste. If you like it sweeter, ferment it on the shorter end, and if you like it funkier, ferment it longer. However, since we’re not strictly focused on alcohol production, you don’t want to fully ferment this out until it’s dry, you’ll need some sugars left behind for the next step.
Once it’s to your liking, bottle it in fermentation-grade bottles. I like to use plastic PET bottles as I can better judge how carbonated they are, but glass swing top bottles also work great. It can just be tougher to judge their carbonation level in glass and it might be necessary to “burp” or open and reseal the bottles quickly to release pressure. This can help prevent bottle bombs and it could be needed every few days if you have a lot of residual sugars left. Speaking of which, no need to add more sugars like you would to prime a bottle-conditioned beer. There should be plenty of sugars left in this to continue fermenting in the bottle and create carbonation. Set the bottles on the counter for another week or so. The time it takes to carbonate depends on how long you let it originally ferment. Shorter fermentations will mean more sugars are still available and in that case carbonation will build faster.
Once they are carbonated to your liking, pop the bottles in the fridge overnight and enjoy. Alcohol content on tepache can range from 1–3% depending on your total fermentation time and amount of sugar fermented.
Tepache should be quite carbonated and sweet with a hint of warm spice character. If you let it ferment on the longer end of the 3–5 day range, that sour and slightly funky Lactobacillus flavor is very delightful.
One of my favorite things to do with tepache is mix it half and half with a crisp Mexican lager. I have found no better way to cool off on a hot day than sitting poolside with a cool glass of this.
Ginger Beer

Ginger beer sounds like it would be a beer with lots of ginger, but this is actually a bit more like a ginger soda. Not to be confused with ginger ale, ginger beer is actually fermented, usually it’s under 1% ABV (though there are versions with more beer-like alcohol levels), and has a strong spice kick. While ginger beer isn’t something I’d drink by itself regularly, it is one of the best cocktail mixers you can make from home. Plus, it can be adapted to make a myriad of other fermented sodas thanks to the base fermentation that fuels this drink, called a “ginger bug.” Don’t worry, this is not actually an insect!
Ginger bug is to ginger beer as a sourdough starter is to sourdough bread. It’s basically a smaller, more condensed fermentation that allows you to propagate enough bacteria to ferment larger batches. All you need to make a ginger bug is fresh ginger, sugar, and water.
The ginger provides a strong spice flavor as well as the Lactobacillus and yeast needed for the fermentation. Toss about 10 grams of chopped ginger into a Mason jar with 10 grams sugar and 1 cup water. As this sits on your counter, the Lactobacillus and yeast on the ginger will start to consume that sugar, slowly reproducing. For the next week, you’ll feed this ginger bug more sugar and more ginger, 10 grams of each every day. After a few days you should start to notice more activity and eventually it should start to foam up a bit. That’s when you know you’re ready to make ginger beer.
In a pot, heat 4 cups of water to a boil. Kill the heat and add in 30 grams of chopped ginger, skins and all, and 100 grams of sugar. This recipe makes a very sweet ginger beer. If you want it less sweet you can always dial back the sugar amount to your preference. For this entire process you can use any type of sugar. Table (cane) sugar, brown sugar, agave sugar/nectar, or whatever floats your boat. After the ginger-sugar water has steeped for 5 minutes, cool it down to room temperature and add in about 50 mL of your strained ginger bug liquid.

Instead of fermenting this again in a big fermenter, just add this ginger solution into some fermentation-grade bottles and seal them up. I recommend using PET bottles so you can better judge how carbonated they are getting. Otherwise, if using glass be sure to burp them every other day so you don’t have any exploding bottles on your hands. Let them ferment on your counter for 3–5 days until they get nice and bubbly. Toss them in the fridge overnight and just like that you have ginger beer!
As I mentioned, you can use that little ginger bug to make all kinds of other fermented sodas as well. Take any sugary substance you want and add some ginger bug into it. Then bottle it up and in a few days you’ll have a fizzy version of that drink. On my YouTube channel I’ve used ginger bug to make fermented root beer, sparkling lemonade, and all kinds of other fun drinks. Get creative and give it a go!
The most common way ginger beer is used is to make a Moscow mule (consisting of vodka, ginger beer, and lime juice).
Here is a unique twist on the classic cocktail that is a real crowd pleaser with guests:
APPLE CIDER MOSCOW MULE:
(Servings: 1)
4 oz. (120 mL) non-alcoholic apple cider
1.5 oz. (45 mL) vodka
Juice of ¼ lime
Top up to 12 oz. (350 mL) with ginger beer
Kefir Soda
You’ve likely seen a form of kefir while strolling the dairy section of your grocery store. Milk kefir is a popular probiotic drink, much like a drinkable yogurt, that people consume to support gut health. But lately, water kefir has become increasingly popular. While they both claim to help with digestion, weight management, and immune defense, water kefir is more like a health soda than a yogurt.
Both forms of kefir start with kefir grains, which are tiny crystals of bacteria and yeast. Much like a ginger bug, these can be added to a sugary drink to create fermentation, and thus probiotics and eventually carbonation. However, unlike a ginger bug, you can’t grow these on your own, you’ll need to purchase kefir grains to get started, unless you know someone who will give you some of theirs. With care, you should be able to grow and make endless batches with just one packet of grains.
Depending on which form of kefir you are making, you’ll need to acquire the right version of grains before beginning as the milk and water versions are not easily interchangeable. I prefer the water kefir grains because they offer the opportunity to do the most experimenting and turn almost anything into a soda. You can easily find these starter grains online or even at some specialty health stores.
With the grains in hand, it’s time to bring them to life. In their dry state they are inactive, so heat up 4 cups of water and mix in ¼ cup sugar to dissolve. Allow that to cool to room temperature, add in the kefir grains, and cover for 2–3 days. As they rehydrate, the grains will turn from a sandy, almost brown sugar color to near white. And you should see some bubbles and foam start to appear as the grains begin their fermentation journey.
Once fully hydrated, strain the water away from the hydrated grains and place them in a Mason jar. From here you can get as creative as you want. An easy method is to find your favorite juice and add it to this Mason jar on top of the kefir grains. The grains will ferment the sugars in the juice extremely fast and turn it into a probiotic version of the juice in just 24 hours. This process does produce a small bit of alcohol, usually between 0.5–2% depending on how much sugars are fermented. If you want it fizzy, you just need to strain out the grains and bottle up the fermented juice. Add a splash of that same juice to give some additional sugars and close it up. Let it ferment again in the bottle for a day or two and throw it in the fridge. Again, I recommend plastic bottles for safety and ease of determining how carbonated the beverage inside has become.
From there you just need to rinse the grains with some water and start over with some new juice. Rinsing the grains allows you you start on a clean slate with no carry-over of flavor, though isn’t required. Since it does ferment so fast you can always take a break while preserving the grains by making a batch of plain sugar water at the same ratio as before (¼ cup sugar to 4 cups water) and adding your grains to that. Then store it with a loose-fitted lid in your fridge for up to a month, any longer than that and you might need to refresh the sugar water to help keep the kefir grains alive and fermenting. As long as the grains have some sugars to munch on you should be able to keep this going for years.
Good options for flavor that I’ve enjoyed are to use coconut water, fresh fruit juice, or even just make it plain with sugar water and then add flavoring right to your glass. Adding some herbs can amplify the flavor to something even more delicious. Some of my favorite flavor combinations have included passionfruit-orange-guava, watermelon-mint, piña colada (pineapple and coconut water), hibiscus-ginger, lime-agave (sub out sugar for agave), and blueberry-lavender kefir soda.
Ready to give it a Try?
Whether you’re looking for inspiration, or just love experimenting, the world of low-ABV fermented beverages presents a spectrum of flavors, histories, and possibilities. Homebrewers can and should embrace Lactobacillus for its ability to turn ordinary ingredients into extraordinary, fizzy drinks. Not every batch will be perfect, and that’s part of the joy of fermenting and experimenting with ingredients. But hopefully now you can take a step to try something new.