Expanding Your All-Grain Equipment for Bigger Batches
The last ten years have been a period of intense rapid growth and change in the homebrewing community and industry. The average homebrewer now has more brewing knowledge, equipment, and high quality ingredients available than ever before. However we also have a dizzying array of decisions to make with respect to batch size, equipment, and brewing technique choices in the quest to brew the perfect beer.
In this article we will explore some of the equipment and process decisions to be made as you scale your homebrewing system up from typical 5-gallon (19-L) sizes into 10-gallon (38-L) or larger systems.
Obviously all-grain brewing can give you more flexibility and control over the brewing process, but it comes at the cost of the additional time needed to mash and sparge the grains. But the fact that it takes no more time to brew 10 gallons (38 L) or 15 gallons (57 L) than it does to brew 5 gallons (19 L) makes larger brewing systems more attractive to all-grain brewers. In line with the innovations we’ve seen in homebrewing as a whole, we’ve seen huge improvements in the quality and variety of equipment available to large-batch homebrewers including heavy stainless kettles, brew pumps, fittings, and even stainless fermenters. In fact many homebrewing systems are similar in both quality and function to some of the larger systems professional brewers use.
A lot of considerations come into play when moving beyond a 5-gallon (19-L) homebrewing system, including batch size, the physical size of the equipment, heating systems, ventilation, electricity, pumps, connectors, chilling the wort, cleaning, and maintaining your equipment. Let’s go over the options.
Types of Large Brewing Systems
We can broadly divide larger all-grain brewing systems into three types: single-vessel, two-vessel, and three-vessel systems:
Single-Vessel Systems: These systems typically use a style of brewing that is similar to Brew-in-a-Bag (BIAB) where a bag or large stainless strainer is used to mash grains directly in the boil kettle, and then the strainer is removed with the grains before boiling. Often some kind of lift or pulley is used to help remove the grain basket, which can be quite large in this size of a system, and often a pump is used to recirculate wort from the bottom to top of the grain bed when mashing. Many of these are electric, and they are the most compact for those with limited brewing space. A few commercial examples include the larger Speidel Braumeister 50-L, and the High Gravity Wort Hog BIAB (see photo at top right).
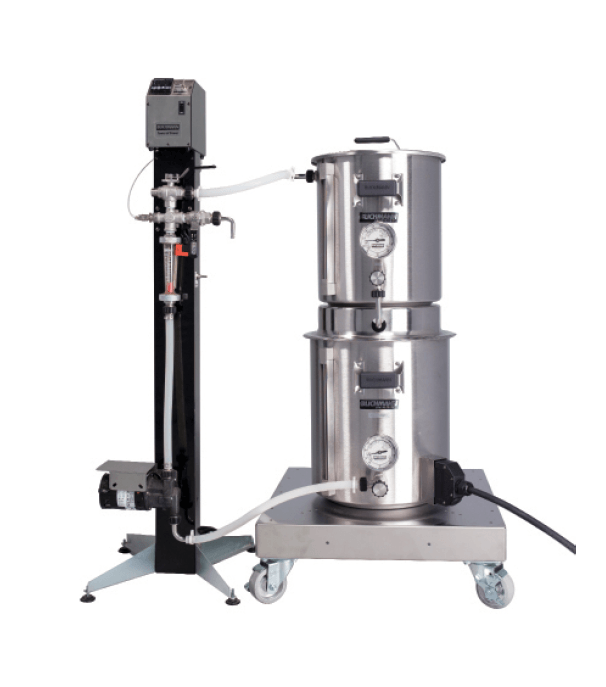
Two-Vessel Hybrid Systems: These systems have two kettles — typically one for mashing and a second to heat water and also boil wort. By combining the functions of the hot liquor tank and boiler into a single kettle it eliminates one kettle. The tradeoff is that more water must be used in the mash, where hot wort is typically recirculated between the mash tun and boiler — much like a single vessel system. These systems can still be fairly compact in physical size, and are easy to use. The classic commercial example is the Blichmann BrewEasy (see photo on page 69, bottom) which comes in both a 10-gallon (38-L) and 15-gallon (57-L) and both gas and electric options, though there are a few others.
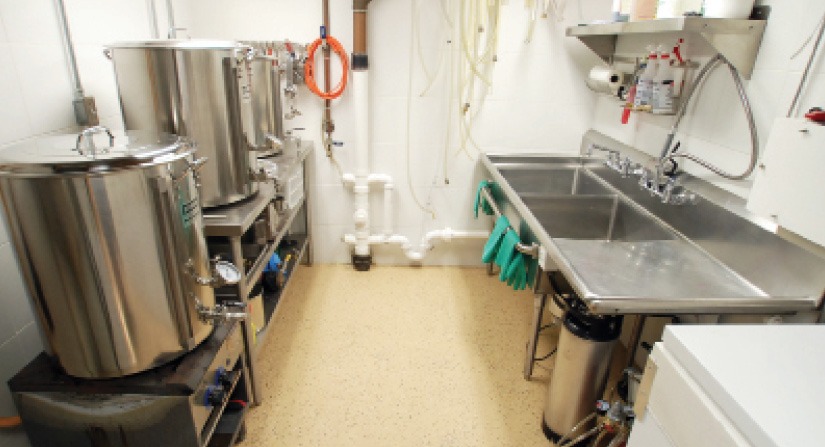
Three-Vessel Systems: This is the traditional setup that uses three vessels consisting of a hot liquor tun, a mash tun, and a boil kettle. A full-size system typically includes at least heating elements, and often two wort pumps to recirculate wort during the mash and also transfer it between vessels. Many of these systems use an uninsulated mash tun and rely on some kind of recirculating mash system to maintain a constant temperature during the mash (see photo, above). While this type of system is most like the traditional smaller setup, it also occupies the most physical space, and is also more equipment to clean and maintain.
Recirculating Mash Systems
While a few large homebrewing systems do use an insulated mash tun (and most commercial systems), it is much more common to see a stainless steel mash tun, usually a large stainless steel kettle with some kind of false bottom. Instead of insulating the mash tun to maintain your mash temperature, most large systems use a recirculating mash system where hot wort is pulled from the bottom of the mash tun and then constantly circulated through a pump and heating element and back to the top of the mash tun to keep a steady temperature in the grain bed.
Because large brewing systems require pumps to transfer the larger quantities of wort around, it makes sense to use a wort pump to recirculate wort during the mash. Recirculating the wort also helps to clarify the wort and makes it easy to draw wort off when sparging by simply sending the pump output to the boiler instead.
The two most popular methods for recirculating wort are the Recirculating Infusion Mash System (RIMS) and Heat Exchanger Recirculating Mash System (HERMS), though there are also a few variations such as Kettle-RIMS, which uses the boil kettle to heat mash water.
Recirculating Infusion Mash System (RIMS): In a RIMS system heat is applied directly to the recirculating wort usually by heating the tubing or a small coil of tubing directly. In RIMS, the wort is pumped continuously, and the heating element is cycled on and off to maintain a constant temperature in the mash vessel.
Heat Exchanger Recirculating Mash System (HERMS): In HERMS, the wort is passed through a heat coil immersed in the hot liquor tun. So as hot water is prepared for the sparge, that same hot water heats the wort passing through the coil as it is recirculated from the top to bottom of the mash tun. In this case, the hot liquor tun is kept at a temperature slightly above the mash temperature, and the pump is cycled on and off to maintain a constant temperature in the mash tun itself. See photo, left.
Hybrid Recirculating Mash Systems: A few commercial systems use variations of either RIMS or HERMS. For example some single vessel (Brew-In-A-Bag-style) systems incorporate a pump to recirculate wort from the bottom to the top of the mash tun but then apply direct heat to the entire kettle itself, as they only have a single kettle and heating element. By recirculating the wort from bottom to top at a sufficient rate they maintain a constant temperature in the mash tun and avoid hot spots. Another variation is the kettle rims (K-RIMS) system used in the two-vessel
BrewEasy, where wort is heated in the boil kettle and then recirculated back to the top of the mash tun to maintain a constant temperature. In both of these systems, the heating element is cycled on and off while the pump runs continuously.
Which type of mash system is primarily driven by the number of vessels in your base system, where your heating elements are and whether your mash tun is insulated or not. Since almost all large brewing systems incorporate at least one pump, a recirculating mash system is often a good option.
Choosing a Beer Pump
After you’ve made the basic decisions about the type of system, number of vessels and mash system to use, the next thing to do is start choosing components. Because 10 gallons (38 L) of wort in a kettle can easily weigh over 100 lbs. (45 kg), moving hot pots of wort around is no longer a great option. That’s why almost all large brewing systems incorporate at least one wort pump. In addition a wort pump can be used for recirculating the mash, sparging, transferring wort between vessels, and driving your plate chiller. Here are some popular pump options:
March Beer Pumps: The industry standard for many years has been the March series of pumps. The current model 815 is a workhorse for many homebrewers, and can pump approximately 7 gal./min (26.5 L/min) of wort at full speed. It has a magnetic head drive to support lower flow rates (via an added ball valve on the output) and comes in both a plastic and stainless steel head version. The standard models have 1⁄2-inch MPT fittings on both input and output. The only drawback is they can be slightly noisy and they are not self-priming so you generally need a bleed valve of some type to get enough wort in the tube to get the pump started.
Chugger Pumps: The standard Chugger pump is largely parts compatible with the standard-size March pump. It has the same 7 gal./min pump rate, 1⁄2-inch MPT fittings and a magnetic head. Like the March pump you can get stainless or plastic head versions. It is also not self-priming so you need to add a bleed valve as well as a ball valve to control the flow. (See a photo on the next page, top.)
Blichmann RipTide Pump: This innovative new pump was just released by Blichmann. It has a fully enclosed motor which means it is significantly quieter than other pumps. In addition it has a built-in linear flow valve which gives you much more precise control over the flow rate and is very handy when transferring via a chiller where the flow rate must be exact to reach a certain temperature. In addition it has a magnetic drive stainless steel head which is easily removable as it is held by one large tri-clover clamp. Finally, the pump features a built-in keg-style bleed valve so you can quickly prime the pump to get it started. Overall it is a powerful combination of features in a homebrewing pump.
In addition to a wort pump you will also need a 1⁄2-inch ball valve attached to the output of the pump to regulate the flow. Most of these pumps move 7–8 gal./min (26–30 L) at full speed, which is too fast for tasks like recirculating wort in the mash. Also the March and Chugger pumps need some kind of bleed valve installed on the input side to allow them to be easily primed.
Chilling Your Wort
While immersion chillers are very popular for smaller 5-gallon (19-L) batches, they are not as effective when you move up to 10 gallon (38 L) or higher batch sizes. It simply takes too long to chill large amounts of wort with an immersion chiller. Instead brewers usually move up to one of the following options:
Tube-in-Tube Counterflow Chillers: A tube-in-tube style counterflow chiller has two sets of tubes in a coil, usually made of copper or stainless steel with one tube set inside of the other. Cold water is pumped in one direction while the wort is pumped through the second tube in the opposite direction. Since the tubes have a large surface area exposed the two tubes act as a simple heat exchanger.
Plate Chillers: A plate chiller is a compact counterflow heat exchanger with a series of alternating metal plates that provide a very large surface area. It has two sets of inputs/outputs — one for the wort, and a second one for a source of chill water. Typically you hook the water input to your garden hose or faucet and then adjust the flow rate of your wort until you achieve the desired output temperature. These are very effective and can chill 10-15 gal (38-50 L) of wort in as little as 10-15 minutes depending on your cold water temperature and cooling surface area.
Which is better? It depends on the specific design, but in general a well designed plate chiller will slightly outperform a comparable counterflow chiller because there is more surface area in the multi-layer plate chiller than in the counterflow tubing. However, if you have a lot of hops and debris in your wort you do need to be careful in cleaning both types of chillers as they can easily become clogged with debris if not cleaned immediately. I recommend buying a back-flush hose fitting and immediately back-flushing your wort chiller after use.
Heating Elements, Burners
Another critical decision to make is whether your brewery will be gas or electric and also how many burners or heaters you are going to use. Some systems use two, or even three, separate burners/immersion coils to individually heat the mash tun (or RIMS system), hot liquor tank and boiler.
While electric immersion coils are ideal for an indoor brewery, when we move to a 10-gallon (38-L) or larger batch size, you will need a full 240-V, roughly 30-amp circuit as a minimum to be able to boil your wort. Since a ground fault interrupt breaker is also needed for safety reasons, installing a large electric brewery means you’ll need to call an electrician to install the proper breaker and wiring to safely power your system.
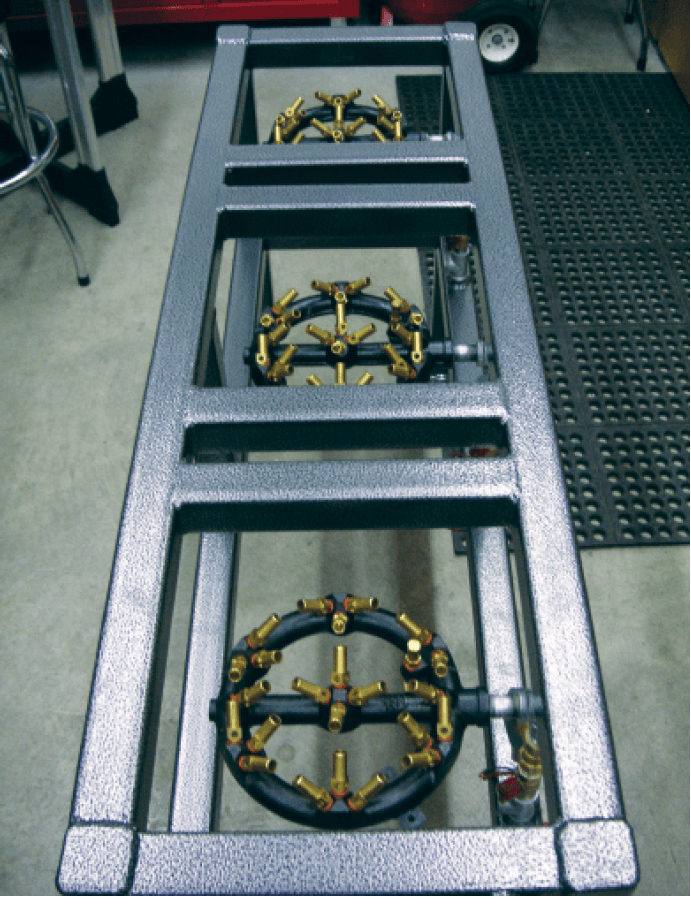
Propane burners are the most popular outdoor option. You will need to size the burners to the amount of wort you are working with. For larger batches, larger burners designed for brewing are needed. You will also need to decide how you want to provide the propane or natural gas.
Control Systems
Larger homebrewing systems often incorporate a control system of some type at least to control temperatures in a typical recirculating mash setup. Sophistication of the control systems varies tremendously from simple on/off temperature controls to fully-automated systems that may control heating elements, pumps, and even have electrically switched valves to re-route wort transfer lines.
If you are not a tinkerer you can purchase off-the-shelf solutions from most of the major brewing suppliers that again run the gambit from simple one-probe temperature controllers to fully integrated touch screen control systems. If you purchase a complete brewing system, often the controllers are included and built in.
If you do want to build your own controller a variety of options are also available (see photo, above, for an example of a home-built control box). The most popular include using an off-the-shelf Proportional-Integral-Derivative (PID) controller. PID controllers are cheap and can be easily setup to maintain a fixed temperature on a single sensor using plans available online.
The other popular control system option is a microcontroller or microcomputer. For example, Raspberry Pi single board computers are widely used to control brewing systems, and you can find plans online for using the Pi such as the “BrewPi” system. Other microcontrollers can also be used if you have a little engineering and programming experience.
Tubes and Valves
In addition to selecting main equipment components such as kettles and pumps you need to connect all of the pieces together. For tubing, the standard for large homebrewing systems is simple 1⁄2-inch inner diameter silicone hose. It handles high temperatures well, provides sufficient wort flow, is relatively easy to clean and can be adapted to a wide variety of connectors used in homebrewing. Note, however, that silicone hoses have low pressure ratings, especially when used for hot liquids.
Valves generally come in three types, each of which has its advantages and disadvantages. Most brew kettles come with some type of valve pre-installed.
Ball Valves: These have a ball with a large hole in it and the handle rotates the ball. They are the least expensive and are easy to open or close, but don’t provide the high precision you might need in adjusting the flow rate through your chiller, for example. They are also harder to completely sanitize as the ball itself, as well as the valve cavity, can harbor contaminants.
Butterfly Valves: These valves have a large flat plate that rotates and closes. They are more expensive than ball valves, but are easier to clean. They don’t offer much precision and are best used in applications where the valve needs to be either open or closed. Because they are easy to clean you often see them used on fermenters.
Control Valves: This includes gate, globe, diaphragm, and linear valves (needle valves, etc.). Valves like the Blichmann linear control valve offer much greater precision, depending on design, but also can be taken apart for easy cleaning. A valve like this is best in applications like controlling the flow through your chiller which requires small adjustments.
Connectors
A 1⁄2-inch MPT/NPT connector is the most common connection for large homebrew setups. The connector screws together, just like your garden hose, but is slightly smaller in diameter. However it takes time to screw and unscrew the connector and you also may need gloves to remove a boiling hot connector from your kettle. As a result some homebrewers do install quick disconnects or other connectors to make changes easier. It all depends on how many connections you will need to change in a given brew session which will be driven by how many pumps, kettles and hoses you have in your setup.
Here’s a quick summary of available fittings beyond the 1⁄2-inch MPT garden hose standard:
Sanitary Clamp Fittings: Most homebrewers refer to these as Tri-clover fittings, although Tri-Clover is a brand name. These types of fittings are the standard fitting used in professional brewing. Each fitting consists of two flat circular fittings, a silicone gasket and a clamp that joins the two disks together. It is not a quick fitting to install or remove and requires gloves if hot. Its main advantage is that it can be easily sanitized. It comes in a variety of sizes including 1-inch, 1.5-inch, 3-inch and 6-inch, and the 1.5-inch fitting is the most common size for homebrewing.
Camlock Quick Connects: Camlock fittings are widely used in industrial applications and provide a quick-disconnect. The female connector has a seal and two levers that lock the male end in place providing a positive seal. You can purchase them in stainless steel, and they do get hot when brewing.
Blichmann Quick Connects: While technically not a “quick connect” these fittings are simple 1⁄2-inch NPT screw-on connectors with a plastic sleeve. What I like about them is that the plastic sleeve insulates you from the heat allowing you to attach or remove them even when hot.
Pneumatic Quick Connects: Many homebrew stores sell other quick disconnects that are not camlocks and are actually designed for pneumatic (air compressor) applications. These have the same advantages/disadvantages as camlocks and provide a simple positive quick-connect.
One issue with adapting any of these quick connects to an existing standard 1⁄2-inch NPT connector is that the connection is still not sanitary, so you may want to occasionally remove the quick-connect and clean the threads, especially if you are using an adapter on the cold side of your brewing system.
Fermenters
While a full discussion of fermenters could easily fill another article, one thing you will need to consider when upgrading your system is how to ferment the larger batch size. The simplest solution is to break your fermentation up into two or three batches and ferment them in existing buckets or carboys.
Eventually you may want to consider a 10-gallon (38-L) or larger fermenter for ease of use and also to minimize transfers. In the last few years we’ve seen a huge increase in the options available to homebrewers, including larger plastic bottles and buckets, large plastic conicals, and of course stainless steel conical fermenters.
My personal recommendation would be to continue using your existing 5-gallon (19-L) fermenters until you can afford either a plastic or stainless conical fermenter. A conical fermenter really starts to make sense as you move to 10 gallons (38 L) or larger batches as you really don’t want to be moving around a 100+ lb. (45-kg) fermenter or doing a lot of bulk transfers between 10-gallon (38-L) and larger fermenters. A conical allows you to leave your beer in place and draw the sediment from the bottom until it’s ready to transfer to a keg or bottles.
Summary
While it’s not possible in a single article to cover every single decision you need to make in upgrading a brewing system for large batches, I hope this overview has given you some idea of the options available as well as some of the tradeoffs to be made in creating your large batch brewing system.
A Brew-In-A-Bag-style single-vessel system, the High Gravity Wort Hog BIAB system.
A two-vessel hybrid system, the BrewEasy by Blichmann Engineering.
A heat exchanger recirculating mash system (HERMS) setup, which is also a three-vessel style of system.
A Chugger pump. Many models are parts-compatible with March pumps.
Some systems require one, two, or even three (above) propane burners.
A larger system often uses a control system to manage temperature changes as well as pumps, and even valves.
Connecting all your pieces together will require tubing and connectors. The standard for large homebrewing systems is simple 1⁄2-inch inner diameter silicone hose (Top). Bottom:
a collection of various connectors.


