Extract Brewing Essentials
As both a homebrewer and professional brewer at Phat Fish Brewing in Dickinson, North Dakota, I frequently get asked about the process of brewing beer, including how difficult it might be to get started brewing at home. I always do my best to give a complete yet concise answer that includes encouragement for them to take the leap to begin brewing beer themselves.
Any discussion of brewing beer is inextricably linked to the equipment necessary to carry out the process, particularly what pieces of equipment would be essential to get started. Before grasping the concepts of the brewing process itself, most people want to know what it will cost them in time and money to get into the hobby of homebrewing. I tell those interested in getting started that it is important for them to understand the essential steps of the brewing process and the equipment needs will then become apparent to them. I say this to challenge would-be brewers to take stock of what equipment they may already have on hand in their kitchen, attic, basement, or workshop in order to not only keep costs down, but to help them realize that they may be closer to getting started brewing than they previously thought.
If you’re a longtime reader of Brew Your Own, you may not learn a lot of new information from this article (although, refreshers are always nice!). However, I believe this article will be useful to read so you can consider it when others take interest in your hobby and you find yourself trying to describe the necessary steps and equipment for a newcomer to get into homebrewing. If you have been homebrewing for a while, the chances are that you, too, have been asked by a friend, family member, or even a stranger about what it takes to start making beer at home.
My elevator pitch to beginning brewers about getting started is that it is easier and cheaper than they might think. Most homebrew suppliers have beginning brewer kits that include most of the items listed in the essential equipment section, below, plus an extract ingredient kit and instructions, enough to brew a 5-gallon (19-L) batch of beer for less than $100. Once you have purchased the essential equipment, you can buy recipe kits that typically cost between $20 and $60 to brew again and again. I strongly encourage new brewers to begin with extract brewing, rather than brewing all-grain batches by mashing malt to produce wort. By getting comfortable with an abbreviated brewing process, you will have a greater chance of immediate success before attempting the somewhat more complicated process of brewing from scratch.

Starting with a liquid malt extract recipe kit not only simplifies the brewing process, it cuts the time required to brew a batch of beer from about five hours to three, and reduces the amount of equipment and expense of getting started brewing. Malt extract comes in the form of a syrupy liquid of approximately 20% water content, or a dry powder, with nearly no water content. Recipe kits may include one or both forms of extract. Once you are a successful extract brewer, you can add the mashing step to your process later. I brewed with extract kits for several years before I made the leap to mashing to produce wort and am glad I did. It allowed me to be successful making good beer first, then I added more detail and dimensions to my brewing later. So, let’s walk through the extract brewing process and the corresponding pieces of equipment needed to get the job done.
Essential Equipment
• 5-gallon (19-L) or larger pot for boiling wort.
• Long-handled spoon for stirring wort.
• 6.5-gallon (24.5-L) fermenter, plus a lid with a hole in it to accept an airlock — fermenter may be made of food-grade plastic (bucket with lid or carboy), stainless steel with a lid, or glass (carboy) where the airlock fits into a drilled rubber stopper that fits into the opening of the carboy.
• Plastic airlock
• A thermometer capable of measuring between the freezing and boiling points of water.
• A 6.5-gallon (24.5 liter) bottling bucket similar to a plastic fermenter bucket with a lid and plastic spigot that fits in a hole in the side near the bottom of the bucket to be used to fill bottles.
• Plastic tubing for transferring beer from the fermenter to the bottling bucket.
• Bottling wand
• Scale or measuring cups to measure priming sugar and water.
• 2-quart (1.9-L) or larger saucepan to dissolve and boil priming sugar solution.
• (48) 12-ounce (355-mL) bottles or an equivalent number and size of bottles to contain 5 gallons (19 L) of beer. Either brown glass bottles that will accept a crimp-on steel cap, bottles with swing-top stoppers, or brown plastic bottles with reusable screw-on caps. Brown glass or plastic is important to restrict light, which can adversely affect the flavor of beer.
• Bottle caps, if not using swing-top bottles or screw-on bottles.\
• Bottle capper
Steeping Specialty Grains

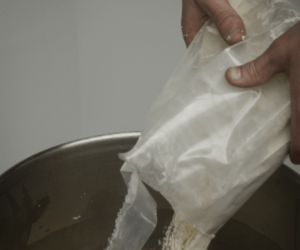
Oftentimes, an extract kit includes the option of some crushed specialty malt (and possibly un-malted grains) along with a mesh bag for steeping them in the brewing water. The crushed grains are placed in the mesh bag supplied with the kit and suspended in the brewing water as the water is heated, but not boiled, prior to adding the malt extract. Do this by steeping the specialty malt in 2.5 gallons (9.5 liters) of potable water in a pot that can hold at least 5 gallons (19 liters) until the water reaches a temperature of 170 °F (76 °C), then lift the bag out of the water, let it drain into the pot for a minute, and discard the malt.
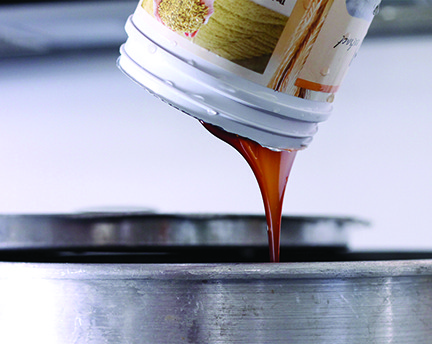
Regardless of whether your recipe kit includes specialty grains or not, it is helpful to warm the container of liquid malt extract by removing the lid from the container and placing it in some hot water while you are waiting for your brewing water to heat. This will make the extract easier to pour. If you have not already prepared some brewing water by conducting the steeping process of any specialty malt (leaving you with a bit less than 2.5 gallons/9.5 L of water that has not yet begun to boil) then place 2.5 gallons (9.5 L) of potable water in at least a 5-gallon (19-L) pot that you will use for the actual wort boil, or continue to heat the water that you steeped the specialty malt in, until the water comes to a boil. At this point it is important to remove the pot from the heat source before adding the warmed liquid malt extract. The reason for removing the pot from the heat source it to avoid scorching the malt extract on the bottom of the pot. Scorched malt is very difficult to clean off of the bottom of the pot and more importantly, will leave a nasty burnt flavor in your beer that is impossible to remove or mask.
Stir the liquid malt extract into the water with a large spoon. Rinse the malt container with a little hot water to get most of it into the pot.
Boiling
Boiling is necessary to sanitize the wort, extract bitterness from the hops, and coagulate proteins so the finished beer will become clear. Wort is a complex solution of sugars, color and flavor compounds, yeast nutrients, and water, which in the case of beer come from malted grains, primarily barley and wheat. Later in the brewing process, wort will also contain bittering acids and aroma compounds from hops. As mentioned previously, we are skipping the step of mashing to allow you to focus on the basics of the brewing process, including what lies beyond the boil.
Once you are certain that the extract is completely dissolved in the water so that no extract remains on the bottom of the pot, you may return the pot to the heat source and continue heating it up to a boil. Do not leave the pot unattended during the time it is heating up to a boil! As the wort reaches a boil it will often foam excessively (this is why we suggest using a 5-gallon (19-L) pot to boil approximately 14 quarts (13.3 L) of wort. When the wort begins to foam, you can reduce the heat, stir the wort with your big spoon, and/or spray water onto the foam to keep it from overflowing the pot. If the pot should foam over its sides (aka the dreaded boilover) it will not ruin your batch of beer, but you will have a burned and sticky mess to clean off of your stove that you will live to regret!
For most beer recipes, you will need to boil the wort for about an hour, adding particular hops at specified times during the boil according to the recipe. The boil should be a gentle rolling boil that can be sustained without resulting in a boilover. Also, each time hops are added to the pot there is a chance the wort will foam excessively and need to be controlled as mentioned previously. During the boil, sanitize your fermenter by spraying it with a solution of 2 mL/liter or 1⁄2 teaspoon/quart of Star San or the sanitizer supplied with your kit per the instructions and allow the excess sanitizer to drain from it.
Chilling
After the boil the wort must be cooled down to a temperature at which yeast can survive and thrive. From this point on, everything the wort or beer touches needs to be sanitized! Failure to sanitize equipment is perhaps the greatest reason for failure in homebrewing beer. By killing any other bacteria or fungi before adding our fungi of choice (beer yeast) we can be reasonably assured that the beer will be fermented by the yeast we add rather than some other organism(s). Star San and other sanitizers are cheap, bad beer is expensive!
As a general rule, brewing yeast perform best between 50–78 °F (10–26 °C). Since we now have something less than 3 gallons (11.4 L) of hot wort and wish to have just over 5 gallons (19 L) of final volume at a temperature suitable for our yeast to thrive, the simplest approach is to add about two gallons (8 L) of ice to the wort and allow it to melt. If you plan to make homebrewing a continuing hobby, the first equipment upgrade to consider is a wort chiller. Wort chillers are available from homebrewing suppliers or can be made yourself from materials found at a hardware store. Transfer the semi-cooled wort into your sanitized fermenter. Some splashing of the cooled wort while pouring the wort into the fermenter is a good thing, as yeast require some oxygen during the first part of their life cycle. Do your best to leave most of the sediment (trub) behind in the pot. Check the wort temperature with a sanitized thermometer and add ice and/or cold water until the wort in your fermenter is at a volume just over 5 gallons (19 L) and a temperature between 50–78 °F (10–26 °C). If you have just over 5 gallons (19 L) in your fermenter and it is still over 78 °F (26 °C), then cover the fermenter with the sanitized lid and set it in a sink of cold water (with ice if necessary) until it does cool below 78 °F (26 °C).
Pitch the Yeast
Once you have the volume of wort adjusted to just over 5 gallons (19 L) and in the correct temperature range, cut the yeast package open with sanitized scissors and sprinkle (dry) or pour (liquid) yeast into the wort. Sanitize the lid or stopper and the airlock and attach them securely to the fermenter. Add a bit of water to the airlock so it is less than half full and place the fermenter in a place with consistent temperatures between 50–78 °F (10–26 °C) and where it will not be exposed to light or wide temperature variations.
Fermentation
Active fermentation should begin within 48 hours of pitching the yeast into the wort. You should see a layer of foam develop on the surface of the wort and carbon dioxide bubbling through the airlock. The layer of foam and the bubbling of the airlock should continue for a week or two. When the layer of foam is nearly absent and little or no carbon dioxide is coming through the airlock, fermentation is essentially complete. One of the next pieces of equipment you’ll likely want to buy is a hydrometer to measure gravity, which is a more accurate way to determine fermentation completeness, but we can get by without one to start.
Racking, Priming, and Bottling
When fermentation appears to be complete (usually 10–14 days), sanitize the bottles, caps, bottling bucket (including the attached spigot), and plastic tubing that will be used to transfer the beer from the fermenter to the bottling bucket by spraying them with sanitizer or soaking them in a bath of sanitizer solution and allowing the excess sanitizer to drain away.
Make a priming sugar solution by dissolving 5 ounces (142 g) of dextrose (corn sugar that is typically provided with a recipe kit) or white granulated sugar in a pint (473 mL) of water and bring it to a boil to sanitize. Allow the solution to cool slightly and pour it into the bottling bucket. Siphon the beer from the fermenter into the bottling bucket using sanitized plastic tubing, leaving the sediment behind in the fermenter. Carefully fill each bottle using a bottling wand or directly from the spigot on the bottling bucket, allowing the beer to flow down the inside of the bottle instead of splashing straight down, to within 3⁄4 inch (2 cm) of the top, position a sanitized cap on the mouth of the bottle and crimp it down to seal it with the bottle capper. If you used swing top bottles or plastic screw-top bottles then secure the sanitized stopper or cap onto the mouth of the bottle.
Conditioning and Serving
Allow the bottled beer to sit upright at room temperature away from light for two weeks to allow the yeast to ferment the priming sugar to produce carbonation. Chill the bottles down to serving temperature. Pry off a cap from a bottle (or open the swing or screw top) and carefully pour the beer into a clean glass being careful to stop before the yeast sediment comes out of the bottom of the bottle. If all went well, you should be drinking carbonated beer (hopefully good beer!). If the level of carbonation seems a bit low, allow the bottles to sit at room temperature for another week before chilling them again to serving temperature.