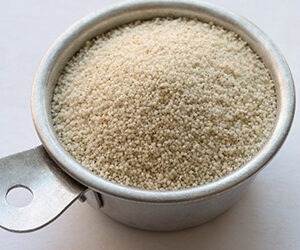
Flaked versus Rolled Grains, Gelatinization, Identifying an Infection, and Draft Cleaning
Q I keep seeing the forums suggesting a difference between “flaked grains” and “rolled grains.” From what I can glean searching online, I’m finding some sources refer to the difference as semantics, and others seem to suggest there IS a real difference between these labels. I’m wondering if there’s a functional brewing difference between these or if they would need to be used differently in my brewery. As a follow-up question, I’ve Gotten into a few debates between milling flaked products versus not. Is there any advantage in your opinion to milling these grains?
Tony DelMedico
St. Paul, Minnesota

A Thanks for the great question, Tony! An interesting topic to dive into for sure because there are some real differences among adjunct grains that are invisible to the eye. For starters, the terms “flaked” and “rolled” are indeed used interchangeably. It seems that some writers have learned that repetitive words make for odd-looking sentences and use the term “rolling” as the process of producing “flaked” grains. Here is an example from the interwebs: “To create rolled oats, whole grain groats are first steamed, then rolled flat into flakes.” And here is a headline from a website about using a handheld grain flaker titled “Make Rolled Oats & Flaked Grains.” In this case, one piece of equipment called a grain flaker (attaches to a KitchenAid® stand mixer) functions in a single manner to produce “rolled oats” and “flaked grains” . . . or is that “flaked oats” and “rolled grains”? Suffice to say, the flat things that make for a healthy bowl of oatmeal are known as rolled and/or flaked oats.
Semantics aside, there are very real differences in how grains are treated prior to being squished into flat bits. For the sake of clarity, I will use the terms “rolling” and “rolled” for the remainder of this answer to describe the rolling process and the resultant rolled grain. There are essentially four different preparation methods before the pre-rolled grain meets the roller. The first is to simply clean or screen grains to remove dust, rocks, etc. before rolling. This method works well enough, but the rolled grains can literally look a bit rough around the edges and are not terribly shelf stable because rolling exposes the inside of the grain to oxygen. This is an important issue with oats because oats contain lipids (fats) that turn rancid over time. Other grains, like barley, wheat, and rye, contain much less lipids and are not known for being prone to rancidity. Rolled, unprocessed grains are most common among home rollers of grain.

When raw grains are wetted prior to rolling, the resultant rolled grain is more uniform in appearance and is easier to produce. The most common way to moisten raw grains in a commercial production plant is with steam. Steaming the raw grain has two key advantages from a brewing perspective: 1) Steaming heats and hydrates starch granules and 2) Steam heating denatures enzymes. Immediately following the steam step, the grains are rolled and then cooled. These steam-rolled grains usually have a longer shelf life compared to raw-rolled grains because of enzyme denaturation and the grain starches are also gelatinized in the process.
As a quick aside, none of these methods were developed to help brewers with brewing or to make the preparation of that morning bowl of oatmeal faster to get onto the table. The science of grain rolling and the nuanced differences in the rolled products all came out of research conducted to optimize feed utilization for beef production. For a really interesting review of the history of this topic, search “History of Feed Processing, John K. Matsushima” and check out his review from the 2006 Cattle Grain Processing Symposium.
In the pursuit of more complete gelatinization, scientists continued to pursue refinements to steaming and rolling. This is why there are so many different thicknesses of rolled grains. In about 1970, the process of micronization was developed. So-called micronized grains are heated using a dry, indirect heating source to cause the starch granules to swell and burst. Popcorn is a common example of this basic process, except with micronization infrared energy is used as the heat source.
The term micronization is not a common term outside of the animal feed world and the same process is more commonly known as torrefication. The products of the process are known as “micronized,” “torrefied,” and “puffed.” Name aside, a real difference between micronization and steaming is more complete gelatinization of the starch. This distinction is key in animal nutrition, especially with horses (non-ruminant herbivores), because it significantly affects nutrient uptake and feed utilization, a.k.a. feed cost.
Micronized/torrefied grains can be rolled just like steam-cooked grains. Examples of these products include torrefied wheat (not rolled) and flaked torrefied wheat, oats, rye, barley, rice, and maize (corn).
Toasting is yet another pre-rolling preparation technique. While toasting uses the same sort of process of micronization, the term “toasted” is not used to describe how animal feed stuffs are made and published data quantifying differences among other rolled grains is not readily available. Most toasted and rolled adjuncts are indeed very similar to “flaked torrefied [micronized] grains” but there are whole toasted grain products that do not have a puffed appearance; these toasted grains are more akin to lightly roasted grains. Up until now, things have been fairly clear. Unfortunately, “toasted” does not have a single definition universally used by all processors. For any commercial brewer reading this, the best way to understand what you are dealing with is to request a Hazard Analysis Critical Control Points (HACCP) process flow diagram from your supplier to understand the method(s) being used in the production of your raw materials.
And finally, let’s touch on milling. The advantage of milling rolled grains is increased extract yield. Digging around in spent grains after the kettle is full is a really great way to see how things went in the mash. Whole malt kernels, easier to spot in spent grains than in milled grist, obviously did not yield their extract and represent loss. Likewise, large bits of rolled grains have largely gone unchanged by the mash. A great visualization is to squeeze one of these rolled bits onto a spoon and drop in a bit of iodine. A jet-black result confirms the presence of starch and indicates that goodies are present in the spent grains. Many brewers don’t want to mill rolled grains for fear of sticking the mash. That’s a legitimate concern, but so is adding an ingredient that ends up being discarded after the process.
Hopefully this clears things up a bit on the topic of steamed, puffed, micronized, toasted, and torrefied, rolled or flaked, grain flakes.
What is Gelatinization?
Starch granules are microscopic spheres containing crystalline, tightly packed starch molecules. Nature’s form of a packet of energy stuffed into a ball. Within these granules is a mixture of amylose (straight-chained) and amylopectin (branched) starch molecules. The ratio of these starches varies between and within cereals bred and grown for starch. For example, “normal” maize/corn, contains about 75% amylopectin and 25% amylose, waxy maize is about 99% amylopectin, and high amylose maize starch is about 75% amylose and 25% amylopectin. When starch granules are viewed under a polarized light microscope, they have a distinctive appearance often called a Maltese Cross due to birefringence of polarized light (think Pink Floyd’s Dark Side of the Moon album cover).
When starch granules are hydrated and heated, they swell and eventually burst. From a practical sense, this can be felt when stirring a starch solution over a heat source. Upon gelatinization, the solution thickens, becomes more voluminous, before the viscosity drops when the granules burst. And if you happen to be visualizing this using a polarized light microscope, birefringence is lost and the Maltese Cross disappears. Very cool stuff. This is important to brewers because hydrolytic enzymes from malt can now break down these large molecules into fermentable sugars. It’s as simple as saying no gelatinization, no beer!
One crazy thing about gelatinized starch is that it stales by a process known as retrogradation. When starch retrogrades, it re-crystallizes. This is the primary path of how bread stales. Speaking of stale and moldy bread, those problems seem to have dropped off the radar over the last fifteen years or so. How is that? Well, exogenous alpha and beta amylases are now commonly used by commercial bakeries to alter the starch structure before baking, thereby preventing starch retrogradation. And organic acids, like acetic (vinegar), propionic, isovaleric, and butyric (all naturally found in cheeses) do a great job of inhibiting mold growth. This one-two combo has all but eliminated fuzzy loaves of hard bread.
Although most rolled grains tend to look similar, don’t assume they are all the same. The pre-rolling method has a significant effect on gelatinization rate. This means that some rolled grains can be chucked into an infusion mash where they will dissolve and easily release gelatinized starch into the mash. Other rolled grains are gelatinized to varying degrees and either require cooking or greatly benefit from cooking prior to use. A process known as cereal mashing is one way to gelatinize grains. But that is a whole other topic to cover another day.
Q Is it possible that you can help me identify this infection (see picture below)?
Roger Jacobs
Hamilton, Scotland
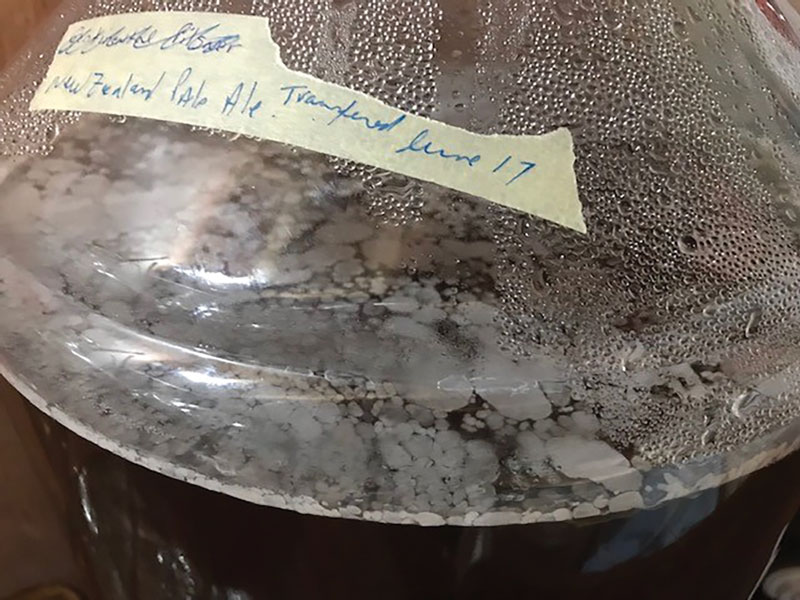
A Identifying beer spoilage by visual observation can be a challenge, but the photo of your brew does look suspect. If I were to wager a bet, my money would be on Acetobacter for the win. Whatever is on the surface of your beer, it’s definitely not normal brewing yeast. Another common surface organism are Brettanomyces yeast species, but Brett pellicles usually have a different texture and appear more continuously across the surface once developed.
My guess about the identity of this does not really help you with your quest. You, however, should be able to do a bit of sleuthing with your nose. Acetobacter converts ethanol into acetic acid (vinegar) and its presence is often highlighted by elevated levels of ethyl acetate aromas, such as solvent, nail polish, and pear drops, as well as rope formation. Acetobacter are not the sort of spoilers that fall under the stealthy category of contaminants! Brettanomyces yeast, on the other hand, produce a different range of aromas from pleasant tropical fruit notes, to leather-like, barnyard aromas, to intense phenolics that are sometimes described as baby diaper. I call this the rosy, the funky, and the fugly.
The practical rule with this sort of brewing challenge is to use sensory to make a swift go or no-go assessment of the beer. Although it helps to have some prior experience in confidently rejecting a batch of contaminated beer, a bad batch of beer is usually hard to miss. If it smells really bad, tastes really bad, looks funky, and persists in this condition for a couple of weeks, it’s probably not going to get any better. In other words — dump it, clean it, and refill it to move on to better times ahead.
Commercial breweries are more analytical about contamination because understanding the root cause is important to stop the problem from spreading through the brewery. Classic microbiological methods are still common in brewing labs. These methods include the use of different types of growth media, colony morphology, anaerobic/aerobic environments, staining, and microscopic observation to identify the spoiling microorganisms. Many breweries, including a surprisingly large number of breweries producing fewer than a couple thousand barrels per year, use PCR (polymerase chain reaction) technology to detect and quantify beer spoilers.
Whether a brewer knows what has spoiled a batch of beer, it is always important to come up with some ideas on how the spoilage occurred so that future problems may be avoided. For the sake of discussion, assume that the photo of your problem brew does indeed show Acetobacter. This bug requires oxygen at the surface to effectively do its magic of converting ethanol into vinegar, and in combining ethanol and vinegar to produce ethyl acetate. A great way to deal with Acetobacter is to exclude air from the headspace of carboys and barrels. Try not to age beer in a primary vessel with lots of headspace for too long. Oxygen will find its way in over time.
Another great question to ask is how the bug found its way into your beer. Was it because of poor sanitation, a faulty piece of equipment that could not be properly cleaned, or was it from an ingredient addition after the boil? Microbiological problems can be difficult to definitively identify, yet they always remind brewers that organisms are everywhere in our world and some find beer a fairly hospitable environment.
Q Two years ago, I bought my first two Corny kegs and have been serving some of my beer on draft (still bottle some). For a while I was just using picnic taps as they were cheap and easy, but I just bought two stainless faucets and will be running them through the fridge door. With the picnic taps, cleaning was easy as I just unscrewed the top piece on both the tap and the quick connect and soaked in cleaner solution followed by a quick sanitizer rinse. I would do this just before putting every new beer on tap. What’s your recommended procedure for cleaning lines and faucets? Do you recommend replacing the tubing over time?
Frank Petrignani
Brampton, Ontario
A Clean draft lines and faucets are key to any properly maintained draft beer system. The good news for the homebrewer is that our draft lines tend to be relatively short and contain little volume. For example, 6 feet (1.8 m) of 3⁄16-inch inside diameter line, a typical length in a balanced system designed for normally carbonated beer, contains about 1 ounce (30 mL) of beer. The usual cleaning period in bars is bi-weekly, so even if a keg is on tap for 8 weeks, bi-weekly cleaning at home will consume only 3 ounces (90 mL) of beer.

The most common and simplest method used to clean draft lines in a bar is to use a keg-cleaning bottle to push rinse water and line cleaner through beer lines using gas pressure. This same basic setup can also be purchased with a hand pump. These work great for cleaning multiple short lines in quick succession. It’s typical to fill the bottle with warm water and flush beer from the lines being cleaned. After rinsing, the bottle is then filled with a cleaner and the lines are flushed with cleaner. When multiple lines are cleaned in succession, the cleaner sits in the lines for as long as it takes to flush all lines. Good practice allows adequate soak time between steps to ensure enough time for cleaning. This time varies by cleaner type and what sort of beer has been in the line; 5–10 minutes is generally adequate.
Primary cleaning is sometimes followed by a rinse with a secondary cleaner, usually an acid, or just a thorough rinse with water. This general method cleans the keg coupler/tap, beer line, shank that goes through the cooler/refrigerator wall, and the main contact surfaces of the beer faucet. Not all faucets are cleaned by simply flushing and should be routinely disassembled and cleaned.
Although the method described above is handy for use in bars, it is not the easiest thing to apply at home because keg-cleaning bottles are designed for commercial keg couplers. A spare Corny keg can be used at home, but one of these gems is probably not just sitting around. And if one is the method is probably more trouble than it’s worth.
. . . 6 feet (1.8 m) of 3⁄16-inch inside diameter line, a typical length in a balanced system designed for normally carbonated beer, contains about 1 ounce (30 mL) of beer.
My suggestion for those using Corny kegs is to set up one side of the line with a swivel fitting to allow easy removal from the outlet coupler on your keg. On the other end use a 3⁄16-inch barbed fitting x beer nut coupler to connect your line to the shank that goes through the refrigerator door. When it comes time to clean your line(s), simply disconnect the beer coupler for your keg, unscrew the male beer nut from the beer shank. Next, unscrew the flat nut that connects the shank to the refrigerator door and pull this out from the front of your refrigerator. You can now easily rinse your Corny fitting, beer line, shank, and faucet, clean with an appropriate detergent (soaking in a mild alkaline cleaner like PBW works well), rinse, and reassemble.
You asked about tubing life; well-maintained beer tubing will last for years. The signs that tubing needs to be replaced include visible cracks, soils that do not appear to remove with normal cleaning (assuming tube is clear), difficulty pouring beer, and excessive age. Because homebrew draft lines are typically short and limited in number, replacing is not expensive. Consider noting the installation date of new draft lines and replacing every two years or so. Whatever time is spent cleaning and maintaining draft lines pales in comparison to the time required for bottling. Here’s to draft homebrew!