Build a Hanging Carboy Holder
 After a few years of homebrewing, what is one of the things we all start to run out of? Storage space!
Horizontal storage space in our house, especially the garage, is in high demand. When I came up with this design, I was in search of a better way to store my glass carboys and drain them in one tool. There are commercially available carboy stands that let you drain your carboy sitting on a counter top or other flat surface, while allowing air to circulate and possibly keeping dust and grime out of the inside. Unfortunately this requires using premium horizontal space. And besides, it’s fun to build stuff.
So I needed something different. The 6.5-gallon (25-L) and the two 5-gallon (19-L) carboys are used more frequently than our two 3-gallon (11-L) carboys. However, I didn’t want to bury the infrequently used carboys in either our attic or crawl space.
To organize the garage, I hang stuff like bikes, kayaks, ladders, lumber and pipe in the rafters and I thought that may be a good solution for the carboys too. They hang a bit low but as long as you mark them and locate them close to the walls, in corners or over refrigerators or kegerators, you don’t run into them as often.
Hanging them also makes them more secure than just setting them on shelves or on top of your fridge, especially somewhere like the garage. Glass carboys and concrete floors don’t get along when gravity comes into play. In addition to providing a valuable and safe storage location, it also allows the carboys to drip dry without pooling the water. I’ve been using these hangers for about two years now without any problems or breakages or any coming loose.
This design is for hanging empty carboys only, and is not to be used as a transport system of full carboys.
Materials
• Double loop #3 chain 90-lb. (41-kg) load limit
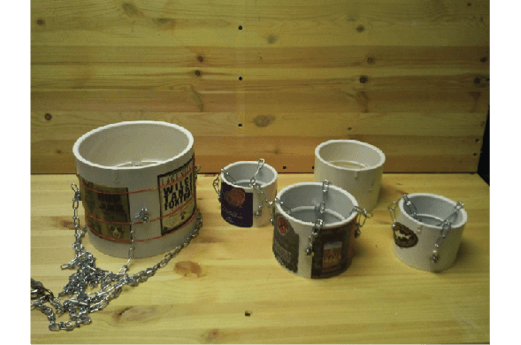
• PVC pipe union: 3-inch diameter for a 3-gallon (11-L) carboys, 4-inch diameter for a 5-gallon (19-L) carboys and 6-inch diameter for a 6.5-gallon (24-L) carboys
• 1⁄4-inch-20 x 1-inch bolts, nuts, washer and lock washers: 3 each for 3-gallon carboys (11-L), 4 each for others
• S-hooks to match the size of the chain: 3 for 3-gallon (11-L) carboys and 4 for the others
• 2 threaded quicklinks (optional but makes things easier)
• 1 carabineer or clip of some sort for top. (Make sure it fits the chain or quicklink if you’re using one.)
• Ceiling hook to install in garage to hang your hanger from. Not the cheap really thin ones. Make sure your carabineer or clip fits over it.)
Tools
• marker and ruler for layout
• mini-bolt cutter or diagonal cutter for chain
• pliers for S-hooks
• box or open end wrench for nuts
• screw driver for bolts
• awl or small finish nail setter
 1. Layout
 1. Layout
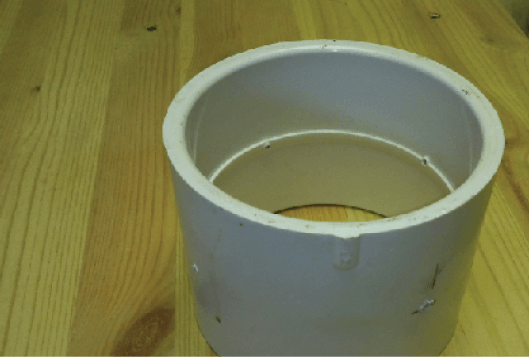
There are a couple of ways to lay out your markings to drill. I chose for my smaller carboy hangers to use only three vertical chains, and for my 5-gallon (19-L) and 6.5-gallon (25-L) carboys to use four chains. For most of it you can probably just eyeball it. With the coupling set with the hole facing up, I chose to place the bolts about half way up the vertical. This is easily found on the inside since the coupling has a lip to stop the pipe from going all the way through. You can measure this on
the inside and then make a mark on the outside to be drilled later.
2. Marking
 2. Marking
To space the holes out, there are a couple of choices. First you can use the ruler to find the longest dimension of the pipe coupling and mark both ends. This will make sure your bolts are on opposite sides and then eyeball a 90-degree and mark the next set. Another way would be to place a piece of paper under your coupling and trace the circle. Cut that out. Fold it in half and then in half again to get a 1⁄4-circle pie wedge. When you unfold it and lay it back under your coupling, you should have your bolt pattern perfectly spaced out. Eyeball is fine for the spacing but the vertical should really be measured so your carboy isn’t hanging crooked.
 3. Drilling
Clamp the coupling down to a table to drill. Make sure it’s clamped well so it doesn’t roll away from you and so it doesn’t spin the coupling on you. Use the awl or the nail set to poke a starter dent to help the drill bit track. Don’t hit hard with a hammer since you’ll probably crack the coupling. Use a 1⁄4-inch bit for the hole. The bolts may be tight but the plastic is soft enough you can screw them in if needed. This tight fit will help them stay put in the future too so don’t ream out the hole.
 4. Cutting the chains
Use mini-bolt cutters or a pair of diagonal cutters to cut one set of the following: 6.5-gallon (25-L) carboy: (4) 28-inch (71-cm) lengths for vertical chains and (1) 40-inch for circumference chain 5-gallon (19-L) carboy: (4) 27-inch for vertical chains and (1) 36-inch (91-cm) for circumference chain 3-gallon (11-L) carboy: (3) 22-inch (56-cm) for vertical chains and (1) 30-inch (76-cm) for circumference chain.
 5. Attaching the chains
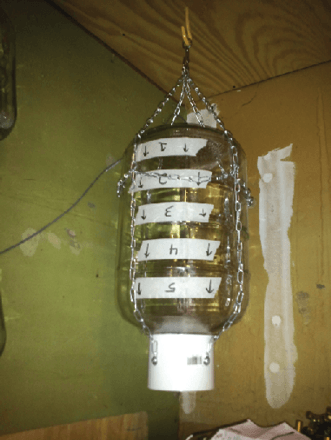
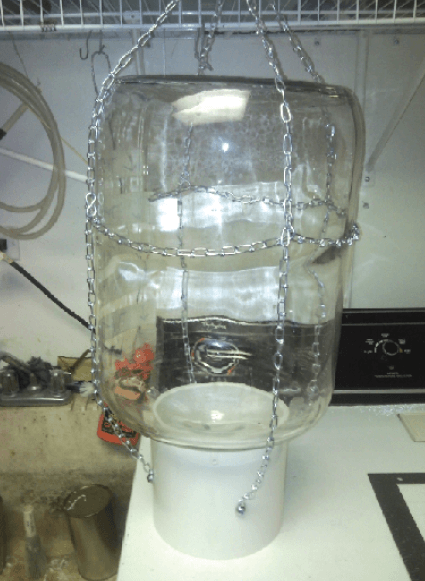
The chain I used has a smaller side and a larger side to each link. I put the bolt through the smaller loop of the link. So the order it goes on the bolt is: washer, chain, outside to inside PVC and then lock washer and nut. Make sure the nut is good and tight and that the washer isn’t slipping through or off the chain on the outside. I find a box wrench easier than a crescent for this because you’re on the inside curve of the pipe. Once you get all chains attached to the PVC, it’s time to put the carboy (opening down) on the pipe coupling. Next, clip the tops all together on top of the carboy so the chains stay up while you’re working. The circumference chain (C-chain) I placed about 2⁄3 of the way up the side of the carboy. Clip the S-hooks on the vertical chains where you’re going to put the C-chain. For the C-chain, start with the first link on the first S-hook but don’t close it yet. Wrap the C-chain inside the vertical chains all the way around and back to that first S-hook and close it to hold it. Then you can count the links and space out where the other S-hooks link to the C-chain. I use the quicklinks to connect 2 each vertical chains. This seems to help with keeping the chains organized and makes chaining up easier. Clip the carabineer to the two quicklinks or just the top of the four chains.
 6. Finish
Install the hanging hooks into your garage rafters (2 x 8’s or bigger, not just into the drywall ceiling) and hang your carboys up to dry. Don’t use the really cheapo flimsy hooks at least for the bigger carboys. Same goes for the carabineer too. You don’t have to get the really expensive climbing ones but at least get a decent one out of the chain and rope section of the hardware store. I also use these when I’ve just sprayed them with sanitizer before brewing and hang them in the laundry room or clip them to the shelf in the laundry room to keep them from falling off the dryer.


