Malting At Home
Most of your brewing friends will tell you that malting is very difficult and complicated — so difficult in fact that it is a waste of your time even to try it. But probe a little further, and most of the time you’ll find that your maltophobic friends have never actually attempted malting. How, then do they know malting is so difficult? Well, they heard from their friend that malting is hard, and . . .
It’s time to break the cycle! Malting is neither difficult nor complicated. If you can brew a beer from malted grains, then you already have the equipment and skills you need to malt grains. Malting is just soaking raw barley in water, then allowing the barley seeds to sprout for several days. The last step is drying your malt with a fan, and “cooking” it in your kitchen oven. As you might be guessing, the procedure isn’t especially difficult.
Malting does, however, take up a little more space than a fermenting a 5.0-gallon (19-L) carboy. Malting grains need to be spread out in a layer no more than 6” (15-cm) deep, so you’ll need 5 or 10 square feet (0.46–0.93 m²) for a week to be dedicated to malting. If you already brew in your basement or a closet, you should have plenty of room.
While it is true that making specialty malts like Munich and crystal malt require a few extra steps, they aren’t that difficult.
And finally, why malt at home? I’m always surprised when somebody who just spent 6 hours plus 2 weeks to make an IPA they could have bought at the local bottle shop asks me this. Malting is an integral part of our art and our craft. The flavors you will develop during malting are just as prominent as the flavors you develop during the boil and the ferment. Welcome to the next stage of crafting your own unique beer.
Equipment and Supplies
First, get your hands on some raw malting barley. Take note: malt has already been malted — you likely won’t find what you need at your local homebrew shop. You’re looking for raw barley, and not just any barley will do. Malting barley has been bred with characteristics that make it easy to produce high-quality malt, such as a uniform germination rate. It has also met higher quality standards than feed barley, so don’t try to malt anything you can buy at your local feed store. When you call around asking for malting barley, most people will think you’re asking for malted barley, in the past tense. But a little persistence will pay off, especially if you throw in the word “raw,” as in raw malting barley.
Popular 2-row malting varieties grown in the US include AC Metcalfe, Conrad and Moravian 69. In 2011, 32% of all US 2-row acreage was planted with AC Metcalfe. Conrad and Moravian 69 were both at 15%. Harrington is still around, too (at 5.4% of US 2-row malting barley acreage).
Among 6-row malting varieties, Tradition is the most popular with 61% of US 6-row acreage, followed by Lacey at 26%. Robust, which has been around since 1984, is still hanging in there at 5.7%. The American Malting Barley Association (AMBA) maintains a website (at ambainc.org) that lists all the malting varieties grown in the US each year since 2007 and gives planting recommendations each year.
You may find that you can purchase raw malting barley in bulk from your local grain elevator, but I’ve always purchased mine in bulk from Colorado Malting Company. Some garden seed companies also sell barley, wheat and other grain seeds. Shipping is always a killer when you’re buying big sacks of grain, but the raw 2-row price per pound can’t be beat! The steps for malting wheat are similar, and most people can buy some raw wheat berries at the local specialty grocery store. I started off in this way making malted wheat, but watch out for grocery store grain prices.
Now that you’ve tracked down a source of raw malting barley, gather all the equipment you’ll need: a 5-gallon (19 L) plastic bucket with a spigot, a roll of large plastic garbage bags, a plastic box fan and a baking dish. That’s it! You likely have all these already, and if you’re missing the fan, they can be had for less than $20 during the summer at most big box stores. As an option, a large food dehydrator can be used to dry the malt, but this isn’t required. When you plan a malting run, make sure you don’t have to go out of town for at least one week. The malt needs about 5–10 minutes per day of your time to stay healthy.
Steeping
First, weigh out about 15 lbs. (6.8 kg) of grains in your plastic bucket. Soak them in water that is good enough for brewing. Most of the grains will sink to the bottom of the bucket, but some small grains and some hay-like matter will float on top. Scoop this stuff out — those small grains were not going to germinate uniformly, or at all, and you can throw them away. Stir up the sunken grains in the water, and once they settle, skim off the floating material once more. Pour off the extra water from the grains and then add more while stirring the grains. Wash your raw barley 3-4 times with fresh water until the water is clear. Some remaining yellow color is natural — even the raw grains will quickly turn the water yellow. Just make sure to wash away all the dirt and dust until the water is no longer hazy and turbid. Ideally, your water temperature should be 50–60 °F (10–15 °C).
Now wait 8 hours, no longer, while the barley takes up water. I usually steep my grains overnight, then drain them in the morning. It is very important not to soak the grains much longer than 8 hours. Once the embryos inside the grains come to life, they will need more oxygen than the water contains. If you soak them for 9 hours, they will still be fine, but push your luck and some grains will begin dying, opening up the door for bacterial contamination. If your malt ever smells like garbage or compost, you’ll know that you steeped it too long!
How are you going to drain 15 lbs.(6.8 kg) of wet grains? If your plastic bucket has a spigot, like many of ours do, then you can just open it up. Another option is to just dump the grains and soak water into your mash tun. Use your false bottom or filter to drain the water. The grains should rest in air for eight more hours. At this point, you’ll notice that your soaked grains are not actually very moist. In fact, after the first 8 hours of soaking, they will still be pretty hard. This is because barley’s hull prevents water from penetrating the grain. The grains will ultimately need two more 8-hour steeps, with 8-hour air rests in between. During the air rests, the barley should optimally be held at 50–70 °F (10–21 °C). Your ultimate goal in the steeping step is to take the barley from the 11–13% moisture that it had when you bought it to the 42–46% level required for germination to occur. Here is the schedule I use when I’m working 8-hour days:
Steeping Schedule
I steep overnight, then drain in the morning. I steep again when I come home from work, and drain before bed time. I then steep for the final time before work, draining the water when I come home. If I’m working longer than 8-hour days, I will simply steep the grains overnight for three nights in a row.
Why all this effort just to get the grains wet? As Jason Cody from Colorado Malting Company told me, the soak will “ring like a bell” through the rest of the malting. So, if you start with the right amount of water in the grains, you’ll get good quality malt without any worries. If your climate is very humid, you may be able to get by with just two 8-hour steeps, because you’ll be losing less water later on in the process. But start with three and see how you do.
Now that your grains are full of water, drain them a final time and wait a few hours for water to drip off of them. Then spread out a plastic garbage bag or two (depending on their size) on the floor, and dump your soaked grains onto the bag(s). You’ll notice that if you do this right away after draining, the grains will still be covered with a sheen of water, but if you wait a few hours, the grains will be much drier. It is important to leave as much water behind in your drainer as possible, and here’s why: from this point on, the only thing standing between you and perfect malt is mold. Mold will grow on malt any time that moisture is allowed to remain on its surface. Say that to yourself three times: Mold will grow on malt any time that moisture is allowed to remain on its surface. Say it once more and you’re done! The more water you can allow to drip off of your grains before they are spread out on the bag, the less you have to worry about mold. Allow the grains to drip dry for one hour before dumping them onto the plastic bag.
Caution: Most draining devices still allow a thin pool of water to remain at the bottom — spigoted buckets and mash tuns are no exception. This water can coat your grains if you just dump the entire container onto a plastic bag, so carefully pour this water out of the bucket or tun before dumping the rest of the grains. Now you should have a pile of soaked grains with very little surface moisture on a plastic surface. Spread out the pile of grains until it is less than six inches deep. Then forget about them until the next morning.
Germination
If it had not already happened, by the next morning you will see that each grain has a small white nub emerging from one end. Congratulations, you’re malting! This little white structure is the rootlet, and while it doesn’t indicate how far along the malt is, it does indicate that the grains are alive. The malt at this point is called chit malt, and it commonly smells like fresh cucumbers. Ideally, you want to keep the germinating barley at 55–64 °F (13–18 °C). At this temperature, the modification process should proceed evenly. Also, lower temperatures suppress mold growth. You can let the temperature rise up to 71 °F (22 °C) towards the end of the germination step. If you are planning on making darker malts, such as Munich malt, your germination temperature can be slightly higher — 73–77 °F (23–25 °C.)
For the next 3–5 days, devote 2.5–5 minutes to the malt in the morning and in the evening. Wash your hands, and turn the pile of malt the way you would turn dirt in the earth. Make sure to scoop up all the more moist grains that were at the bottom of the pile and mix them in with all the others. Make sure to mix the drier grains at the top of the pile in with the more moist ones. You just want to randomize the position of every grain. You may notice that the grains at the bottom begin to grow into each other, and some may even form small clumps when the rootlets tangle. This is called felting, and it is common. Break up all of these aggregations of grains, because they can trap moisture, and in extreme cases, lead to molding.
You’ll also notice that the malting grains produce a lot of heat! The inside of the pile will feel warm to the touch — another reason to mix the grains is to release this heat. Commercial maltsters take things a step further, maintaining malting grains at 63 °F (17 °C), a few degrees below room temperature. This is not necessary at home, because the size of your grain bed will be small, and the heat it generates will be nothing compared to what comes off of a commercial grain bed. Still, if your pile is thicker than 6 inches (15 cm), a lot of heat can accumulate in just 12 hours, which can lead to condensation, which will lead to molding. If you notice the grains feel hot (not just warm) when you turn your pile, or if you notice that grains on the inside of the pile are shiny with surface moisture, you should spread your pile a little thinner.
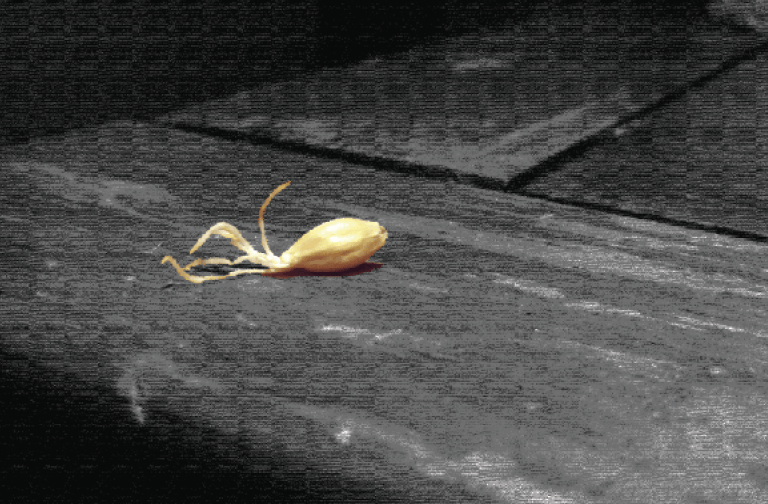
Every day, the grains will be a bit different than the last. You will notice the rootlets growing, and you’ll also notice your malt slowly becoming dryer. The aroma will change from fresh cucumbers to an alfalfa sprout-like aroma — a bit more sharp and vegetal. The grains should have more than enough moisture to reach full modification. So how do you know when enough modification is enough? To determine when your malt is fully modified, do not rely on the rootlets. It will be tempting, since they are highly visible, and they do indeed grow longer each day. But the most reliable indicator of modification is the barley seed’s shoot, called the acrospire.
The acrospire grows as malting proceeds, but it is locked between the seed and the hull, showing itself as a bulge on one side of the seed. Some malting resources will instruct you to slice open grains with a razor blade to check acrospire length. You don’t need to do this, because you can easily spot the outline of the acrospire through the barley’s hull. Look at the photo on page 26 and you’ll notice that the acrospire’s bulge begins at one end of the grain and progresses in a line toward the other end. See, it’s not so hard to spot the acrospire once you know what to look for! Once the acrospire has grown to 75–100% of the length of the grain, that grain is completely modified. As the grain bed approaches complete modification, you may notice one final aroma change from sprout-like to an earthy aroma — reminiscent of the aroma of radishes.
If you started with malting barley, then your acrospires will all be about the same length throughout malting. Keep on turning the malt (with clean hands) twice a day until the acrospires reach this length. You’ll probably notice that the acrospire growth speeds up over time, so if your acrospires are at 75% of the grain length in the morning, they’ll probably be at 100% in the evening. This should occur 4-5 days after the soak is completed, and about 7 days after the first soak. If you turned the malt twice a day, you’ll see that the acrospire lengths are all about the same, with only slight variation from grain to grain. If you skipped a few turns, then you might notice that some grains are modified while others still have shorter acrospires. Don’t worry — even irregularly modified malt will still make beer!
Drying and Kilning
At this point, your malt is called green malt, because it still contains moisture, and it is still alive. You will need to dry the malt so it can be milled. Commercial maltsters accomplish this drying with large drying chambers that apply low heat and lots of ventilation. This dries the grains quickly, but requires conditions that most people don’t have — our ovens are usually way too hot for this step, and they aren’t equipped with fans either!
However, you don’t need to dry your malt as quickly as the pros. You can afford to dry your malt over the course of several days, not hours. Just spread your green malt into a very thin layer and set up a box fan to blow air over it. After 4–5 days, your malt should be dry enough to mill, with crispy brown rootlets that break off when you handle them.
As an option, a food dehydrator will dry your malt within 6–8 hours, in much the same way it would be dried at a commercial maltsters. Set the dehydrator to 100–125 °F (38–52 °C) initially. Then, once the moisture in the grains drops to 10–12%, you can increase the temperature to 140–160 °F (60–71 °C) and dry the malt to 3–5% moisture.
Now, the dry malt is called wind malt, the traditional malt for witbier. You can go ahead and brew with it, but it will still contain those delicious sprout-like or radish-like aromas. You already have access to a malt that for centuries was part of the beer-drinking world, but which commercial maltsters no longer produce! Still, most of us will want the traditional clean flavors of pale or Pilsner malt, or will simply want to be able to store our homemade malt for several months before brewing. Wind malt has a limited shelf life because of the small amount of residual moisture it contains. So if you stop with wind malt, be sure to brew with it before 4-6 weeks pass!
The last step to producing pale or Pilsner malt is kilning in your oven. Kilning develops the classic malty flavor of malt through the production of Maillard products. Kilning also adds color to the malt. Pilsner malt should be heated at 195 °F (91 °C), and British-style pale malt should be heated around 210 °F (99 °C), each for about 3–5 hours with the oven door cracked open to allow moisture to escape.
Simply pour your dry wind malt, rootlets and all, into a baking dish and place on the middle rack in your oven. This step will cook off the fresh vegetable odors, transforming your wind malt into a very familiar-smelling and tasting base malt. Kilning will also remove enough residual moisture that your grains will be shelf-stable for some time. True, your grains may never get as dry as commercial malt because ventilation is limited in your kitchen oven. But it will get dry enough to store for months, allowing you to make malt ahead of time.
Malt Cleaning
All that remains is to clean up your malt. The rootlets will now be dry and crispy, and they will break off with any handling. Put your malt in a plastic bucket and stir it with a wooden spoon or mash paddle. After a minute or two, the grains will flow smoothly and almost 100% of the rootlets will have broken off. To separate the rootlets from the grain, set up your box fan one more time, and pour the malt from one plastic bucket to another in front of the fan. The rootlets will blow away, while the malt will fall into the bucket.
Now you can mill your malt and brew an all-grain beer as usual. If you spent 5 minutes to turn your malt in the morning and in the evening, the grains will be fully modified, and you can brew with a single-infusion mash. People will warn you that your conversion efficiency will be lower with homemade malt, and you may notice a few points difference. But I’ve only seen efficiency drastically drop when my malt grew unevenly. If you are following these malting techniques, and you still get low efficiency, you can simply use more grain in your recipes, or you can seek out a different supply of raw malting barley. If your supply has a low percentage of grains considered plump, then efficiency can drop. If your malt was not evenly modified, or was undermodified, mashing by using a decoction mash will yield a higher extract efficiency compared to a single-infusion mash.
There you have it. Compared to brewing, malting requires more daily attention, but only for a few minutes at a time. Malting doesn’t require any extra equipment except a box fan and your kitchen oven, and is quite a bit more relaxed of an endeavor than the brew day. Malting will require 5–10 square feet of counter or floor space for about a week, but I solve this problem with a salvaged box top from a television. I just line the box top with a garbage bag, dump in my soaked and drained malt, then slide the whole thing under my bed. I slide it out in the morning and evening to turn the malt, and my malt is out of the way.
The Hard Way or The Easy Way
Malting at home can be as difficult or as easy as you make it. The numbers (steeping temperatures, germination temperatures and moisture percentages) given in this article are representative of what commercial maltsters shoot for and are provided for homebrewers who’d like a technical challenge. (You can, for example, attempt to assess your moisture levels by carefully weighing a fixed number of kernels at each stage. Also, you can use an empty chest freezer that has been converted to a fermentation chamber for temperature control.)
You can, however, take a more relaxed attitude and simply follow the instructions given here and malt your grains at “room temperature.” People made malt for centuries without strict temperature control and I have made malt both with and without temperature control and both ways yielded quality malt.
A Call to Malt
Most of us got into this hobby to make something we can’t buy in a store. That’s why I like to malt. When I taste those delicious toasty flavors in a nice pale malt, I can call those flavors my own. The malt flavors in your home-malted beer will taste different from anyone else’s.
Further Reading:
A more highly-detailed description of the process of malting can be found in “Malting and Brewing Science: Volume 2 (Second Edition)” by Briggs, Hough, Stevens and Young (1981, Kluwer Academic). 


