Brewing Maple Beer at Home
Every spring, like many other fellow Canadians that live in Quebec province, I take a few days off of work to lend a hand to a friend at his sugar shack for the maple syrup season. Harvesting maple sap and boiling it 24 hours a day on a wood fire is an outstanding experience. Coming back home with gallons (liters) of sap water as well as maple syrup is also great reward for helping a friend. Not surprisingly, this is also the best time of the year to brew my own maple beer with the sap. It’s not an easy task to brew a maple beer since maple sap/syrup is fully fermentable by brewing yeast, which increases the challenge for the homebrewer, but it’s worth it. Here I will guide you through each step of the brewing process to get the best from the most delicious sugar found on earth.
What is Maple Syrup?
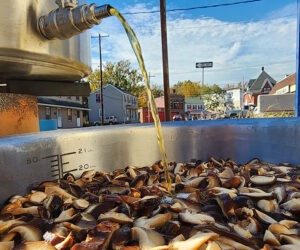
Let’s start with a quick overview of what maple syrup is and how it is made. At the very first day of spring, when the outside temperature is below freezing at night and above freezing in the daytime, sweet maple sap flows from the root of maple trees to the top of the tree to enhance its metabolism. A little notch cut into the tree is enough to collect the sap, which is transferred to the sugar shack either by collecting buckets or through a network of tubing. The sap is then brought to a boil in order to concentrate its sugar content into syrup. The sap is made of water and around 2% sugar (~2 °Brix/1.008 SG), mainly sucrose. About 40 liters (10.5 gal.) of sap is needed to yield 1 L (0.26 gal.) of syrup. To convert a low sucrose solution into syrup requires tremendous boiling time as well as energy. The use of reverse osmosis (RO) is then perfectly suited to help decrease both the time and energy consumption. It can theoretically decrease the water volume that needs to be boiled by 80%. The resulting water has a sugar content that can vary from 8 to 20 °Brix (1.032–1.083 SG). Once the boiling process is complete, the result is a syrup of about 66–67.5 °Brix (1.329–1.342 SG), which is called maple syrup. Its color and flavor comes from the caramelization and Maillard reaction that happen during the boiling process.
According to Agriculture and Agri-Food Canada, there are more than 200 volatile molecules that contribute to maple flavor, such as vanilla, caramel, candy, coffee and wood. You can get a good overview of each flavor found in maple products by downloading the Flavor Wheel at http://www.agr.gc.ca/maple_wheel. From all these molecules, the one that is mainly responsible for the characteristic smell of maple syrup is the maple furanone. On the other hand, the woodsy flavor mainly comes from molecules of the pyrazine family.

While still waiting for a better and unified classification method of maple syrup, the actual standards only rely on the color. The names for the categories were up until recently not uniform and can be pretty confusing. They differ among countries and even states/provinces, and it would be even more confusing trying to explain it here. Use Wikipedia to get a better idea of these classifications: (http://en.wikipedia.org/wiki/Maple_syrup).
Designing Your Recipe
It is important to brew a style that will focus on the malt flavor instead of the hops since you want to emphasize the sweet flavor of the maple sugar. Aim for a low to medium OG (1.030–1.040 before your syrup addition), since any sap or syrup addition will quickly increase the gravity and ABV. Perform only one hop addition at the beginning of the boil using a mild and pleasant hop with low alpha acid targeting a maximum IBU/OG ratio of 0.35 (before syrup addition). I also recommend using a yeast strain with low attenuation and high flocculation. Aim for a deep red to brown color to mimic the maple syrup color.
Brewing Water
I suggest replacing your brewing water with regular maple sap. This can be obtained directly from the producer or if you have a maple tree, you can try to harvest some sap yourself from the old fashioned way using a spigot and a bucket. The gravity value of regular sap can range between 1.003 to 1.007. Also, RO sap can be obtained directly from the producer but be aware that the sugar concentration can vary widely. I recommend using regular sap for your first try since RO water sugar content is much higher and will make the resulting beer unpredictable. One thing to know about fresh sap is that it could start fermenting by itself in just a few days, so keep it frozen until usage. A regular 60-minute boil will be just fine to get rid of any native yeast and microorganisms that might be present.
Mashing
For all-grain brewers, if you plan to mash with sap water, it is a good thing to know the chemistry of the batch of sap you plan to use for brewing. Some brewers suggest that you should not modify the ion content of your sap since the purpose of brewing with sap is to use it as it is, but I believe it is a good practice to get the most of your mash. I suggest adding about 0.15 g per gallon of brewing water (and not the batch size) of both Epsom salt (MgSO4) and calcium chloride (CaCl2) in order to achieve the minimum level of calcium and magnesium required for enzymatic activity of the mash as well as for the yeast metabolic functions. This won’t directly improve the maple taste of your beer, but will help achieve a better beer. If you are using RO sap, you don’t have to add any brewing salt since the ion concentration is expected to be sufficient. Don’t worry about the pH of the mash since any addition of crystal and roasted malt will decrease the pH value into the right range. Keep in mind that any addition of maple sap (and syrup, later in the process) will dry the beer. To counterbalance this dryness and increase the mouthfeel of your beer, mash around 160 °F (71 °C) for 40–45 minutes and add at least 5% of dextrin malt to the grain bill. These two actions should be enough to compensate the dryness that will be caused by the fermentation of sap (and syrup, see further). When the mash is completed, perform a no sparge technique and slowly drain all the mash liquor straight to the boil kettle. This will prevent the dilution of the subtle maple flavor added by the use of sap. If you usually use a fly sparge technique, expect a lower mash efficiency of about 10%. See Figure 1 below.
Boil
Although maple syrup is obtained by boiling sap, you shouldn’t add maple syrup at the boiling step. Maple syrup flavor is made of subtle volatile molecules and the boiling process will get rid of it. Perform a gentle boiling to minimize this effect on your wort since it is made from sap. At this step, if you are extract brewing, add maltodextrine to the boil to increase the dextrinous content of your beer. Add about 0.5 lb. (0.23 kg) per 5 gallons (19 L) to fix the dryness caused by using the regular maple sap and syrup (read on). I also recommend adding a yeast nutrient that contains zinc to your wort at the end of the boil as the zinc content of maple sap is not optimal for fermentation.
Fermentation
While some brewers may suggest adding more than 20% of maple syrup for fermentation, no matter how much maple syrup you add, it will almost all convert into alcohol by fresh and active yeast, not to mention that it could also become very expensive. I rather recommend that once the primary fermentation is completed, that you rack your beer into a secondary container (to get rid of most of the yeast) and then add the maple syrup. In Canada, maple syrup is commonly packaged in 540 mL cans (18.3 oz), so I start by adding one can at this stage and let the secondary fermentation start. This increases the alcohol content of the beer by 1.5%. At this point, there is still some yeast remaining in the solution, but they are not as effective at fermenting the sugar as they were at primary fermentation so there will be some residual sugars after fermentation. Some brewers suggest pre boiling the maple syrup in order to decrease its fermentability, but from my experiments, that doesn’t affect the syrup fermentability at all, so I’d avoid this technique. Also, it is important to maintain a low fermentation temperature of 63 °F (17 °C) and keep the fermentation slow and steady to prevent escaping carbon dioxide from scrubbing away the volatile maple compounds. Always remember to take gravity reading at each step of the syrup addition process.
Bottling
Even though maple syrup is fully fermentable, I recommend using it as your priming sugar because it is another way to add extra maple flavor. This extra flavor will be trapped inside the bottle. Do not add a new yeast culture because there is a high probability that this fresh and active yeast will start to ferment the remaining sugar left by the secondary fermentation. The quantity of maple syrup to add to your bottling bucket is calculated by comparing it to dextrose (corn sugar) quantity you will normally use. The formula to convert dextrose to maple syrup is based on either the solid content of the sugar or its PPG (points/pounds/gallon) value. The equation is: (dextrose weight X dextrose solids content) ÷ (maple solids content) = (maple syrup weight) to add as priming sugar. If you want to use the PPG value, simply convert it with the solid content value. Since maple syrup content varies through harvest season and from regions, a good rule of thumb is to multiply your dextrose weight by 1.44 to get a good average of the maple syrup weight to use. If you prefer measuring your maple syrup by volume, you can convert it by using the density of the syrup which is 1.326 g/mL at 77 °F (25 °C). Simply divide your maple syrup weight (in g) by the density value and you’ll get the volume to measure (in mL). For example, a 5-gallon (19-L) batch with a carbonation level of 2.5 volumes of CO2, it will be about 180 g of maple syrup or 136 mL. See Figure 2 below.
Kegging
Not every homebrewer has the opportunity to own kegging equipment, but if you do, you’ll be pleased to learn that you can avoid all the hard work of the non-kegging homebrewer. The main problem with maple syrup, as stated before, is that it is 100% fermentable sugar. But when kegging, you can solve this problem. First, at the end of the fermentation, you’ll have to precipitate a good portion of the remaining yeast in suspension by adding unflavored gelatin. Simply add 1⁄2 to 1 tsp. of unflavored gelatin into 1⁄4 to 1⁄2 cup of water, heat it up in your microwave using 5–10 second bursts until it fully dissolves (144–151 °F/62–66 °C). Stir the solution between each burst. Pour the gelatin on the top of your beer and cold crash to 39 °F (4 °C) for a few days. You’ll notice a big layer of yeast at the bottom of your fermenter. Then, rack your beer into your keg leaving behind as much trub as you can. Once completed, your beer may look clear but there is still residual yeast present. You’ll have to inactivate those leftover cells by adding 2.5 tsp. of potassium sorbate per 5 gallons (19 L) of beer. This will prevent the yeast from multiplying and further fermenting the maple syrup that you add to the keg. For example, I add a quarter of a can (4.6 oz./135 mL) of maple syrup straight to the keg, mix, and then force carbonate as usual. This will be almost equivalent to the maple taste you would reach with the non-kegging technique. Adjust the taste of maple in the beer by adding more syrup, which is up to you at this point. When kegging, you can easily try recipes such as Scotch ale and imperial stout, which will blend well with maple flavor.
Final adjustment
If you didn’t reach the maple taste you were aiming for, there is still some maple flavor extract that can be added to boost the maple flavor of your beer. It is usually found in a very small bottle (1.5 oz./43 mL). You can add a few drops (maximum of 1 tsp per 5 gallons/19 L) to adjust the taste either in your bottling bucket, your keg or even in the glass at pouring. At this point, it is up to you to do the adjustments that fit your needs but do not abuse it.
Another way to do some final adjustment is to add oak flavor. The similarities of the high temperature treatment applied to an oak barrel and the boiling of maple sap results in a long list of similar flavor compounds. American oak is the variety that exhibits the most similarity with maple flavor. If you plan on aging your beer for one to two weeks, there might not be enough yeast to carbonate your beer. Instead, create an oak tea. Use at least 40 g (~1.5 oz.) of American oak chips for a 5-gallon (19-L) batch. Mix the chips with enough water to cover them and boil for 10 minutes. Then add the tea to your bottling bucket. When using oak tea, you can easily control the level of oak flavor so you can use as much as you wish.
Tap and Brew
The key to success for brewing a good maple beer is to take care with your procedure and take your time for each of the brewing steps. Take lots of notes and write down what worked and didn’t work so that you can brew it again next spring (you probably won’t remember what you did after a year has passed!) For further experimentation, try using unfiltered syrup straight from a producer’s pan. It is full of tannins, wood particles, and sugar crystals. This could add a lot of flavor to the beer!

Maple Beer
(5 gallons/19 L, all-grain)
OG = 1.041 FG = 1.010
IBU = 13 SRM = 16 ABV = 5.1%
The original gravity is calculated based on the estimated OG on brew day. The ABV is calculated based on the beer after the maple syrup addition. This volume of maple syrup will add ~8 gravity points to 5 gallons (19 L). The all-grain version of this beer is designed to be a no-sparge brew. If you feel like substituting in a sparge step, be sure to acidify any sap as you would reverse osmosis sparge water.
Ingredients
6.5 lbs. (2.95 kg) North American two-row malt
1 lb. (0.45 kg) crystal malt (80 °L)
0.5 lb. (0.23 kg) Maltodextrine
1 oz. (28 g) chocolate malt (500 °L)
7.2 gallons (27.3 L) maple sap (gravity of 1.005)
18.3 oz. (540 mL) maple syrup (darkest grade)
3.4 AAU Willamette hops (60 min.) (0.7 oz./20 g at 4.8% alpha acids)
1.1 g calcium chloride
1.1 g Epsom salt
1⁄2 tsp. yeast nutrient
1 Whirlfloc® tablet
1.5 oz. (40 g) American oak chips
Wyeast 1968 (London ESB) or White Labs WLP002 (English Ale) yeast
2⁄3 cup maple syrup (if priming)
Step by step
Mill the grains and dough-in with all the sap water targeting a mash temperature of 160 °F (71 °C). The brewing salt must be added to the sap prior to mash. Hold the mash at 160 °F (71 °C) for 40 minutes. Raise the temperature to mash out at 171 °F (77 °C). Slowly drain all the liquor to the boil kettle until the pre-boil volume is around 6.6 gallons (25.1 L) and a gravity of about 1.034. The total wort boil time is 60 minutes. Add hops according to the ingredients schedule. Add Whirlfloc® and yeast nutrient with 10 minutes left in the boil.
While the boil is taking place, use your oak chips to make a “tea.” Do this by placing the chips in a small sauce pan and filling it with just enough water to cover the chips. Boil 10 minutes, remove from heat, cover the pot, and reserve.
At the end of the boil, turn off the heat. There should be about 5.5 gallons (21 L) of wort in your kettle. Chill the wort to 63 °F (17 °C), pitch the yeast and ferment at the same temperature until completion. Rack to a secondary fermenter and add the maple syrup. Wait for the end of the secondary fermentation. Target a carbonation level of 2.5 volumes using maple syrup as priming sugar. Add your oak tea at bottling. As an optional step, add a few drops of maple extract for the final adjustment.
Maple Beer
(5 gallons/19 L, extract with grains)
OG = 1.041 FG = 1.010
IBU = 13 SRM = 16 ABV = 5.1%
The original gravity is calculated based on the estimated OG on brew day. The ABV is calculated based on the beer after the maple syrup addition. This volume of maple syrup will add ~8 gravity points to 5 gallons (19 L).
Ingredients
3.5 lbs. (1.6 kg) extra light dried malt extract
1 lb. (0.45 kg) crystal malt (80 °L)
0.5 lb. (0.23 kg) Maltodextrine
1 oz. (28 g) chocolate malt (500 °L)
6.6 gallons (25.1 L) maple sap (gravity of 1.005)
18.3 oz. (540 mL) maple syrup (darkest grade)
3.4 AAU Willamette hops (60 min.) (0.7 oz./20 g at 4.8% alpha acids)
1⁄2 tsp. yeast nutrient
1 Whirlfloc® tablet
1.5 oz. (40 g) American oak chips
Wyeast 1968 (London ESB) or White Labs WLP002 (English Ale) yeast
2⁄3 cup maple syrup (if priming)
Step by step
Heat the maple sap to about 160 °F (71 °C). Add the crushed grains in a muslin bag. Steep the grain for 20–30 minutes in the sap, then remove and allow the grains to drip back into the pot. Add the dried malt extract and bring to a boil. The pre-boil wort volume should be around 6.6 gallons (25.1 L) and a gravity of 1.034.
The total boil time is 60 minutes. Add hops according to the ingredients schedule. Add Whirlfloc® and yeast nutrient with 10 minutes left in the boil.
While the boil is taking place, use your oak chips to make a “tea.” Do this by placing the chips in a small sauce pan and filling it with just enough water to cover the chips. Boil 10 minutes, remove from heat, cover the pot, and reserve.
At the end of the boil there should be about 5.5 gallons (21 L) of wort in your kettle. Chill the wort to 63 °F (17 °C), pitch the yeast and ferment at the same temperature until completion.
The remainder of this recipe is the same as the all-grain version above.