Adjusting Homebrew After Fermentation
Brewers often commit that five-step sequence to muscle memory. After all, a strict routine is vital in maintaining a high level of control over the countless variables affecting the beermaking process and is essential for maintaining consistency.
But small-batch brewing is fundamentally imperfect. No matter how strict the regimen, how fancy the controls, or how shiny the stainless, striving for complete control on the homebrew scale is a waste of energy. We will occasionally miss our target. Luckily, homebrewing is also fundamentally flexible, and not held to the same strict rules that governs commercial beer. By adjusting our homemade beer before packaging and serving, we can right the course towards our intended target or chart a new course altogether.
Definitions and Background
Post-fermentation adjustments are modest changes in the overall impression of a beer that are made at some time after fermentation is complete, normally by way of ingredient addition in relatively small quantity. I like to think of adjustments as the final seasoning, similar to a chef adjusting spice, salinity, or acidity of a dish before service. These adjustments seek to accentuate, complement, or balance the beer’s finished flavor profile.

Effectively applying post-fermentation adjustment techniques to your homebrew requires a left brain/right brain mindset, which was not an easy adjustment for me (aren’t beer puns awesome?). I am a process engineer by degree, and so I am trained to approach all things analytically. I have always taken pride in brewing technically sound beers, even if they were a little boring. My left brain game is strong, as the kids say. As I progressed in the homebrewing hobby, my right brain yearned for involvement. I knew I needed to allow my creative side some input. I needed to find my personal brewing style without losing control of the process.
Rather than fiddle with the major process of brewing, I used post-fermentation experiments to exercise my weak artistic muscles while maintaining relative control. After several experiments, successes, failures, and learnings, I still lean heavily towards the meticulous, but my laissez-faire, free-spirited right brain has a little more room to breathe, create, and bring inventive balance to my beer.
Adjustment Techniques
Adjustment possibilities are endless. For the sake of this discussion on post-fermentation “fixes,” let’s group adjustments based on the issue we are attempting to resolve.
Adjusting for Recipe Issues
It’s difficult to hit your target flavor profile when trying out a new recipe or process. However, you can use post-fermentation adjustments to guide your up-front adjustments on the next batch.
Try adjusting the water profile by adding salts to the keg. Water profile can have a significant influence on a beer’s finished flavor profile. Many brewers adjust their water on brew day, but adjustments in mineral content and pH can also be made in the cellar. When experimenting with a new beer style or recipe, I will brew with a relatively neutral water profile. During conditioning, I will dose samples of the beer with a saturated solution of gypsum or calcium chloride and observe the effects. If the beer improves with either solution, I will dose the full volume directly in the keg.
Adjusting bitterness and astringency can be difficult with simple ingredient additions. Adding water salts (as we just discussed) can certainly modify the perception of bitterness, but it may also detract from the beer’s overall flavor profile. Small-scale tests (which we will discuss) are critical to gauge the overall effect.
Cold conditioning and fining are my preferred methods for reducing excessive bitterness and astringency. Proper cellaring allows several sources of perceived bitterness (suspended yeast, hop particles, roast malt fines, etc.) to drop out of solution.
When I presented on this topic at the National Homebrewers Conference in 2015 in San Diego, California, I received feedback from several homebrewers who have actually added bitterness post-fermentation with hop extract. Though I imagine more practical methods exist, I can’t help but marvel at the ingenuity of these hop-head brewers.
Adjusting for Balance Issues
Whether I am evaluating my own beer, judging homebrew, or casually drinking with friends, truly memorable beers are always a product of flawless execution and proper balance. Balance is an important factor in making beer, however “balance” is also an overused buzzword in the beer industry. Marketers are experts in watering down important brewing concepts to a single word or catchphrase. They chant and parade a term until its meaning is lost to the beer drinking public, then it is banished to wayward pop-culture purgatory (See also: “Drinkability”).
For our purposes, we will define the word balance as an alignment of aroma and flavor components. A beer is balanced when its components align to promote the brewer’s intended drinking experience.
If there is a point to this very abstract definition, it is that a well-balanced beer is largely dependent on the expectation of the drinker. The perfect balance of a double IPA is worlds apart from that of a coffee stout. The IPA’s flavor profile leans heavily towards hop flavor and aroma with just enough malt flavor and fermentation character to recognize it as beer. The coffee stout offsets sweetness with bitterness and harmonizes the coffee, chocolaty and roasty notes. If we attempted to balance one like the other, we would end up with a beer unrecognizable as the intended style.
Post-fermentation adjustments can be used to hone the balance of a beer, tweaking the perception of sweetness, acidity, body, mouthfeel, bitterness, or even the overall intensity to suit taste or target. Here are a few examples:
Adjusting carbonation may sound trivial, but carbonation can significantly affect balance by intensifying or dampening certain flavor components. Increasing carbonation reduces the perception of body and sweetness, intensifies bitterness and alcohol warmth, carries aroma, and promotes a dryer finish. Decreasing carbonation can allow flavors to linger on the palate and reduce the perception of a thin body.
Adequate control over carbonation level can be used as a tool to dial in your beer and fix balance issues. Just as well, poor control over carbonation can cause a beer to tip out of balance. Many of these minor balance issues start and end with the proper amount of bubbles.
Next is adjusting sweetness. For mead and cidermakers, balancing the perception of sweetness is probably second nature. I use several mead and cider techniques to adjust the perception of sweetness in my homebrews. Back-sweetening is a prime example. Back-sweetening can help balance an overly-attenuated or dry beer. Small-scale tests are important to verify the overall effect of the sweetener, which may include a diluted solution of honey, maple syrup, Belgian candi syrup, lactose, unrefined sugars, or even simple sugar. More creative possibilities include marshmallow cream, homemade caramel, and sweet liqueurs. Back-sweetened meads and ciders are often stabilized with sulfites to inhibit refermentation. Stabilizing your beer is an option if you are not bottle conditioning. I prefer to simply outpace the residual yeast by storing cold and drinking the keg relatively quickly.
Finally, try adjusting for acidity. Acidity is often overlooked as a balance component in beers fermented solely with Saccharomyces. In reality, all beer is acidic, and the level of acidity plays a significant role in flavor perception.
A relatively high pH in the finished beer promotes a more coarse, and generally less-favorable, perception of bitterness. Increasing acidity can highlight fruity flavors and aromas from both actual fruit and yeast esters. Similar to a squeeze of lemon over a fruit salad, a splash of acid helps the fruity flavors to pop.
A straightforward method of increasing acidity is adding food-grade acid directly to the beer. Several types of acid are available to brewers.
• Phosphoric acid is flavor-neutral and effective at adjusting the pH of mash or finished beer, but it is hazardous and should be handled with proper skin cover (safety gloves and goggles at a minimum).
• Lactic acid is much less hazardous and effective at adjusting mash pH, but it can add undesirable flavors to finished beer.
• Citric, malic, and tartaric acids are primarily used in wine, cider, and meadmaking. Because they are derived from fruit (normally grapes), they are most effective in fruit beer. I prefer to use acid blend, a blend of all three acids.
In fruit beers, the fruit itself also contributes acidity. Both the type and ripeness of fruit can be selected to adjust acidity. Examples include blending sweet and sour cherries, over-ripe and under-ripe berries, or using a mix of fresh and frozen fruit.
Reducing acidity can be a bit tricky. Back sweetening is an option that can add both balance and depth (Berliner weisse is a traditional example). I have also back-sweetened a keg of overly-sour Flanders red.
Neutralizing acid with a strong base is a meadmaking technique, though perhaps relatively uncommon in homebrewing. I have never attempted it myself, but if I did I would be pretty concerned about lack of control and unintended flavor changes.
Body and mouthfeel are best adjusted with carbonation. Tannin is a common body-builder in wine and mead. Adding oak cubes or liquid tannin can enhance the perception of body in very specific ways that can be desirable in beer. Spiking samples with liquid tannin will help gauge its overall effect. Be careful, however, with these tannin experiments: A little bit of liquid tannin goes a long way!
Adjusting Overall Intensity
A less useful adjustment and more fun experiment, blending beer with water can create a completely new drinking experience. Both examples I’ll share here were discussed on past Brewing Network podcasts (www.thebrewingnetwork.com).
• During California’s beer festival season, Mike “Tasty” McDole totes his homebrew to several local fests, often depleting his supply for golf and casual drinking. To boost his homebrew output, Tasty brews a strong Pilsner and blends with chlorine-free, deaerated, carbonated water. Blending in kegs allows him to customize the beer strength and intended audience.
• Jamil Zainasheff, homebrew author, BYO contributor, and owner/founder of Heretic Brewing Company in Fairfield, California dilutes two of his regular offerings to create more sessionable options appropriate for the long workdays (and nights) required of a brewery owner. He tempers Shallow Grave Robust Porter with cold, uncarbonated water to create a dark English mild. He blends his West Coast Double IPA (Evil Cousin) with cold, carbonated water to create “Half Cousin.”
Adjustment Preparation and Execution
Critical evaluation is . . . critical. Tasting and evaluating is a vital part of making great beer. This is especially true for post-fermentation adjustments, which are most effective when guided by taste. Take the time to evaluate every sample in a quiet, distraction-free environment (which can be tough for parents). Take detailed notes on how the beer looks/smells/tastes and how it compares to your intended target.
Critical, objective feedback from others can be incredibly helpful. It can be a challenge to accurately evaluate your own beer. Even if the beer has no off-flavors, it can be difficult to determine why a beer tastes differently than expected. Tasting and discussing your beer with other homebrewers can help bring flavor balance issues into focus. These outside opinions are not affected by the power of suggestion. Firsthand knowledge of the process and recipe can conjure a false perception of an anticipated flavor: “This beer tastes sweet because the finishing gravity was higher than expected,” or “This beer smells like orange peel because I added orange peel.”
A skilled brewer’s greatest tool is a finely-tuned palate. Your palate’s ability to conceptualize a desired flavor profile and evaluate adjustment options is acquired through thoughtful, repetitive tasting. Any homebrewer can learn to effectively evaluate beer and form opinions about desired flavor profiles. Brewing, drinking, and talking about beer with like-minded friends is not just fun — it is also good practice!
Set (Or Reset) Your Goal
The first step in the adjustment process is setting a goal for your beer’s finished flavor profile. Are you targeting a BJCP Gold Medal or your ideal house beer? Are you trying to impress your beer geek buddies or your potential father-in-law? Knowing where you are going with your beer is the best way to get there.
Don’t Overdo It!
There is no greater disappointment in the homebrewing hobby than ruining a batch. Though adjustments can help you consistently hit your target, it is all too easy to over-adjust and create an issue that cannot be undone.
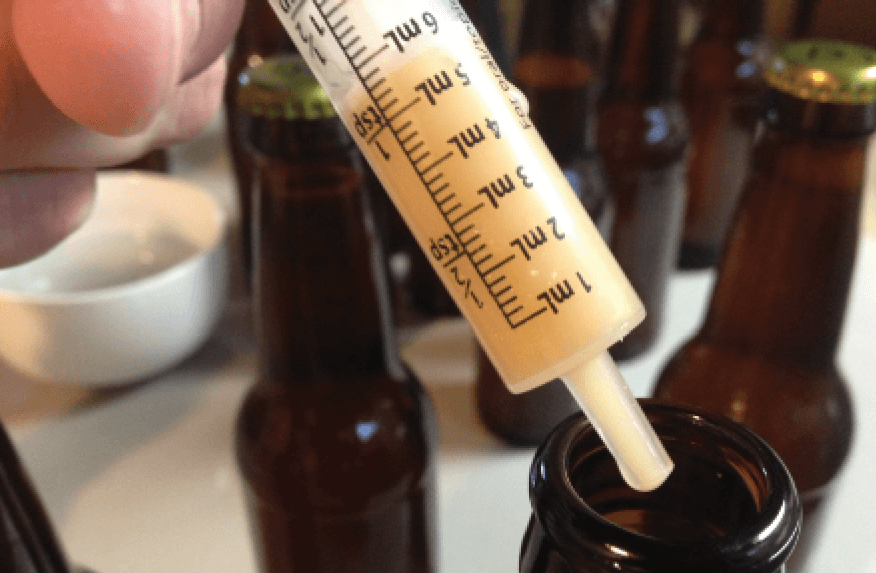
Start with small-scale tests, especially if you are trying a new adjustment or relatively potent ingredient. Make test adjustments using a hydrometer or keg sample. I like to use graduated cylinders and disposable pipettes to get a rough idea of the adjustment amount before dosing the full batch volume (winemakers call this technique “bench trials”).
If your full batch volume is relatively small (less than 2 gallons/7.6 L), you may not have the luxury of pulling multiple samples for tasting, evaluation, and tests. If you routinely make small batches of beer (or mead, cider, wine, etc.), consider purchasing a set of reusable glass pipettes. The glass pipette serves as a mini-wine/beer thief, allowing a small-batch brewer to customize his or her sample size. They can also be used to accurately measure the small amount of adjustment ingredient.
Use tinctures for precise control of adjustments. If your adjustment ingredient happens to be a solid instead of a liquid (spices, chocolate, hops, chili peppers, oak, etc.), introducing them directly into the beer poses some additional challenges and creates additional variables. What is the right contact time? What form of the ingredient should I use? Should I mill, crack, or otherwise break down the ingredient to gain surface area?
All of these variables affect the amount of flavor extraction from the ingredient into the beer. Consider the dogma of dry hopping: Every brewery has their own technique for extracting the right amount of hop flavor and aroma, usually built on a foundation of experience. Rather than attempt to acquire a similar level of experience for every solid ingredient you may add to finished beer, why not attempt to control the extraction as a separate process altogether?
A tincture is a homemade extract that is either alcohol or water-based. Extracting the flavor components into a liquid medium gives you the ability to add flavor to your beer in a controlled, accurate, and repeatable manner. It also saves you the hassle of removing the spent solids from the beer when extraction is complete. Using alcohol or hot water offers a level of protection against microbial contamination from the ingredient.
Tinctures can be used to accentuate or increase the amount of a certain flavor in the finished beer. Here are a few options:
• Independently adjust the heat and flavor of your chile beer. Make two separate chile tinctures: One with deseeded and destemmed chiles, and another with only the seeds and ribs. Note: Use the heat tincture with extreme caution. Be sure to wear gloves and safety glasses.
• Adjust the spice profile of a witbier or pumpkin ale. When I make pumpkin ale, I draw off a few gallons of finished beer into a separate keg and dose to taste with spice tinctures. Not only do I save the hassle of making a separate batch, I can blend in the base beer if I overdo it (or just drink the base beer when I’m tired of the pumpkin beer).
• Accentuate chocolate flavor in a porter or stout with a small amount of homemade vanilla extract. Bakers often add sub-threshold amounts of vanilla, coffee, or salt to enhance the chocolaty flavors in cakes and brownies. This same technique can add depth and highlight chocolate and coffee notes. The advantage of this technique is leftovers! Use the rest of the extract for baking cookies or making vanilla porter!
A wealth of information, instructions, and ideas on tincture-making can be found in Denny Conn and Drew Beechum’s book Experimental Homebrewing: Mad Science in the Pursuit of Great Beer.
Minimize Exposure to Oxygen, Microbes, Oil
Every ingredient addition increases the risk of oxygen pickup, infection, or decrease in foam stability. Kegs offer the best protection against exposure for several reasons:
• The risk of oxygen pickup and infection is significantly reduced during sampling, when adding ingredients, and during transfers.
• Sampling requires minimal effort or additional cleaning.
• Carbonation can be adjusted.
• Batch volume can be measured by weight.
• The adjusted beer can be served almost immediately.
Wear gloves! When handling ingredients bound for finished beer, gloves are essential for minimizing infection and foam inhibition. Oil, sweat, and dead skin cells on your hands and under your fingernails can transfer wild yeast and decrease head retention. Simply washing/sanitizing your hands does not stop your skin’s life cycle. Maybe this is just a pet peeve of mine, but here is some food for thought: Would you dip your bare hand in the keg or bottling bucket?
Bad Beer Should Be Dumped, Not Adjusted
The techniques described above are not a fix for poorly made beer. Beers with noticeable off-flavors from poor brewing practices, stressed or incomplete fermentation, oxidation, infection, or poor ingredient quality cannot be remedied or covered up.
Resist the temptation to serve poor-quality beer to others. Be they a few thirsty friends at a Sunday barbeque, or undiscerning palates at a beer festival, knowingly serving beer below your standards reflects poorly on you, your homebrew club, and the hobby. Take pride in the beer you serve to others. Take pride (and education) in dumping batches that don’t measure up.
Get adjusting!
Give your right brain some exercise! The options for post-fermentation adjustments are endless, so don’t be constrained to my examples. Try a few small-scale tests in the glass and hone your tasting and evaluation skills. It takes a little bit of practice, but in this case — practice is fun!

Making Mineral Solutions
I keep concentrated solutions of gypsum and calcium chloride in eye-dropper bottles for spiking samples. If you’re willing to do a little creative math, you can approximate the adjusted water profile to use on the next brew day. This is a great learning exercise for homebrew clubs, sensory panels, or BJCP study groups.
To make the solution, dissolve 1 gram into 500 mL of distilled water at 90–100 °F (32–38 °C) for a 2100 ppm concentration. Gypsum solubility decreases at high temperatures, so don’t use hot or boiling water. Calcium chloride is significantly more soluble than gypsum, but keeping solutions with equal concentrations helps gauge the relative effect when comparing side-by-side.
Practical Example of Small-Scale Adjustment Tests
I was lucky enough to attend a St. Louis Beer Week event where Cory King, the barrel program director at Perennial Artisan Ales, led an interactive class on small-scale adjustment tests. He described how the brewery selects the type and amount of coffee to blend with their big, barrel-aged stout to create Sump, an annual collaboration with a local coffee company. Here is the process I have adapted from that awesome experience:
First, get a rough idea of upper and lower bound: from “just noticeable” to “too much”. Using a graduated pipette, spike a sample with small amounts of the ingredient (cold-brewed coffee, in this case). Find a minimum threshold, where the ingredient just starts to noticeably affect the beer. Continue dosing until the flavor of the ingredient is slightly more pronounced than desired. Note the amount of ingredient required to reach the upper and lower bound, as well as any unexpected changes to the beer (changes in body or mouthfeel, flavor clashes, changes in color or clarity, etc).
Scale the upper and lower bound amounts from the sample size to the full batch volume. Begin making conservative additions to the full volume with these relative amounts in mind. Starting between the lower and upper bound, make small adjustments to the large batch, mimicking the process to reach the upper bound in the sample.


