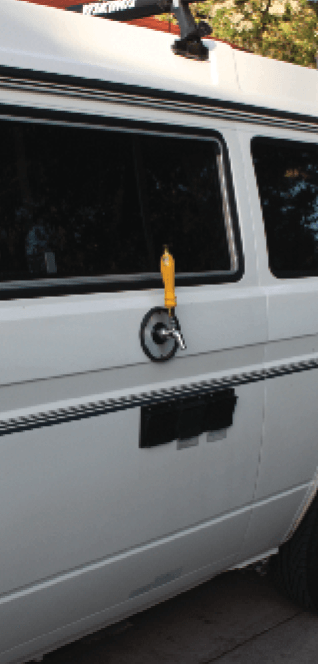
Put Taps on your Truck
There’s nothing quite like pulling into your campsite and pouring a nice cold draft homebrew before you’ve even pitched your tent. It certainly helps foster domestic tranquility and makes you the envy of your fellow campers. In fact the only downside I’ve found is that it can be hard to get any camp setup done as people begin to flock and ask questions.
Just about any vehicle is suitable for adding a mobile draft system, but you’ll want to consider how much to risk your resale value. I’ve made this upgrade to a full-size truck with a contractor body as well as to my current weekend toy, a 1988 Volkswagen Vanagon Westfalia camper (see photo). When I sold the truck it wasn’t an issue as I simply used some bolts and washers to seal the holes on the back. For the Westy I strategically placed the shank hole behind a vent cover so it’s out of sight. If you plan to keep the vehicle indefinitely, however, you can modify at will!
Faucet Location
The single most important decision to make when modifying your vehicle is where you want to locate the faucets. An ideal location will be a perfectly flat surface with access to ample storage space inside the vehicle, and where drips from the faucets won’t make too much of a mess.
Some good options include:
• Straight through the tailgate for pickup trucks and Jeeps, though consider how drips might hit the bumper
• Take over one of the entire rear tool boxes on a contractor body pickup truck
• Through the rear quarter panel on vans or SUVs
Whatever you decide, make sure you’re going to be able to drill a hole through the body and have adequate access to install the shank on the inside. You’re not going to get multiple chances so make sure to plan adequately and double check that your desired location will work.
Beer Storage
Once you’ve chosen where your faucets will go you’ll want to think about how you’re going to keep your beer cold on the go. You’ve got a few options.
Insulated Section
In some cases you might have a box of some sort that’s part of the vehicle. This was how my first installation worked as I was able to lay claim to an entire rear tool cabinet in the contractor body on my pickup truck. Other specialty vehicles may have similar spaces that can be used.
If you are lucky enough to dedicate a space like this for your keg what you need to consider is how you’ll keep the beer cold and how you’ll deal with the inevitable moisture. I have had good luck with using a spray adhesive and carefully cut pieces of reflective bubble wrap insulation. Expanding spray foam might work as well but you’ll want to make sure whatever you use for a lining won’t get waterlogged or trap any moisture against the vehicle’s metalwork.
The most likely way you’ll be cooling the beer is with bags of ice or ice packs of some sort. As these melt, or just through condensation, you’ll quickly find that you’re dealing with a lot of moisture. You need to make sure there’s a good way for that moisture to either be safely contained for your trip or that there is a way for it to drain out.
Cooler/Insulated Container
A good flexible approach that works for any vehicle is to put your keg into a cooler or a custom insulated container. This works especially well with smaller kegs, such as 2.5 gallons (9.5 L), which easily fit into larger coolers.
If space is at a premium you can build your own cooler with some foam and a 5-gallon (19-L) bucket. I was able to find a styrofoam liner for a 5-gallon (19-L) bucket at a big box home improvement store and just needed to carve away a little bit to make everything fit.
Jockey Box
Of course a tried and true approach is to allow the keg to be closer to room temperature and then use a jockey box to cool the beer on its way to the faucets.
Build
I’ve provided several options for keeping the beer cool, but I’ll walk you through how I built out my chosen path on my Westy.
You’ll need the following parts:
• Shank just long enough to go through bulkhead
• Faucet
• Tailpiece and nut
• Beer line
• Beer quick disconnect
You’ll need the following tools:
• 1-inch drill bit for cutting bulkhead hole for shank. Either a hole saw or quality step drill bit will work
• Automatic center punch for marking the hole location and preventing the bit from walking
• Adjustable wrenches for tightening up the shank nuts
• Faucet wrench for tightening faucet to the shank
Start by marking the location where you want to drill the shank hole with a permanent marker. Use the automatic center punch to create a divot that will guide the drill bit so it doesn’t wander. Drill the hole carefully and then install the shank. It’s honestly as simple as that.
The rest of the build is just like any other keg installation. Install a tailpiece on the inside of the shank and attach beer line and a beer quick disconnect. Attach the faucet to the outside of the shank and snug it up with the faucet wrench.
Those are the only modifications to the vehicle. The keg and CO2 setup are just like you’d use on any other kegerator and in fact you can borrow them from your home setup when needed.
Transport
It should go without saying that when you are transporting your beer you need to be careful. While there is a patchwork of state and local laws relating to all aspects of alcohol, it’s pretty safe to say that you should ensure that nobody can operate the draft system while the vehicle is in motion on public roads. I’ve gotten some pretty strange looks from other motorists as I’m cruising down the freeway with faucets and tap
handles on the back of my truck so these days I just entirely disconnected the faucets to discourage unwanted attention.
Beyond that there’s nothing worse than getting to your destination and discovering that the carbonation on your homebrew is out of whack or that your precious beer has leaked out. The agitation of driving will rapidly cause your beer to reach its carbonation equilibrium for the pressure and temperature much like shaking a keg at home.
Given all those risks the best approach is to simply disconnect the keg from the gas and beer lines for the drive.
Serving
Regardless of how you store your kegs you obviously need to provide gas. There are numerous options on the market from 5-lb. CO2 tanks with full regulators to paintball setups to CO2 injectors that use disposable cartridges. All work so it’s a matter of your budget, preferences, and available space. You can even borrow your CO2 setup from a kegerator you have at home.
Hooking it up
Before leaving home I like to put some sanitizer in the beer lines so that when I get to the campsite I’m just about ready to go. A few sprays with some sanitizer in a spray bottle on the keg posts and quick disconnects and then I can hook everything up and start serving within minutes. There really aren’t any tricks to this step.
Cleaning
For a short weekend trip one of the nice things is you don’t have to worry too much about the cleanup. At the end of the trip I disconnect the keg and drain the lines and run a bit of sanitizer from a spray bottle through them.
When I get home after pouring beer remotely I have a keg of sanitizer that I use to rinse out lines. Since the beer doesn’t spend much time in the lines when you’re traveling you don’t have to deal with the buildup that can often be a challenge in more permanent installations. Just make sure to let everything dry out after you clean the lines before you put it all into storage.
Go Forth and Pour
While one can tuck an entire draft setup in a large cooler, it lacks the epicness of committing to putting taps on your ride. It’s a great conversation starter and when done right it can make for a really clean way to share your homebrew. I’ve gotten a lot of positive comments and even built up some long lasting friendships as a result.
To install a basic draft system on your vehicle, you will need: a shank long enough to go through your bulkhead, a faucet, a tailpiece and nut, a beer line and a beer quick disconnect.
Assemble your parts and then install a tailpiece on the inside of the shank and attach beer line and a beer quick disconnect.
A styrofoam liner for a 5-gallon (19-L) plastic bucket.
Attach the beer line, regulator and CO2 supply as you would on a regular setup.
You can easily modify the foam lining and bucket lid to accommodate the beer line.
When you are on the road, simply cover the keg and lines with ice to cool the homebrew.
Now you are ready to transport your homebrew to your next tailgate party, barbecue or campsite!
As with your home kegging setup, keep your beer lines clean and sanitized. Rinse them with sanitizer after each use.


