Repitching Yeast

Repitching is a technique widely used by commercial brewers mainly because of its convenience, rather than the relatively trivial cost savings it offers. Do note that you can’t do it forever, as the yeast will eventually mutate and will then need to be replaced with a fresh sample. But commercial breweries brew all the time and it is easy for them to ensure that they have one fermentation finished and ready for cropping just when the next batch of wort needs to be pitched. This is not so simple a matter for a homebrewer, who usually has a much more irregular pattern of brewing and often brews beers of quite a different nature. In fact, if you brew only once a month or less, this method will not work for you at all. Should you brew more frequently then repitching is an option for you, but only if you carefully plan your schedule in advance. This is true even if you brew the same beer each time, but it is especially so if you are going to turn out a line of different beers.
It’s always the same isn’t it? No matter how great the idea may be there are always limitations on it. In this case when you have harvested yeast from one batch you do not really want to store it for much more than a week before pitching it into your next brew. That means you have to brew at least every two weeks to make this work well. And you do not want to take it from a beer that is strongly flavored, like an IPA or doppelbock and pitch it into something more neutral like a pale ale or Pilsner. So there should be a progression in intensity of flavor with each successive brew and I’ll offer some suggestions as to how to go about this. At BrüRm @BAR here in New Haven, Connecticut our approach is straightforward. Yeast is only repitched from our Toasted Blonde, which is a fairly bland, pale beer low in bitterness and OG 1.040 (10 °P). It is our biggest seller, and so is brewed more often than any other beer. Yeast is taken from this at the end of fermentation and used to pitch all our other beers — pale ale, amber, stout and all our specialty beers, and the yeast from these is discarded. The next batch of Blonde is repitched from the last, and its yeast will be used for the subsequent batch. In short we only continually repitch from and to the same beer.
Therefore it would seem that you should only carry over the yeast into identical beers, or into beers falling into a narrow band of OG, flavor, color and hop bitterness. That is certainly true if you want to re-use the yeast indefinitely, but what if you don’t want to brew more than a few weeks at a time, and/or you want to make some very different beers? And what if you only want to make a couple of brews for the foreseeable future and these are very different in nature? The answer to the last question is that this is no problem. In fact if you want to make a big beer, say an imperial stout at around OG 1.090 (20.4 °P), a good way to make sure you have sufficient yeast to handle this wort, is to repitch all the yeast from another beer. This could be another stout, or pale ale but it should be brewed from a wort with an OG of no greater than 1.050 (12.5 °P). In short you are effectively using the lesser beer as your yeast starter for the imperial stout, which is a somewhat specialized case of repitching.
So back to the first question, and the answer is that you can brew a progression of beers, repitching one to the next, and with the last beer being very different in strength and style from the first one. All you have to do is to ensure that you do not have a big jump in wort gravity at each stage of repitching, and that changes in flavor are progressive. By the latter I mean that you are always going from a lighter level of flavor to a higher one, and that each stage leads naturally to the next. For example, you could start with an English bitter at 1.040 then repitch from that to an ESB, from there to a robust porter at a similar gravity, and from there on to an oatmeal stout and finally to an imperial stout. Or you could start with a lightly-hopped Pilsner, and move along to stronger lagers such as bock, then doppelbock. Just note in the latter case that you should be more careful with lager yeasts than their ale cousins. Professional brewers generally repitch lager yeasts after eight or ten cycles, whereas ale yeasts have been taken much farther along the chain. In all cases, you should check the fermentation carefully at each stage. If the last one has been sluggish, or the finishing gravity at the end of the primary is higher than you targeted, then the yeast should not be re-pitched.

How to repitch
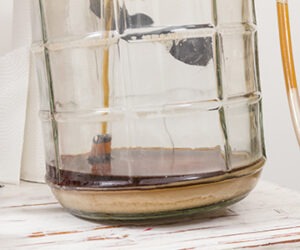
The bottom layer of yeast sediment will contain whatever trub (hop residue and/or proteinaceous from the hot and cold breaks) is present in the fermenter; it will also contain a high proportion of dead yeast cells. The top layer may contain alpha-acids which precipitate during fermentation, and the cells in it will have been exposed to the alcohol in the beer for longer than any other cells, and may therefore be somewhat weakened. So, the ideal is to collect only the middle layer for repitching, as this will be the cleanest and will have the highest concentration of “normal” active cells. If your yeast forms a thick skin on the surface you still do not want the top layer which has been exposed to air and will contain precipitated hop alpha-acids. However, the layer beneath that is fine and will contain plenty of active cells, as most of the dead cells will have settled to the bottom of the vessel. Collecting yeast is much easier, by the way, when you ferment with a wide-mouth vessel such as a brewing bucket.
So you need to try and scrape off the top layer from the head or from the sediment after racking. Be sure fermentation has finished before doing so, which should be no longer than five to six days after pitching the wort. Take a suitable scraper and carefully remove the first 1⁄4 inch (0.64 cm) or so, then do the same for the next layer, and try not to take the very bottom layer in doing so. I use a rubber spatula that is reserved for brewing yeast only and sanitized with iodophor before use. I collect the yeast in a wide-mouthed glass screw-top jar, which has also been sanitized beforehand. I then store the sealed jar in a refrigerator and repitch within six to seven days. Be careful with screwtops, though, as some further fermentation may occur and there is a risk of the jar exploding. If you are lucky enough to have a conical fermenter you can collect the yeast through the racking arm, or run off the bottom layer through the drain valve and collect the middle layer the same way. Whatever system you use, collect a half to two-thirds of a pint for repitching in the next brew.
Pitching schemes
Now, before I list some schemes there are a couple more caveats about re-pitching I should mention. First, make sure the first brew in the series is pitched with a good supply of yeast, either by using more than a single pack or vial, or more preferably by making a good-sized starter — a quart (1 L) being a good size. The second is that you must be very careful with your hygiene. Every vessel and utensil must be properly cleaned and sanitized, or you may simply be repitching spoilage organisms along with the yeast.
Scheme one: (The lager path):
Start with a clean, straightforward lager yeast, such as White Labs WLP830 (German Lager) or Wyeast 2001 (Pilsner Urquell), both of which tend to emphasize malt characteristics and offer a reasonable compromise for the listed beers.
First: American lager (1.045, 11.2 °P, 15 IBU)
Second: premium lager (1.050, 12.4 °P, 20 IBU)
Third: Munich helles (1.048, 11.9 °P, 20 IBU)
Fourth: Dortmunder export (1.052, 12.9 °P, 30)
Fifth: German Pilsner (1.050, 12.4 °P, 40 IBU)
Sixth: classic American Pilsner (1.055, 13.6 °P, 35 IBU
Seventh: Märzen (1.055, 13.6 °P, 24 IBU)
Eighth: bock (1.070, 17.1 °P, 24 IBU)
This is about as simple a repitching series as you can get, with only a little variation in OG until the last jump to the bock, and only modest variations in bitterness and color. Yeast contributions to flavor are relatively, maltiness being the main characteristic flavor of these beers. On those grounds Kölsch is not included in this series, despite its similar color and bitterness level to those of the beers listed, because of the yeasts I selected. If you want to make a genuine Kölsch you have to live in Köln, but to get as close as you can to the style you should really use a Kölsch yeast strain.
Note that you could at any stage repeat any of the individual beers in this series, before progressing to the next, except for the last of them. Once you have got to the high OG of the bock it’s the end of the road for that yeast, no more repitching. Note also that you would not have to make the last beer a bock, as you could have gone straight from the Märzen to a doppelbock just as easily.
Scheme two: (The pale ale path):
First: ordinary bitter (1.038, 9.5 °P, 30 IBU)
Second: special bitter (1.046, 11.4 °P, 35 IBU)
Third: Irish red ale (1.050, 12.4 °P, 28 IBU)
Fourth: extra special bitter (1.055, 13.6 °P, 40 IBU)
Fifth: American pale ale (1.052, 12.9 °P, 40 IBU)
Sixth: English IPA (1.065, 15.9 °P, 60 IBU)
Seventh: double IPA (1.085, 20.3 °P, 90 IBU)
For this series I would suggest White Labs WLP051 (California V), or Wyeast 1272 (American Ale II), because most of these beers need a little fruity, estery character, but not too much or the American pale ale will be thrown out of character. If you eliminate that beer from the series, then you use a more typical English yeast, such as White Labs WLP005 (British Ale), or Wyeast 1098 (British Ale).
Note that this scheme is relatively brief, because, unlike Scheme one it is necessary to balance bitterness levels as well as OG in this progression. Also, you do not have to follow this roughly similar color scheme. For example, if you did not want to make an IPA at this stage, but instead wanted to move to porters and/or stouts this can easily be done as you will see below.
Scheme three: (The dark path):
First: ordinary bitter (1.038, 9.5 °P, 30 IBU)
Second: special bitter (1.046, 11.4 °P, 35 IBU)
Third: Irish red ale (1.050, 12.4 °P, 28 IBU)
Fourth: northern English brown ale (1.047, 11.7 °P, 25 IBU)
Fifth: brown porter (1.046, 11.4 °P, 30 IBU)
Sixth: robust porter (1.053, 13.1 °P, 35 IBU)
Seventh: dry stout (1.045, 11.2 °P, 40 IBU)
Eighth: foreign extra stout (1.064, 15.7 °P, 50 IBU)
or imperial stout (1.090, 21.5 °P, 80 IBU)
You can have your pick of English yeast strains for this one, but I think White Labs WLP004 (Irish ale), or Wyeast 1084 (Irish ale) would be a good choice. Of course, you can repeat any individual step as often as the yeast will take it. For the porters and dry stout you can even take a step backwards and brew a robust porter after the dry stout, and from there back to a brown porter. But you can’t go back from the foreign extra stout, and as I have indicated you should not expect repitched yeast to handle going from that beer to an imperial stout.
Final thoughts
I have not mentioned the fact that the yeast grows at each stage, so you actually end up with more than you need to pitch your next beer. You can do a split at any stage, and use half the collected yeast for one beer, and the other half for a different beer. That means that you could do a full sequence of pale beers, and at any point cross over to a dark beer or series of dark beers. If you do this, however, you are going to be pretty busy, and your planning must be even more detailed than for a single series.