Simple Temperature Control
We brewers have a tendency to accumulate a lot of equipment. Most of the time, different pieces of equipment have very specialized and limited uses. I have tools to oxygenate wort that get used a grand total of two minutes on every batch of beer and then get stored away until the next brew day. What a wonderful discovery it is when I can find multiple uses for brewing equipment. I discovered this in the past few years with my heat mat and temperature control. I now use these tools for fermentation, yeast starters, drying yeast, drying hops, and even proofing bread.
Fermentation
When I got my first small chest freezer many years ago, I was excited to have a tool where I could finally control fermentation temperature. Most brewers I knew at the time were getting fridges to make kegerators. I wanted something that I could use to not only cool the kegs I was planning to get, but could also double as a fermentation fridge. The kegerators are cool — everyone wants their beer on draft like the pros. But I believed it was much more important to have a controlled fermentation temperature to make beers rivaling the pros in taste first, and then get or make a kegerator.
For my own temperature-control chamber, I used my seven-cubic-foot chest freezer, a FermWrapTM heat mat, InkBird 308 temperature controller, and small space heater. For less than $100 I had all of the heating tools and I was in business. All I had to do was learn how all the parts worked together. Care must be taken to ensure the refrigerator is not cycling suddenly and often (compressor delay protection) but otherwise it was an easy setup. The first beer I made this way was a lager that was the best light beer I had ever made. I have now used this same method for many years, and it has always worked seamlessly.
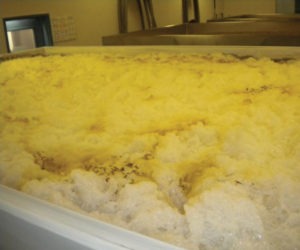
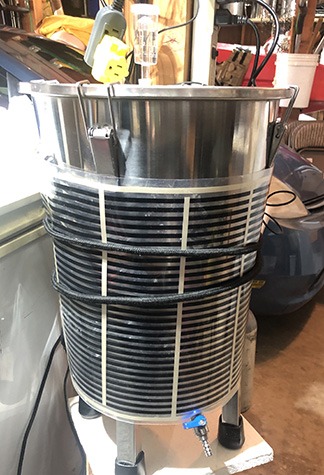
For fermenting, I use a 7-gallon (26.5-L) stainless steel fermenter. The wrap fits well on the outside and covers approximately two thirds of the total surface of the fermenter in cases where I want to ferment warmer than the ambient temperature in my cool basement. A big advantage of the wrap vs. a belt is it gives more even heating over a larger surface area. Using a bungee cord and tape, the wrap can be adhered directly to the fermenter, or it can be laid on the bottom of the freezer to heat the fermentation space.
Materials and Equipment
A heating wrap, small space heater, and temperature controller are all simple and essential tools for controlling the fermentation process. Here’s a breakdown of how each of these components typically works in a fermentation setup:
Freezer: A chest freezer is a versatile piece of equipment for homebrewers. By using a temperature controller with your freezer, you can use it for both fermentation as well as keg storage during serving. For fermentation, the controller can be set to a temperature range that matches the yeast’s ideal fer-
mentation conditions.
Heat Wrap: A FermWrapTM heating wrap is an electric heating pad designed for fermentation. It can be placed under your fermentation vessel or taped to the side to provide gentle and controlled heating, especially in colder months when maintaining the right fermentation temperature may be challenging. I mostly make ales, so the refrigeration part is not as important for me.
The manufacturer says you can increase the temperature of your fermentation from 5–20 °F (3–10 °C). I have found that the wrap can easily heat up a fermentation more than this. I typically ferment my kveik beers at 100 °F (38 °C) with an ambient temperature of around 64 °F (18 °C). Insulation will get you a long way towards higher temperatures than quoted by the manufacturer. I have also used this method with PET plastic fermenters, albeit at lower temperatures. (I wouldn’t go any higher than 70 °F/21 °C with a plastic fermenter.) Don’t be fooled by the low price of these wraps. They are well-built and will last a long time if cared for properly.
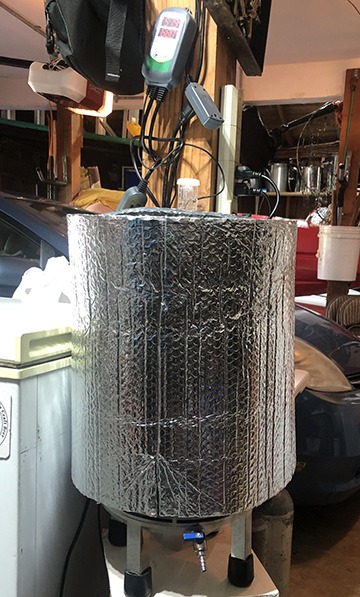
Insulation Wrap: I use insulation wrap around all my vessels to hold the heat in. I remember being surprised at how expensive a small sheet of this foil wrap was when I first purchased it, but I have used it many times over the past few years and I don’t see it wearing out. Using an insulation wrap, or insulating the fermenter through other means, is how you can reach much higher temperatures with the heat wrap.
Temperature Controller: The Inkbird 308 is a temperature controller that allows you to set a target temperature for your fermentation. It can control both heating (attached to the heating wrap or a space heater) and cooling (attached to the freezer), making it a crucial component for maintaining a stable and controlled temperature inside the chest freezer. Be sure to set the lag time for cooling so your freezer doesn’t cycle on and off too much. Most recommend using the controller with a thermowell, but I am quite happy simply attaching my temperature probe to the outside of or underneath the vessel being heated.
Small Space Heater: The small space heater is used to provide additional warmth inside the chest freezer if the heat wrap alone isn’t enough to maintain the desired fermentation temperature. This heater can be controlled by the temperature controller. Make sure your particular model of space heater will come on when power is applied and does not require a separate switch. Many inexpensive ones don’t do this. As time has gone on, I use a space heater less and less since the wrap does quite well on its own.
Yeast Starters
Creating a yeast starter with temperature control is a critical step in brewing beer. Yeast is a living organism, and its activity and flavor profiles are greatly influenced by temperature. Controlling the temperature during the starter phase helps promote healthy yeast growth and fermentation.
I use a stir plate and a 2-L Erlenmeyer flask. My inexpensive stir plate does not have heating so I use my wrap and temperature control to keep the temperature within the manufacturer’s recommendation for the particular yeast I am using. There are many experienced brewers who believe a stir plate is unnecessary. Their feeling is that periodic agitation of the starter is plenty for adequate yeast growth. Regardless of how you agitate, there is a significant benefit to maintaining the temperature of the starter. Using a wrap and controller to maintain temperature control is easily done.
Materials and Equipment
Stir Plate: Optional, but helpful for continuous aeration and yeast growth. If you don’t have a stir plate, periodically give the flask a shake to maintain suspension of the yeast.
Fermentation Vessel: A glass flask, Erlenmeyer flask, or a sanitized mason jar.
Wrap and Controller: To control the temperature accurately.
Similar to when fermenting, insulation wrap will require less running of the heating wrap and may come in handy if the ambient temperature is more than a few degrees cooler than the desired starter temperature.
Drying Yeast
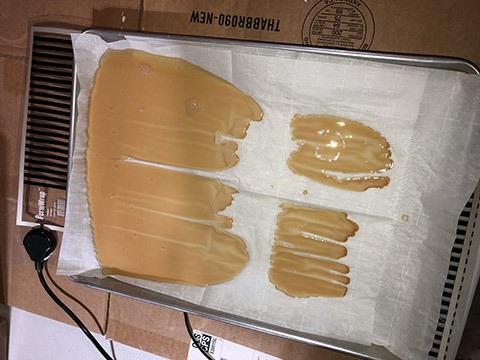
Drying yeast is a common method for preserving yeast for long-term storage. There are a few ways to do this, but one method is to dry yeast on parchment paper placed on a cookie pan with the heat mat underneath. I have used the oven set on a very low temperature, but I never liked having an oven tied up with such a small process that might take a few hours to complete. The wrap method is very effective at drying out small volumes in as little as a few hours.
It should be noted that I harvest and dry mostly kveik yeast strains, which have been harvested and dried for generations. Many commercial yeast strains will not tolerate the drying process — this is one of those trial and error things that you may need to test on your own.
I will also point out that some people are very particular about the purity of their yeast strains. Being a farmhouse brewer, I have never been overly concerned with this. My yeasts become proprietary almost immediately upon receipt. I spend little time worrying about how they change during this process and have never gotten a bacterial infection in my strains. If you are concerned about wild yeast infections during drying, you can place a small space heater near your drying pan. As the heat rises it draws air (and wild yeast) up and away from the surface, minimizing the chance of drawing wild yeast from the air.
I dry my yeast so I can take advantage of long-term storage. Once dried, it can last a very long time. I have dried yeast in my archive that has been there for two or three years and still works well. I always do a starter so if the yeast is no longer viable, I know before pitching.
This process isn’t for everybody, but I have saved a significant amount of money by harvesting liquid yeast after a batch and then drying it for easy storage for future brew days.
Drying Homegrown Hops
Drying hops is an essential step in preserving the cones for long-term use, especially in homebrewing. Fresh hops can mold in a very short time, so if you grow your own hops it is best to use them right away in a “wet hop” beer or dry them to store for a later use. Dried hops can be stored in a freezer for future use after removing as much air from the bag as possible (vacuum-packing in smaller sizes that you will use in one recipe is a great option).
A few years ago, I was leaving on a vacation right about the beginning of harvest time for my homegrown Cascade hops. I needed a plan for harvesting and drying. With a little bit of creativity and some familiar tools, I was able to dry my crop in just hours and use the hops when I returned.

Materials and Equipment
Fresh Hops: You’ll need freshly harvested hops. The moisture content is typically around 75–80%. I grow a small crop and consistently get about 1 lb. (0.45 kg) of fresh hops. This translates to roughly 3 oz. (84 g) of dried product for brewing a “fresh hop” beer.
Drying Equipment: I needed a little more than just a heating mat and temperature control to do this job. Amazon came to the rescue with some recycled cardboard boxes. By using these, I was able to build a cardboard kiln, or oast, that I could use for drying the hops.
Air Circulation: Adequate air circulation is essential to prevent mold. My small space heater did part of the job. I also used a small fan to get some additional circulation. I then cut out the bottom of the drying chamber and installed a false bottom. My heat wrap and insulation material made it possible to get the whole cardboard unit up to hop-drying temperature.
It took around four hours to dry the hops down to below 20% of their weight. I then bagged them, added a shot of CO2, squeezed out as much gas as I could, and refrigerated. It made a fabulous fresh hop beer that I brewed a few weeks later.
Beyond Beer: Proofing Bread
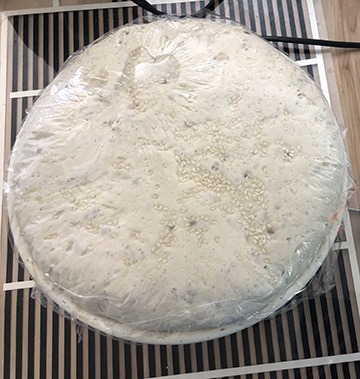
I am one of those 3+ million people that started making bread during the pandemic of 2020. At the time, I thought, “This should be easy. I understand fermentation and yeast and I know how to measure.” Man, was I in for a surprise. It took me a few years to learn the “zen” of breadmaking and gain the skills to make great bread. One of the keys for me was proper proofing, or rising of the dough. Once I got into this, the wrap and temperature control really helped. Proofing bread with temperature control is essential to reliable results. Similar to brewing, temperature-controlled proofing helps control the fermentation process and adds consistency to the final product. Using this method, I can proof a loaf of bread in six hours (although I prefer overnight proofing in the refrigerator).
More Ideas
I have covered just a few of the ways I use my FermWrapTM and a temperature controller. I have never used one as a seed mat to germinate plants in a greenhouse-like environment, though all of you gardeners out there could use these tools for that purpose as well. I am sure there are many other applications that I have not yet considered.
I live in a very small house on the north coast of California. My brewery is a two-car garage. Anything I own that can be used for multiple things is a real advantage because my storage and working space is very limited. A heat wrap and a temperature controller take up very little space and can be used for a multitude of tasks. I have really just started exploring the potential uses of these tools but I use them often enough that I now keep them readily available and don’t pack them away with the rest of my equipment. These are versatile and inexpensive tools to add to your brewery. I’m sure the creative minds of the makers reading this magazine can find even more uses.