Small Batches
 How do you learn what effects different strains of yeast or different hop varieties have on the taste of your beer? That’s relatively easy for professional brewers, since they frequently brew a beer to a standard recipe. Since they have good control over extract levels and fermentation temperatures, they can simply change one variable at a time and compare the beer with what they brewed previously. For the homebrewer it is more difficult, partly because they often brew only now and again, and partly because they do not brew the same beer every time. And they may not want to make two separate 5-gallon (19-L) brews at the same time because that makes for a long brew day, or they may not want to be left with 10 gallons (38 L) of two beers that are quite similar in style.
If you feel that way you may well have tried to determine the effect of a yeast change by adding different strains to two different worts. You would, of course have done that with brews that have some similarities, say a pale ale and an IPA, or a Pilsner and a bock beer. However, such an approach is of limited value, for you are committing the experimental scientist’s “no-no” by changing more than one variable at a time. So what’s the answer?
It’s quite simple; do one brew and split the wort, adding a different hop variety or yeast strain to each portion. Using identical worts immediately eliminates a lot of variables, although it may not reduce brew time much if you are looking at hop varieties, since each portion of wort will have to be boiled separately, and that can introduce differences through losses in the trub and on cooling, for example. This approach can also be used for checking different varieties for dry hopping, but that can just as easily be done by splitting a finished brew at racking for the secondary stage, so I am not going to deal with that here. This method works very well for looking at different yeast strains because wort preparation and boiling are identical, and your brew day will be only a few minutes longer than usual.
How to do it
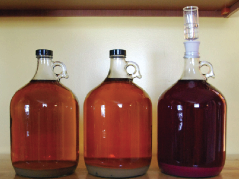
First you have to decide exactly how to split your wort, and I assume that you are starting with 5 gallons (19 L). I also assume that you will be using 1 gallon (3.8 L) glass jars that can be fitted with fermentation locks for the fermentation, since sizes between 1 and 5 gallons (3.8-19 L) are less easy to come by. You could obviously split this into five 1-gallon (3.8-L) batches and test five different yeast strains, but I feel like that is complicating matters too much and you are better off looking at only two strains at a time. And, in fact, by the time you have cooled the wort you will probably have less than 5 gallons (19 L) due to losses to the trub and so on. That means we are talking about four 1-gallon (3.8-L) test samples; if you do not want to throw it away seal and store cold the remainder for use in topping up later. For me the ideal way would be to ferment two of these with a yeast strain you are familiar with, while using the test strain in the other two batches. In other words, you have duplicate tests for each strain, which will give you a good check on the consistency of your experimental technique as well as two tests to compare the test strain’s performance against your “standard” strain.

There are a number of other factors to consider in these experiments. A prime consideration is what kind of beer to use as your base. It should be obvious that the style of beer should be suited to the yeast strains under examination – lager for lager and ale for ale. But beyond that you need to be able to detect any differences in the final beers, so you do not want one where high alcohol or lots of roasted flavors are present or even ones with very high hop bitterness and flavor, since all these will mask the differences you are looking for. In short, you want something simple such as pale ale for looking at ale yeasts, and a modestly hopped Pilsner for lager yeasts. Of course if you are looking at Belgian yeasts that produce somewhat stronger flavors, you might go for a more flavorful base beer, but I would still recommend something fairly neutral in terms of malt and hop flavors, such as a saison, rather than, say, an Abbey ale.
You want to pitch the worts with the same amount of active yeast, which is relatively easy with liquid strains. Just use a separate pack or vial for each wort which will be about the right amount for 1 gallon of wort. I think it best to use either all packs (Wyeast) or all vials (White Labs), rather than to mix them because there may be a difference in yeast content from vial to pack, since the former requires some yeast growth in the pack (see use instructions on them). In the case of dry yeasts, it is common to use 0.5 g/L of wort, so for each 1 gallon (3.8 L) fraction you’d need 2 g of yeast. Bear in mind that if you want to compare a dry yeast strain against a liquid strain, there may be some differences in the amount of active cells pitched, which might reduce the reliability of the test.
The worts must be cooled to the appropriate fermentation temperature and be well-aerated. You can do this by the “splashing” technique or by oxygenation from an oxygen bottle using a carbonation stone. The latter is more reliable in terms of reproducibility, so I would opt for that. Simply set a suitable gas flow rate for the first portion of wort for two minutes, then repeat the process for the other worts. Measure original gravity (OG) at this stage.
Then comes the tricky bit, for you need to keep the fermentation temperatures as close as possible. You won’t be able to control four different vessels precisely, so the best you can do is to try to keep them all together in a relatively cool place. Try to use a similar environment that you would normally use for your standard strain. You particularly do not want the standard to be warmer than your normal practice since this could result in the development of flavors that would mask differences between the two strains. It doesn’t matter if the test strain races away and ferments at a higher temperature because that is one of the differences you are looking for!
Finally, you have to be consistent in allowing similar fermentation times (including a diacetyl rest if you are comparing lager strains), and residence time in the secondary fermenter. You should observe the tests as frequently as possible and note any differences, such as when the first rush of activity slows dramatically, and whether there are significant differences in flocculation as the fermentation nears its end. You must, of course, measure finishing gravity and compare the attenuation of the beers (that is the difference between the OG and FG) so that you know whether the test strain is likely to give you a sweeter or drier beer than will the standard. Bottling should be carried out at the same time – I assume you are not going to keg such small amounts! Priming can be a bit of a problem, since the test samples may finish up with a different CO2 content than the standard. If they do, then using the same amount of priming sugar for all four tests will result in different levels of carbonation in the finished beer, which may mask flavor differences somewhat. There is little you can do about this, except to make sure you keep the beers in a secondary for at least a week to allow as much of the CO2 to diffuse out as possible. Note that when you transfer to the secondary you should top off each jar with boiled and cooled water. You could top off with the cooled residual wort retained from the original split, but that will result in further fermentation, so the water option is better in my view.
Make careful tasting notes when the beer is ready; first comparing the two similar beers to each other, and then contrasting the different pairs. A good way to do this is to invite some homebrewer friends over and record their responses to the samples without telling the tasters which is which. If the two pairs are closely similar to each other then you can conduct a “difference” test with your friends. Give them each two similar samples and one different one and record their responses. Discard results from any taster who cannot pick out the different sample (don’t tell them or you might lose a friend or two!), and check the results from the others to determine the real effects of the test yeast strain. That’s it, simple enough, so below I’ll run through an example with some real yeast strains.
Let’s actually do it
I have selected an example I looked at some years ago when I wanted to check out my standard (White Labs WLP002 English Ale) against WLP023 Burton Ale yeast, thinking that the latter might become my standard for IPA (since IPA was first brewed in Burton). I deliberately opted to use a modestly hopped, relatively low gravity bitter ale so that flavor differences might stand out. I also decided to go with extract with steeped grains rather than all-grain, just to keep things as simple as possible. So here we go:
Split Infinitive Bitter
(5 gallons/19 L, extract with grains)
OG = 1.045 FG = 1.013* IBU = 30 SRM = 12-15 ABV = 4.1%
*These figures refer only to the standard — read on
Ingredients
6 lbs. (2.7 kg) pale malt extract syrup
0.5 lb. (0.227 kg) crystal malt (60 °L)
8 AAU East Kent Goldings (60 min.) (2 oz./57g at 4% alpha acids)
2 vials WLP002 (English Ale) yeast
2 vials WLP023 (Burton Ale) yeast
Priming sugar
Step by Step
Steep crushed crystal malt in a grain bag with 3 quarts (2.9 L) of water at 150-160 °F (65.5-71 °C) for 20-30 minutes. Add liquid to boiler and rinse bag with 1 gallon (3.8 L) of hot water. Add more water to bring the volume up to 3-4 gallons (11-15 L) and carefully stir in the extract syrup, making sure it is fully dissolved. Adjust final volume to 5 gallons (19 L) and bring to a boil. Add the hops and boil 60 minutes. Switch off heat and cool the wort as quickly as possible to 65-70 °F (18-21 °C). Take four 1-gallon (3.8-L) jars, which have previously been sanitized (preferably with an iodophor), and fill each to the same level, say about ¾ full to allow enough space to minimize any loss due to frothing. Oxygenate each sample, using a carbonation stone and an oxygen bottle for two minutes. Pitch two bottles with one vial each of WLP002 (English Ale) and the other two with one vial each of WLP0023 (Burton Ale). Allow to ferment under airlock for 5-7 days, preferably in a cool, constant temperature area — I used my basement, which holds at around 60 °F (16 °C) during winter. Once fermentation ends, rack into four sterilized demijohns, taking gravity measurements on each one, and leave in these secondaries for 7-10 days, topping up as described earlier. Rack and bottle each sample, priming with a maximum of 1 oz. (28 g) sucrose or dextrose per gallon. Keep warm for 1-2 weeks to condition, then cool, taste and compare the results as described above.
My results
First, there was little discernible difference between the two separate pairs, so my technique had been at least reasonably consistent! The Burton yeasts gave slightly more attenuation — the two samples having fermented down to 1.010 and 1.011. That’s not significant in this beer but could make up to 0.5% alcohol by volume (ABV) extra in a beer with an OG of 1.070-1.080. The English Ale yeast samples were thought by some tasters to be a little fuller on the palate, and again that difference might be more noticeable in a bigger beer. The Burton yeasts certainly did not flocculate as well as the standard, so the beers from them were somewhat hazy when tested. From those results alone the Burton yeast might work fairly well in an IPA I thought. But the biggest difference was that the Burton yeast beers were very estery — banana and pear drops in particular — to the extent I did not like them at all. As a result, I have never used this yeast in an IPA again. Given what I learned about the difference in the two yeasts, I would say that my experiment told me what I needed to know!