Steampunk Brewing
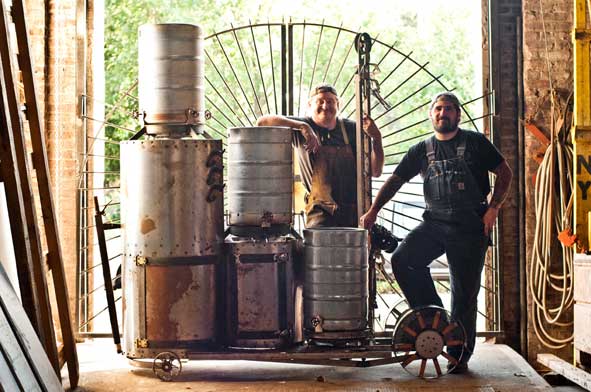
Like any good collaboration, Staten Island, New York neighbors Scott Van Campen and Mark Zappasodi’s “Brewing as Art” — a fully functional, gravity-fed brewing apparatus on wheels that happens to look like something from a Victorian-era horror movie set — began over beer.
“We were hanging out having some beers and talking about the art of beer making and the creative processes behind it and actually how similar it was to what I do with my work. It’s the same process, different ingredients,” Van Campen, 43, owner of New York Custom Fabricators, recalls.
“We said, ‘Hey, wouldn’t it be cool to make something that was just over the top really cool looking and functional that makes beer?’ That’s really how it started,” he continues.

“Then, it was like, ‘what if it was mobile?’” says Mark Zappasodi, 42 — the self-described “obsessed” homebrewer.
The pair began making plans to build their adventurous device and concluded their idea was artistic enough on two levels — brewing and metallurgy — to seek a grant from the Staten Island Council on Arts and the Humanities, which helps fund projects from local artists.
The pair submitted pictures of Zappasodi brewing and Van Campen doing metal work. The application’s required “work sample” became a six-pack of Zappasodi’s homebrew delivered in a custom carrier Van Campen fabricated to look like an old milk jug-style holder with wire handles.
“So it was proven we could work together,” Van Campen says with a laugh. “But I think there were some grumblings in the art community that the council is funding people to make beer now. They weren’t upset with this, but sort of taken back that ‘Oh, that’s not really art.’ That lit a fire under us that we really did need to make sure this came off right, and not just something making beer, but one with esthetic qualities to it.”
Design 101
The council grant stipulated the project be completed in one year. Given that Van Campen’s days were filled at his shop and Zappasodi worked nights as a union painter, the pair, who lived only five minutes apart (Zappasodi recently relocated to a family farm in rural Massachusetts), relied on their Sundays — nine months worth to be exact — to do everything from initial design to final fabrication and testing.
“We’d have a bagel and coffee and sketch out some ideas, how we’d do the plumbing, etc. It was piece by piece. We took our time,” Van Campen says.
The pair decided the machine would be best served both artistically and practically with a steampunk esthetic, that can best be described as something integrating modern technology with a decidedly Victorian and industrial age look and feel.
“A lot of my work has an industrial slant to it,” Van Campen says.
“I’ve always liked the look of bridges with big rivets. The industrial look of the Victorian age is really pleasing to me. And I always liked the steampunk look,” he continues.
The sculpture eventually used steel, aluminum, stainless steel and wood, but before the pair could begin utilizing the piles of scrap materials in Van Campen’s shop (in fact, almost the entire machine was fabricated out of recycled materials) a structural design was needed.
To do this, Zappasodi invited Van Campen over for a brewing session. Working off the brewing station layout, a design model was formulated.
“We decided to mold it around my brewery set up at home: Two coolers, mash lauter, boil pot,” Zappasodi says. “Scott came over a couple times and took notes and measured out how I brew, and we envisioned it on the sculpture.”
Thus, like Zappasodi’s home system, Brewing as Art is a gravity fed system that doesn’t require pumps or electricity — an important aspect of the project as the goal was to be able to brew anywhere.
“Everything has to be done by hand. Nothing is automated, there are no pumps. It’s very streamlined,” Zappasodi says.
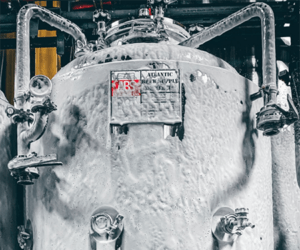
The tallest tower at the machine’s frontend features a propane-fired hot liquor tank on top with the mash lauter in the middle feeding into the boil pot below. Once the boil’s complete, the wort is lifted via a hand-cranked pulley, drained through a heat exchanger and into a demijohn for fermentation.
“I just fell in love with it. It was perfect,” Van Campen adds of the demijohn that Zappasodi sourced by trading a couple of traditional six-gallon (23-L) carboys for it. “It has that mad scientist beaker look.”
While this system, which can brew up to 12 gallons (45 L) at one time, sounds straight forward enough, Zappasodi and Van Campen realized that hoisting a barrel of boiling liquid in the air could be problematic — as many homebrewers can no doubt attest. The first thing they built was the tower used to lift the boil pot to drain into fermentation. Attaching it to a table, a keg was filled with water and lifted to see if their plan would work.
“You’d be amazed at how quickly a barrel full of liquid can twist a heavy piece of metal,” Zappasodi exclaims.
A heavier piece of steel was utilized, but still, as a mobile unit, there were concerns with overall safety while brewing in a public setting.
“Safety is a big issue as we’re going to have 10 gallons (38 L) of boiling water and high in the air. What’s going to stop it from spilling? Or if we do a public brew, what if somebody bumps into it?” Van Campen asks.
“That’s why there are some handles; they crank down and actually hold the kegs on the burners. They are not going to fall off.”
Propane tanks are stored in the tower and almost all plumbing is hidden from view for a clean look. As the brew machine slowly came to life like a modern day Frankenstein — old rivets here, leftover wood handles there, cast-off wheels — the pair realized they would have to use modern day kegs for the liquid portions of the process. Kegs weren’t around in the industrial age but, as Van Campen explains, the steampunk esthetic of modern technology with Victorian age looks made the use of kegs within the realm of possibility.
“It makes sense to use them in a lot of respects,” he says. “One, the volume. The size of the machine we were looking for, we wanted to do 10-gallon (38-L) batches. And although stainless steel 100 years ago wasn’t a commonly used or readily available material, we tried to cover that look (with some copper wrapping).”
“And cleanliness was a big factor,” Zappasodi adds. “We wanted something that would work and be able to be cleaned and produce good beer.”
Zappasodi admits not quite everything was recycled. Gauges, clocks, burners and thermostats were purchased to save time and energy.
“At some point we knew we had to rein it back a little bit,” he says. “Scott actually wanted to make the clocks and thermostats on it. It’s not that he couldn’t do it, but how much time did he really want to spend on this? For simplicity sake and time we cut back some of our ideas, but I think it was best that we did. It could have been overdone.”
Brewing on Art
Zappasodi has brewed about a dozen batches on Brewing as Art, from Belgian ales to IPAs, stouts to pumpkin beers, with a modicum of success. A few brews have been made in public settings at festivals and fairs — where passersby are both surprised and impressed by their creation — but most of the brewing has occurred with the machine parked at home or in Van Campen’s metal shop.
While he is “really happy” with how the machine performs, Zappasodi notes that it’s not all perfect. The burners are too airtight under the tanks, causing the occasional mash scorching. He’s tried using a false bottom, but then has to deal with slower sparge times. He’s also had to make other minor adjustments using kegs for mashing.
“I’d never mashed in a keg before, only coolers. Coolers are pretty efficient and you can get every drop out of them,” he says. “With kegs you have that little pocket on the bottom so it does change the dynamic. You use a little more water, and there’s a little more waste. But scaling up fixed that. It required a little bit of tweaking, but it wasn’t dramatic. The gravity might have fallen off slightly, say 6.5% (ABV) instead of 7% or 7.2%.”
“Really, there haven’t been any sort of issues,” he adds. “It’s actually very efficient. I’ve been getting somewhere in the 80 to 85 percent efficiency range.”
Both men admit there’s more they’d like to do to Brewing as Art, such as add hard lines for water intake and outtake, maybe install a copper wort chiller (fitting the steampunk ideal) and adding bigger wheels for increased mobility.
“There are things we’d still like to execute on it, but we just haven’t got there yet,” Zappasodi says.
The pair also agree the whole process proved to be an enjoyable and educational experience, and serves as a testament to the friendship they have forged over the years.
“I had never brewed before, so it was a big learning process for me about beer making,” Van Campen says.
“And Mark, I think he learned a fair bit more about metal working than anyone anticipated.”
“A welder and a brewer that are on the same page?” Zappasodi concludes. “It’s just like chocolate and peanut butter, you know.”
Recipes
Smoked “Imp”
Imperial Stout
(5 gallons/19 L, all-grain)
OG = 1.092 FG = 1.018
IBU = 55 SRM = 57 ABV = 9.6%
I like to make my imperial stouts on the dry/thin side so I mash low, but feel free to raise your mash temperature, or add some rolled oats for more of a “wet” stout with added mouthfeel. I also purposely used lighter sugar, specialty malts and a clean yeast strain to let the smoked malt shine.- Mark Zappasodi
Ingredients
11.5 lbs. (5.2 kg) Crisp Maris Otter malt
1.5 lbs. (0.68 kg) Caramunich® Type I malt
1.0 lb. (0.45 kg) crystal malt (60 °L)
8.0 oz. (0.23 kg) light chocolate malt
8.0 oz. (0.23 kg) roasted barley
2.0 lbs. (0.91 kg) Briess Cherry Wood Smoked Malt
1.0 lb. (0.45 kg) light brown sugar (15 mins)
¼ cup molasses (0 mins)
½ tsp. Wyeast yeast nutrient (10 mins)
1 WhirlFloc® tablet (15 mins)
5.5 AAU Galena hops (FWH)
(0.5 oz./14 g of 11% alpha acids)
11 AAU Galena hops (90 mins)
(1 oz./28 g of 11% alpha acids)
1 oz. (28 g) Fuggle hops (0 mins)
White Labs WLP001 California Ale
(1 qt./1 L yeast starter)
Step by Step
Mash in with 166–168 °F (74–76 °C) water to settle at 149–150 °F (65–66 °C) for 60 minutes. Raise temperature to 168–170 °F (76–77 °C) for ten minutes. Sparge with 175 °F (79 °C) water for 60–90 minutes. Add first wort hops and collect at least 7 gallons (26 L) of wort to be boiled for 90 minutes. Cool quickly to 65 °F (18 °C) and pitch yeast. Let temperature raise naturally to between 68 and 70 °F (20–21 °C) and hold. This beer should take 7 to 10 days to complete and then rack to secondary for a week to ten days. Keg at 10 PSI or bottle with 1 cup of corn sugar in 750 mL corked and hooded bottles. This beer will age well for years or can be consumed in a few weeks after bottling.
Smoked “Imp”
Imperial Stout
(5 gallons/19 L, partial mash)
OG = 1.092 FG = 1.018
IBU = 55 SRM = 57 ABV = 9.6%
Ingredients
0.5 lbs. (0.23 kg) Crisp Maris Otter malt
1.5 lbs. (0.68 kg) Caramunich® Type I malt
1.0 lb. (0.45 kg) crystal malt (60 °L)
8.0 oz. (0.23 kg) light chocolate malt
8.0 oz. (0.23 kg) roasted barley
2.0 lbs. (0.91 kg) Briess Cherry Wood Smoked Malt
1.0 lb. (0.45 kg) light brown sugar (15 mins)
¼ cup molasses (0 mins)
6.0 lbs. (2.7 kg) Muntons Light dried malt extract
½ tsp. Wyeast yeast nutrient (10 mins)
1 WhirlFloc® tablet (15 mins)
5.5 AAU Galena hops (FWH)
(0.5 oz./14 g of 11% alpha acids)
11 AAU Galena hops (90 mins)
(1 oz./28 g of 11% alpha acids)
1 oz. (28 g) Fuggle hops (0 mins)
White Labs WLP001 (California Ale),
Wyeast 1056 (American Ale) or
Fermentis US-05 yeast
(3 qt./3 L yeast starter)
Step by Step
For the partial mash adaptation of this recipe, you will need a 3.0-gallon (11-L) beverage cooler (with a spigot) and a grain bag capable of holding 6.0 lbs. (2.7 kg) of grain. Place crushed grains in the large steeping bag and place in the cooler. Heat 8.2 qts. (7.8 L) of water to 161 °F (72 °C) and stir into grains so that the temperature hits 149–150 °F (65–66 °C). Place lid on cooler and hold at this temperature for 60 minutes. Collect wort and sparge with 190 °F
(88 °C) water by drawing off 2–3 cups (470–710 mL) of wort and adding it to your brewpot, then gently pouring the same amount of hot water to the top of the grain bed in the cooler. Repeat until you have collected 3.0–3.5 gallons (11–13 L) of wort. Add first wort hops (FWH) while collecting wort. Add roughly half of the malt extract and boil wort for 90 minutes. (Keep some boiling water handy and don’t let the boil volume dip below 3.0 gallons/11 L.) Add hops at times indicated and carefully stir in remaining malt extract in final 15 minutes of the boil. Cool wort quickly to 65 °F (18 °C) and pitch yeast. Let temperature raise naturally to between 68 and 70 °F (20–21 °C) and hold. This beer should take 7 to 10 days to complete and then rack to secondary for a week to ten days. Keg at 10 PSI or bottle with 1 cup of corn sugar in 750 mL corked and hooded bottles. This beer will age well for years or can be consumed in a few weeks after bottling.
Tips for Success
When making a dark beer, water chemistry can make the difference between a beer that seems too acidic and one in which the roasted flavors taste pleasant. If you were starting from distilled water, adding 0.25 oz. (7.1 g) of calcium carbonate (chalk) and 0.25 oz. (7.1 g) of sodium bicarbonate (baking soda) per 5 gallons (19 L) of brewing liquor (brewing water) would benefit this beer. (If you have a pH meter, check the mash pH. It should fall between 5.2 and 5.6.)
Also, as with any big beer, thorough wort aeration, adding some yeast nutrients in the boil and making a yeast starter will yield a better fermentation.