The Draft Combine: Deep clean your draft system
Commercial cleaning systems allow multiple taps to be cleaned simultaneously. Homebrewers with a draft system should maintain a regular cleaning schedule to assure clean lines and faucets.
Draft beer offers an experience that is difficult to recreate in a bottle or can. The rich head and bright aromatics are unparalleled compared with most bottle pours. This affordable and wonderful pour comes at a high maintenance cost though. And nothing ruins a great beer faster than a dirty draft system.
The Perfect Balance
In order to deliver a perfect pour, a draft system has to walk a delicate balance. The CO2 pressure on the keg must match the carbonation level in the beer and the temperature of the keg. Let me say this one more time: Temperature, pressure, and carbonation level must match! Once these parameters are defined then the back-pressure created by the resistance of the beer flowing through the line must allow the beer to flow at the faucet’s designed flow-rate. The resistance is usually changed by adjusting the length of a leader of 3⁄16-inch line placed just before the faucet. Most faucets work well when set to pour a pint in 6 seconds although it is common to see a range of 4 to 8 seconds in professionally-designed systems. If the back-pressure is set higher than this the beer will not pour with a head or, in the extreme case, the faucet will trickle foam. If the back-pressure is set lower than this then the beer will flow too quickly, making it difficult to pour and, in the worst cases, pour foam.
It is also very important for all of the parts in a draft system to be designed so the beer transitions smoothly from one part to the next. Abrupt changes can cause turbulence in the beer flow and will release the carbonation prematurely (breakout) causing the beer to pour foamy. If the draft system is designed with clear line these bubbles can be seen by visually inspecting the line while the beer is flowing, making identifying the offending fitting easy. The appearance of beer flowing should not show breakout in the lines at all. If you see bubbles form in the line when it is not moving then the temperature, pressure and carbonation level do not match. More pressure is the quick solution but getting your handy CO2 chart out is the best way to see what is going wrong.
Know Your System
While chrome-plated brass was the industry standard for many decades, modern draft parts are available in stainless steel. Chrome-plated draft parts lose their plating quickly, exposing the brass to the low pH of beer; this can contribute to metallic flavors in beer. The action of beer on brass is to dissolve it and erode the fittings. Hardware store brass fittings should not be used in draft systems. Brass in a water supply relies on the municipality properly adjusting the water chemistry so a small protective layer of calcium carbonate will be deposited on the brass protecting it from erosion. The protective action of properly adjusted water is not duplicated in beer, causing the fittings to erode and depositing the metals into the glass of beer.
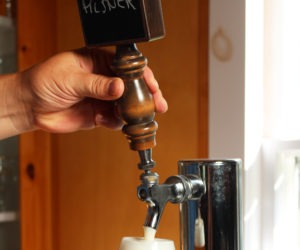
If you study a schematic of a standard draft faucet there are a couple of things that are very important to its function. When we pull on the handle the lever of the handle pulls the valve stem backwards and lifts the rear seal off of the body allowing beer to fill the cavity. The handle has a small paddle on the end that fits a rectangular slot in the valve stem. The back of the faucet and the valve stem are carefully designed to create a laminar flow that does not break the CO2 from the beer. It is very important that the faucet is fully open or fully closed. In between settings, even briefly, will cause the beer to foam.
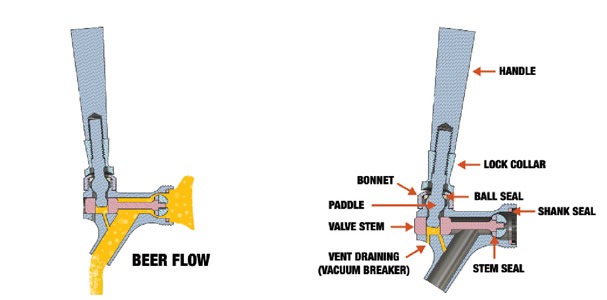
The faucet is designed with two mechanical stability points, fully open and fully closed. The flow and the weight of the handle will hold the faucet closed. When open, the weight of the handle holds the faucet completely open. Faucets should never be used in the in-between positions. In-between positions result in excessive foaming. An exception to this rule: A faucet can be cracked slightly at the beginning of a pour to start a little foam in the glass to correct for an under-carbonated beer.
After the handle is closed it is extremely important for all of the beer to drain from the faucet. There are two small vents that break the vacuum and allow the beer to drain from the paddle’s slot in the valve stem. If these vents get clogged the beer will not drain causing a perfect place to culture spoilage organisms.
Keep It Clean
When yeast ferments wort to beer it can create 2 ATP for each molecule of glucose (glucose —> 2 ethanol + 2 CO2 + 2 ATP). This is important because ATP is the currency of energy inside of cells. If an organism has available oxygen it can create 28 molecules of ATP (glucose + 6 O2 —> 6 H2O + 6 CO2 + 28 ATP)! This is a much better value for organisms. Since the ethanol contains such a rich source of energy many organisms are also able to extract that energy once there is available oxygen. We call them spoilage organisms.
The main spoilage organisms that can tolerate hops and flourish inside of draft faucets are Lactobacillus, Pediococcus, and Acetobacter. These organisms have distinctive flavors and can easily be identified by experienced tasters. Based on taste and smell (not lab culturing) I have found that the Lactobacillus presents as a black thin slime (picture 1 below) and the Pediococcus presents as a gray slimy thick rope (picture 2 below). It is also likely that Brettanomyces is a common beer line infection. It is very unlikely that any contamination is a single organism and lab culturing would show positive for all three and likely more organisms.

Lactobacillus growth

While I have been unable to identify the exact bacteria involved; most people exposed to a very dirty draft line will encounter gastro-intestinal distress. People vary in their sensitivity to this effect but I have found it widely reported. Please don’t do your beer the disservice of causing digestive issues in yourself or your friends.
When a contaminated faucet is opened the contamination actually will spread upstream to the draft line itself. This makes cleaning the line at the same time as disassembling and cleaning the faucet very important.
Large breweries spend a considerable amount of effort insuring that faucets get cleaned in the trade. Some states even require draft line cleaning as part of health code. Many breweries require that a publican allow the distributor to clean the line in states that allow that. At home or in a brewpub this very critical task is left to the brewer. This is a very easy task to put off but it is of the utmost importance if you care about the taste of your beer.
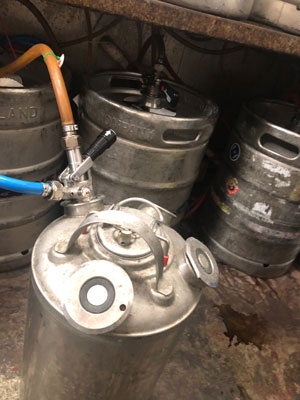
A typical draft line-cleaning regime would be to hook the keg coupler (including any accessories like Foam On Beer detectors) to a keg with hot line cleaner and run line till warm and clear cleaner is being dispensed. At this point the keg cleaner is disconnected and the faucet is disassembled and each part is scrubbed and inspected. It is very important to pay special attention to the rectangular slot, the area above the paddle and both of the vacuum breaking vents. These spots do not allow very much line cleaner to flow through them and are ideal places to harbor bacteria that will re-colonize the faucet. Once the faucet is clean, it is reassembled and a keg or hose of fresh water is coupled onto the draft line and the line is rinsed until it is pH-neutral. You will know when it is pH-neutral when it no longer feels soapy/slimy to the touch.
Most faucets work well when set to pour a pint in 6 seconds although it is common to see a range of 4 to 8 seconds in professionally- designed systems.
A cleaning like this will keep a beer line clean for about two weeks. If we do a better job of cleaning we can keep a beer line clean for 4 weeks. This advanced cleaning procedure involves pulsing cleaner through the beer line with the faucet removed for 15 minutes. Normally one line is used for the send and its flow is looped back through a second line as a return cleaning two lines simultaneously. The cost in equipment is considerable and it is time-consuming but for many brewers there is a net timesaving from the length of time a line stays clean justifying the costs. A third method of line cleaning has been promoted for a few decades now. I have not used the method but the sales people have big claims for it. It involves passing a sponge through the line from the coupler through the shank using cleaning fluid.
There are a few chemicals used for line cleaning. Most beer line cleaners are simply diluted caustic with some anti-foam agents added. My favorite line cleaners also have a pH indicator added. With a pH indicator added, the cleaner runs dark until the pH is in a good range for cleaning and then turns clear. Since calcium oxalate (beer stone) can also build up, line cleaning acids are also available. Beer stone deposits are very brand-specific so your need for this step can be from every 6 line cleanings to never. Beer stone after a caustic cleaning is a white rough surface that looks like pumice. Before the caustic step it can also be brown and rough. All cleaning chemicals work better warm and getting water as hot as 150 °F (66 °C) will speed the cleaning time. It is not recommended to exceed 150 °F (66 °C) as the beer tubing itself can fail. Rinse till the water no longer feels soapy. After the line is clean it is important to taste a small sample of beer. This is a good safety check to make sure the line has been properly rinsed. About once a year I hear of a customer being served a pint of line cleaner. This usually results in permanent damage to the customer’s esophagus.
Once a line is clean, a good but rarely done quality assurance step is to plate the beer for spoilage organisms. A faucet should plate negative for at least 2 weeks if the line cleaning was done properly. Alternatively, you can add 1 oz. of beer from the faucet to 1 liter of 1.040 wort and cover it in a flask. It should stay clear for 7 days. If you are not experienced with using wort in this way you can also make a control flask of wort with nothing added to insure your methods are sanitary.
After a line cleaning session I always take the time to pull a perfect pint and relax. I note the rich head, smell the just released aromas, and feel proud that I did a task well that many brewers and publicans put off till it is too late.