Kegerator Troubleshooting
For any beer lover (or recently CIDER, wine, sake, or kombucha), buying a kegerator is a defining step of being able to enjoy our favorite beverage on draft. The possession of draft beer from home is a true dream . . . until it stops working. Here are a few tips to help out when the beer stops flowing!
PROBLEM 1:
“There’s no beer coming out!”
One of the most common problems with kegerators is that the taps just stop flowing.
1. Check the keg to see if it’s empty. It’s very possible you’ve enjoyed your beer to its finish! Usually this is accompanied by CO2 hissing out of the faucet.
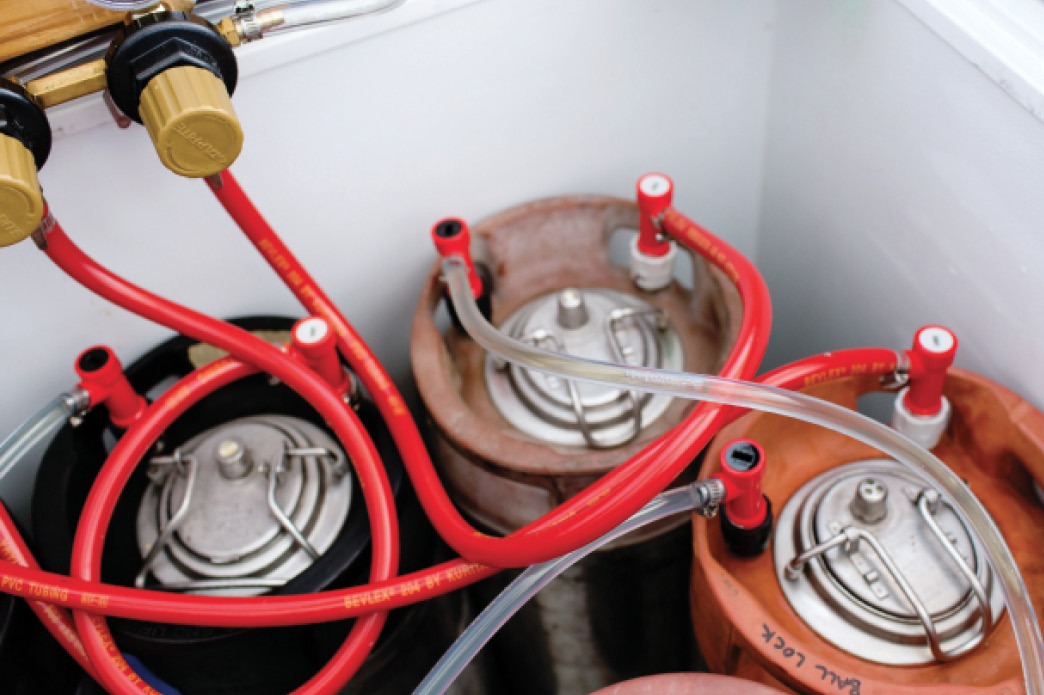
2. Ensure your valves and fittings are properly set:
• For Sankey coupler: Set the Sankey coupler in the valve opening of the keg and twist 90 degrees clockwise until it stops, then either press down or pull out and press down the coupler tap handle to engage beer and CO2 flow.
• For Ball-locks: Hold your thumb on the head of the ball lock quick disconnect and your index and middle finger on the bottom ridge. Press the ridge towards your thumb to release the ball bearings, and place on the correct post fitting. (Grey = Gas- “In” & Black = Beer- “Out”)
• For Pin-Locks: Place quick disconnects on correct post fitting (Grey = Gas- “In” & Black = Beer- “Out”) with pins sliding into the fitting, and twist bottom piece clockwise so that the pins lock in place.

3. Ensure all the valves for CO2 are set to flowing.
4. Check your pressure regulator and lift your CO2 canister to make sure you’re not out of CO2. Of the two gauges, one will represent outgoing pressure, while the other indicates tank pressure.
5. Listen for hissing or feel the extent of the tubing for any leaking gas pressure, possibly from a pinhole leak. A pinhole leak or a loose clamp anywhere on the lines or fittings will quickly dissipate pressure, making little to no pressure to push the beer through the lines.
6. Inspect all gaskets on the keg and valve. It is very common for ball-lock and pin-lock kegs to run through O-rings if used often enough or not lubed with food-grade silicone grease. Make special inspection that there are no cracks on the O-rings.
7. Inspect your beer line, make sure there is no clogging or blockage. If there is a blockage, remove the blockage or replace the line if the blockage is bad enough.
8. Sankey coupler systems only: The check ball may be stuck inside of the Sankey coupler. Take the coupler off the keg, turn off CO2 pressure to the coupler and drain remaining beer in line. Release check ball if not free moving.
*If there is any discrepancy with a commercial keg, especially the Sankey valve gaskets, and it is not pouring correctly or not pouring at all, inform the store or brewery immediately and ask for an exchange so you don’t lose your deposit.
PROBLEM 2:
“My beer is flat!” or “There’s no head on my beer!”
There are a few things to check if your beer is falling flat.
1. Be sure that your beer has no head or little to no carbonation. This should not be confused with a fast dissipating head as is typical of certain styles, especially served at colder temperatures such as American light lagers.
2. What temperature is your kegerator? 38 °F (3 °C) is the typical temperature for serving beer. The higher the temperature, the higher you should set your CO2 pressure.
3. Keep your keg in your kegerator for a minimum of 24 hours before pouring to allow the entire keg to acclimate to the proper temperature and pressure.
4. Turn up the pressure a couple PSI and wait (unfortunately) another day so that the beer will re-carbonate. For most beers in a kegerator setting, anywhere between 7–12 PSI at 38 °F (3 °C) is appropriate depending on the style of beer factoring out atmospheric pressure from sea level.
5. When was the last time you cleaned your lines? Might be time for a tune up!
PROBLEM 3:
“My beer is foaming like crazy!”
Here’s what to look for if you’re pouring beer that’s all head and no liquid.
1. Make sure your kegerator is set to 38 °F (3 °C) for ideal serving conditions. Too high of temperature as well as too low may cause severe foaming. If your beer is at an ideal 38 °F (3 °C), your beer is over-carbonated so the immediate issue will be that the pressure may be too high. To avoid this, verify what your incoming gas pressure is before hooking up your keg, and adjust it in conjunction with your temperature for the proper volumes of CO2 for that particular beer.
2. Keep your keg in your kegerator for a minimum of 24 hours before pouring to allow the entire keg to acclimate to the proper temperature and pressure.
3. Lower temperatures require a lower PSI. Check your pressure and adjust to the ideal PSI for your temperature, beer style, and elevation.
4. Carefully inspect your lines, fittings, and quick disconnects as there might be a pinhole leak, faulty gasket, or loose clamp causing oxygen to mix with your beer rapidly.
5. When was the last time you cleaned your beer lines? Might be time for a tune up! See the sidebar on cleaning your lines to the left.
6. Inspect lines for debris, clogging or blockage and remove it. If the blockage cannot be moved, the lines should be replaced.
7. For Sankey couplers, be sure to tighten the beer “out” nut. You may also want to check if the Thomas valve is still intact or missing — this is a small flute-mouthed gasket on the gas side of the Sankey coupler, seen when you undo the gas “in” nut. This is an important gasket that is very unique because it allows the flow of CO2 out but closes so as not to let beer come back into the gas line. This should not be replaced by a standard black gasket.
PROBLEM 4:
“My beer has a vinegary, sour, or buttery taste”
Some of the biggest problems with kegerators is faulty-tasting beer.Although some styles may have a slightly buttery or sour taste naturally, they are typically off flavors and undesirable in beer. Vinegary is always inappropriate.
1. Vinegary, sour/tart, and buttery flavors are because of contamination if they are not typical of a particular beer style. These are caused by bacteria, such as Acetobacter, Lactobacillus or Pediococcus, in the draft equipment and very rarely are because of the keg if produced commercially (although homebrewed beer may become infected in various ways). The best cure is to clean the draft equipment with a caustic solution at around 80–110 °F (27–43 °C) , not acid. If the issue persists, change the lines and all gaskets, soak the faucet, coupler, and fittings in an appropriate acid solution at 80–110 °F (27–43 °C) for 20 minutes, multiple times, with brushing, and try again.
2. If it’s a commercial beer (not homebrew), contact the brewery to ask if this is a normal taste for that particular beer.
PROBLEM 5:
“My beer tastes papery, cardboard- or Sherry- like”
Papery, Sherry, and cardboard favors are signs of oxidation. This may happen because of pinhole leaks in the line, gaskets, or fittings/couplers that allow beer to become oxidized, especially the first pours of the day. Inspect your lines regularly and try these steps.
1. Clear the entire line of beer before pouring that day, because beer lines are not 100% impervious to gas diffusion. This is especially problematic if beer sits in the line for days between pours.
2. Change the line. Sometimes lines become old, crack, or are made of the wrong material, which allows micro-oxidation. When searching for new line for your kegerator from an online source or your local homebrew store, look for food-grade, pressure and temperature rated, tubing, usually 3⁄16-inch. This is typically easy to find as beer line specific.
3. If it’s a commercial beer, check the date on the keg as oxidation may be a cause of age. Contact the brewery if the taste persists, even with new lines.
4. Make sure all of your gaskets are in good shape and lubricated with food-grade keg lube.
5. What has the maximum temperature been of the keg? Many times oxidation may occur if improper storage conditions have happened inside the kegerator, such as leaving the keg at higher temperatures for long amounts of time.
PROBLEM 6:
“My beer tastes rancid”
A rancid taste in your beer can mean multiple things: Sanitation, temperature, and age. If you know it’s not the beer itself because it was ok when you kegged it, follow these steps.
1. If it’s a commercial beer, check the date on the keg. Even in good conditions, some beers should be served young! If in doubt, contact the brewery. If it’s a homebrew, this is a good reminder to date your kegs (masking tape and a marker works great).
2. Leaving a beer keg for extended amounts of time in high temperatures is detrimental to the beer inside. Always keep your beer in the cooler.
Some other good kegerator tips:
For ideal beer service, you need to find your ideal PSI. Using the chart on page 38 of the Draught Beer Quality Manual by Brewer’s Association (available as a free PDF at http://www.draughtquality.org/) will help you take an accurate account of what your CO2 pressure should be at certain temperatures, factoring in elevation. For the best results per beer, call the brewery for proper volumes of CO2.
It is good habit in addition to cleaning lines and hardware every two weeks to also use a brush plug or faucet cover after each session. Squirt sanitizer into the closed faucet after finished with a drinking session and put in the brush plug or cover. During faucet use, simply leave the brush plug or cover in a sanitizer solution. This ensures better sanitation as well as significantly decreasing the chance of fruit flies.
For a professional brewery, it is typical to clear some of the beer from the line before serving because of sanitation, taste, and to flush any residual sanitizer left in the faucet. You should clear the line at least a few ounces before every drinking session for the same reasons, especially after 24 hours between uses. Off flavors are more likely to occur if you haven’t properly cleaned the lines though, so no amount of flushing will fix that. Although you may think this is sacrilegious . . . so is serving bad beer.
If you serve multiple types of beverages from your kegerator, be sure to not have cross contamination. For example, if you have a wine on tap, be sure that that specific draft line stays limited to wine, and the same goes for beer and sake. If you plan to change a tap line from one type of beverage to another, change the line and clean it as well as soak of all of the equipment (faucet, coupling, and fittings) in an acid solution of the manufacturer recommendation with 80–110 °F (27–43 °C) water for 20 minutes. Rinse with water until the pH is water-neutral and then connect to your other beverage. Note: If if you want to serve wine on draft, only use nitrogen or argon — CO2 will carbonate the wine.
Kombucha on draft is a popular item these days but if you have a kegerator that you would like to start serving kombucha from, kombucha should be its sole purpose from then on. Due to the acetic acid-producing bacteria from the kombucha scoby, any kombucha served on draft has a virtual guarantee of infecting all equipment in the kegerator even after changing lines. Even with new lines and a detailed acid draft equipment cleaning, you still will have to change all gaskets the liquid has touched as the bacteria imbeds itself in the rubber. This is the minimal precautionary action you should take, but it will never be guaranteed. My recommendation is to keep the entire kegerator specific only to kombucha once you start serving it.
Take the advice outlined in this article and you should have no problem keeping beer flowing from your draft and tasting exactly the the way you intended.
If your beer stops flowing from the taps, one of the problems could be with your CO2 setup. First, check the regulator and lift the canister out to make sure you haven’t simply run out of CO2. If it’s not the tank itself, check the lines in case there is a leak in the tubing or a loose clamp.
Check your ball-locks by holding your thumb on the head of the ball lock quick disconnect and your index and middle finger on the bottom ridge. Press the ridge towards your thumb to release the ball bearings, and place on the correct post fitting. (Grey = Gas- “In” & Black = Beer- “Out”).
Cleaning Draft Lines:
One of the most common problems with serving beer from a kegerator is that the draft lines get neglected. This is unfortunate because the result is often bad-tasting beer from what’s left behind in the lines. Both home kegerators and those out at your favorite bar or tap house are often guilty of this — but don’t let bad beer happen to you! Be diligent in keeping those lines clean and you can be assured that your homebrews and commercial beers on draft will always taste great.
There are beer line specific cleaning chemicals that are readily available at homebrew stores and online. For standard cleaning in between every keg, use a caustic solution. Typically professional breweries will do a caustic cleaning every two weeks, or when they change the line to a different beer. Even for the average kegerator owner, this should be the same. Every two weeks and between every keg of different beer, or the same beer, is recommended for best sanitation, taste, and longer life of lines, faucet and couplers.
Before cleaning your lines, and hardware, take precautions as you are dealing with caustic chemicals. Wear appropriate gloves, goggles and mask.
For Sankey coupler: Use a kegerator line cleaning bottle or hand pump. This setup will have a small plastic reservoir where you will put the line cleaning solution into, and a tube connection to a drop in Sankey valve. To operate it, fill the reservoir with caustic solution to the manufacturer’s recommended strength, between 2–3% mixed with 80–110 °F (27 °C) water. Tap the Sankey coupler into the Sankey valve connection, and open the tap faucet. Pump or let CO2 push the solution through the line and out the faucet (keep a bucket under the faucet to collect the caustic solution). Don’t let the caustic solution in the reservoir run out. Before it is empty, stop the flow of solution, close the faucet, and disengage the coupler, keeping solution in the line for approximately 20 minutes. Continue to the “Cleaning draft hardware” section below.
For Cornelius couplings: Mix a gallon and a half (5.7 L) of 80–110 °F (27 °C) water with the appropriate amount of caustic line cleaner to the manufacturer’s specifications, between 2–3%. Connect the gas quick disconnect and allow the keg to pressurize for about 15 seconds, then connect the beer quick disconnect. Put a bucket under the faucet to collect the caustic solution and open the tap faucet. Let about a gallon (3.8 L) of solution flow out, close the tap faucet, and unhook the beer quick disconnect, leaving the solution within the line for approximately 20 minutes.
Cleaning draft hardware: Open the tap faucet to release any excess pressure; not much should drip out. Take a faucet wrench and unhook the faucet body from the coupling. Disassemble the faucet body and soak all the pieces in the bucket of caustic solution for 20 minutes. Take a small tube brush and scrub all of the pieces of the faucet, especially anything with threading. Reassemble and attach to the faucet coupling. Dump the reservoir or keg of caustic solution and fill with water. Run the water through the line and faucet to rinse out the solution. Using pH strips, continue rinsing until it is water neutral. Hook up new keg and pour for 10 seconds before serving.
*Acid cleaning a kegerator is the same process, but instead of caustic solution you would use an acid beer line cleaner. Acid cleaning is needed far less in kegerators than in professional breweries, where it is done quarterly. In the event of line infection or deep cleaning, do an acid cleaning, following the manufacturer’s dosage.


