Running Wild Fermentations at Home
 “I remember several years ago Jean Van Roy at Cantillon telling me, ‘You can spontaneously ferment in the United States, but, keep in mind that it probably won’t be the same way we do it here. You might have to come up with your own program.’ In the case of Allagash they’ve pretty much been able to copy how it is done in Belgium and they are getting amazing/similar results as our friends in Belgium. For us, we’ve had to come up with a couple of hybrid methods to make it happen.”
– Vinnie Cilurzo, Brewmaster and Co-Owner of Russian River Brewing Co.
Out of all of the ways to sour a beer, the most romantic is to let the fresh wort ensnare wild yeast and bacteria from the air as it slowly cools. People often refer to Brettanomyces as “wild yeast,” but the truth is that the strains most brewers pitch have been selected, isolated, and propagated and are no longer truly wild. While using untamed microbes may not be as easy as pitching a mixed culture from a Wyeast or White Labs, the flavors created can be far more exciting.
A mixed culture of wild yeast and bacteria was the only option for fermenting beer until Louis Pasteur identified and isolated brewer’s yeast (Saccharomyces) 150 years ago. While brewers in Germany and England continue to produce beers with microbes in addition to Saccharomyces (like Berliner weisse and a few traditional old ales), the only place where spontaneous fermentation survived on a commercial scale was in Belgium. However, as public tastes gravitated more towards sweetness, most large Belgian producers began blending pasteurized lambic, fermented in stainless steel, with fruit syrup. With dry, sour beers regaining popularity, the handful of traditional Belgian lambic brewers and gueuze blenders who remain are lauded for producing beers with a balance of acidity and complexity unrivaled by any other fermentation.
Over the last decade, a small number of American brewers have not only started to experiment but have also succeeded with their own spontaneous fermentations. Despite the risks, more than a dozen craft brewers scattered across the country (including New Hampshire, California, Texas, Alaska and Michigan) are fermenting with their own local microflora. Although I have not yet tasted a spontaneously fermented American beer to equal a gueuze from 3 Fonteinen, Girardin or Cantillon, it may only be a matter of time and commitment.
Wort Production
When planning to spontaneous ferment any beer, you need to start with suitable wort. Standard pale ale wort, for example, is not a good candidate for spontaneous fermentation. Aside from the fact that sour and bitter flavors don’t generally work well together, this type of wort is a poor choice in that even moderate hop levels inhibit some of the bacteria that are needed to produce these beers.
Using the right recipe and wort production techniques will increase the probability of a success. Produce a wort rich in chains of sugar molecules too long to be fermented by Saccharomyces, dextrins and starches. For lambics, this result is traditionally accomplished with a turbid mash. No complex regimen is required, but I suggest using a conversion rest at least in the high 150 °F (around 70 °C) range. Wild Brettanomyces, Lactobacillus and Pediococcus produce the enzymes necessary to ferment these complex carbohydrates. (If you don’t do a turbid mash or accidentally end up with mash temperatures near the lower end of the usual range, don’t worry that your wort won’t sour at all; even the driest beers achieve only about 75% real attenuation.)
While any grain bill suitable for a pitched sour beer could be used, every American brewer experimenting with spontaneous fermentation that I have spoken with has stayed close to the lambic template: between 30 and 40 percent unmalted wheat, with the remainder being Pilsner malt. Extract brewers can substitute wheat malt extract supplemented with 10% maltodextrin to boost the percentage of dextrins in the wort.
Spontaneous fermentation is the single sour beer brewing method that absolutely requires aged hops. Their antimicrobial contribution prevents wild Lactobacillus from reducing the pH of the wort too far before Saccharomyces has sufficient time to complete its fermentation.
Aging hops at a warm temperature and exposing them to air causes their alpha acids to oxidize, thus reducing their bitterness contribution. While isomerized alpha acids are partly responsible for the antimicrobial properties of hops, enough other compounds survive, or are created by oxidation, to maintain the desired effect. Many of these other compounds have low solubility characteristics in wort, which is part of the reason that aged hops should be boiled in the wort for an extended period of time (three to four hours). If, on the other hand, you were to use a sufficient amount of un-aged hops to inhibit Lactobacillus, the bitterness they contributed would clash with the sourness in the resulting beer.
You can usually buy hops that have already been aged or debittered for a reasonable price. Homebrewers might also consider aging their own hops if planning on frequent spontaneous fermentations. The standard approach is to place whole, low alpha acid hops in a container large enough to allow air circulation. Keep the container out of direct sunlight, and in low humidity to prevent mold growth. After three years properly (poorly) stored hops will smell similar to dried hay. Adequately aged hops will not smell excessively cheesy or off, although their aroma may be slightly unappealing. The extended boil also helps to volatilize any off-aromas.
In the absence of aged hops, a method for accelerating the debittering process is to bake the hops at your oven’s lowest temperature setting, stirring occasionally, until tan and crisp. Jeff Sparrow’s book, Wild Brews (2005, Brewers Publications) suggests 4 ounces of aged hops per 5-gallon batch (120 g in 20 L) as the traditional rate used by Belgian lambic brewers. However, the American brewers I talked to have all settled on lower hopping rates. The range spanned from 2.6 to 3.3 ounces per five gallons (80-100 g per 20 L). The brewers of Allagash tasted a metallic off-flavor in early batches of their spontaneously fermented beers and traced the cause to the traditional lambic hopping rate.
Safety
An oft-repeated reassurance to beginning brewers is that no matter how bad a beer tastes, it will not make you sick. Although true with standard fermentation, it is not necessarily the case when it comes to spontaneous fermentation. When I spoke with Jason Perkins, Head Brewer of Allagash, about his coolship, he was audibly nervous at the thought of homebrewers attempting something similar. He warned me that “the things that usually keep you safe aren’t there. You are making a big yummy nutrient soup that all the things you worry about can grow in.”
For the first few weeks of fermentation, there is a chance that pathogenic enteric bacteria, like Escherichia coli and Salmonella, might take up residence in your beer. Luckily, as soon as the desired yeast and bacteria lower the pH and produce sufficient alcohol, the danger is gone. Evaluate spontaneous fermentations only by sight and smell for the first month. Do not taste samples early in fermentation.
If growing a big vat of E. coli seems like a bad idea, then artificially lower the pH of the wort below 4.4 to prevent these bacteria from reproducing. Acidification could be accomplished with a sour mash, sour worting or acid malt, but adding food grade lactic acid is the easiest method. The off flavors some enteric bacteria produce during the early stage of a spontaneous fermentation can be used by Brettanomyces to produce complex fruity esters, but for many brewers the risk is not worth the reward.
Timing Your Brew
Outside temperature is the key indicator for determining the best time to capture wild microbes. Wild Brews reports that during the hot summer months lactic acid bacteria are too prevalent for successful spontaneous fermentation. Several brewers suggested to me that vinegar-producing Acetobacter is the graver concern. Hot summer temperatures also slow natural cooling, allowing thermophilic bacteria more time to flourish before the wort cools below 105 °F (41 °C) where yeast can thrive.
Before undertaking their spontaneous fermentation project, the brewers at Allagash compared their weather pattern in Portland, Maine to the epicenter of lambic brewing, Brussels, Belgium. During most of the year, temperatures are similar, but since Maine is much colder in the winter and lambic brewers do not brew in the heat of the summer, Allagash decided to avoid starting spontaneous fermentations in both winter and summer. Jason considers an outside temperature of 40 °F (4.5 °C) to be ideal.
Inoculation
One way to think about the process for producing lambic/gueuze is that the wort is being fermenting by a carefully selected and propagated mixed house culture. Microbes floating on the breeze land in the wort and initiate fermentation in the “horny tank,” but at this point the beer is pumped into microbe rich barrels that held previous batches of fermenting lambic.
For decades lambic brewers and blenders have been reusing the barrels that have yielded good beer, and getting rid of the ones that have produced less pleasing brews. The first time a barrel is filled with wort it is usually inoculated with microbe laden beer from an established barrel to increase the chances that it will produce high-quality beer. Obviously, for your first batch, you will not have this option.
Cool the hot wort in a wide vessel to speed the dissipation of heat and provide more surface area for potential microbe landing sites. While a copper or stainless steel coolship is traditional for lambic brewers, American breweries without this specialized vessel have used mash tuns, open fermenters, and oak barrels. Rapid cooling is less of a concern for homebrewers because of the smaller volume of wort. As such, your boil kettle is a fine option.
Location
There are ongoing debates over the best location to expose your cooling wort for inoculation. Lore holds that areas near orchards or vineyards are ideal because the sugar-loving yeasts that ferment the fallen fruit are well adapted to sugary wort. Interestingly, Brasserie Cantillon is located in an urban part of Brussels where only a few cherry trees remain, not the bucolic landscape depicted on their labels.
If for any reason you have a pessimistic outlook on the microbes in your neighborhood, you can move your wort to a more favorable location for inoculation. Gabe Fletcher inoculated his first batch of spontaneous fermented beer at Anchorage Brewing by driving the wort filled barrels several hours outside of Anchorage into the wilderness of Slana, Alaska. In Slana, Gabe opened small lids which he had cut into the top of each barrel, thus exposing the wort for two days to the air next to wild blueberry bushes.
It seems as if there are as many inoculation techniques as there are breweries attempting it, some prominent examples are highlighted below.
For their Coolship series, Allagash installed a shallow stainless steel basin in a small room attached to the side of the brewery. When each three-and-a-half hour boil is complete, the brewers pump the wort into the coolship through a screen that catches any stray hops. The wort is then allowed to sit undisturbed with the windows open and an exhaust fan running until it cools to 60–65 °F (16–18 °C). The exact amount of time to cool depends on outside temperatures, but 12 to 18 hours is the expected range. Once the wort is cool it is moved to a stainless steel tank to ensure that the microbes that landed on its surface are evenly distributed among the barrels.
Three days is the fastest Allagash coolship wort has started fermenting, and some barrels take as long as a week. Fermentation, once it has started, is often so vigorous that the kräusen overflows out of the barrels. Saccharomyces fermentation lasts 10 to 11 days, at which point 80% of apparent fermentables have been consumed.
At Jolly Pumpkin in Michigan, the boiled wort for Lambicus Dexterius is sprayed into one of their shallow open-fermenters to kick-start cooling. The wort temperature drops slowly overnight as the brewery’s HVAC (heating, ventilation and air conditioning) system draws in microbe laden air from the outside. The next day, the now cool wort is ready to be pumped into well-used barrels. Fermentation usually starts within 24 hours in oak, 48 hours at the most. Owner and Brewmaster Ron Jeffries credits the quick onset of activity to the microbes in the wood rather than those that land in the cooling wort from the air. Those same wild microbes also serve to sour all of the other beers that Jolly Pumpkin releases, although they are also pitched with cultured brewer’s yeast.
Cambridge Brewing Company in Massachusetts (CBC) spontaneously inoculates the base beer for their potent “imperial” lambics using a unique method. The five oak barrels holding the current batch were first filled with boiling water to kill the microbes living in the wood. The water was emptied and each barrel was filled 20 percent full with boiling wort directly from the kettle. The bunghole of each barrel was covered with cheesecloth. The goal was to draw air from the barrel cellar into each barrel via the vacuum created as the wort and air cooled. The remaining 80 percent of the batch was pumped into CBC’s clean mash tun. The manway was left open, the doors and windows of the brewpub were opened, and fans were run to introduce wild microbes. One day later, the cool wort in the mash tun was used to fill the barrels. The batch took three days to show signs of fermentation, at which point the barrels began erupting with kräusen.
The original process for Russian River’s Sonambic (it is transformed into Beatification when it is blended and packaged) started with a complex step mash. After mash-out an overnight sour mash prepared the mash tun for its role as makeshift coolship. The following day, while the wort boiled, the empty mash tun was rinsed with cold water. This water ensured that most of the spent grain was removed, but the lactic acid bacteria that multiplied during the sour mash were still present. Once the boil was complete the wort was pumped through the heat exchanger and into the mash tun. Vinnie eventually settled on 60 °F (16 °C) for the target wort temperature going into the mash tun. This temperature delayed the peak of fermentation for a couple of weeks and led to lower final acidity compared to warmer knockout temperatures. After spending a night in the mash tun, the wort was pumped into wine barrels which had previously aged Russian Rivers’ other sour beers.
In late 2011, Russian River installed a 19 ft long by 4 ft wide (5.8 m by 1.2 m) coolship that they began inoculating Sonambic in. As the primary purpose of the sour mash was to inoculate the mash tun with microbes, the sour mash procedure is no longer part of the brewing process.
Personal Experimentation
Despite the success that American craft brewers have had with Belgian inspired methods, most homebrewers report poor results from the combination of traditional inoculation methods and fermentation in a glass carboy or plastic bucket. (Because some of the microorganisms at work in a sour fermentation are microaerophiles, organisms that thrive on small amounts of oxygen, buckets are a better choice than carboys since they let in tiny amounts of oxygen over time.)
For my first attempt at fermenting with microbes native to Washington, DC, I decided to use a more reliable method. To reduce the risk of catastrophic off-flavors, I captured and propagated multiple wild cultures in advance of brew day.
On a chilly March night, I concocted a half gallon (1.9 L) of low gravity, 1.030 (7.5 °P), wort from light dried malt extract, half an ounce (14 g) of three-year-old Willamette hops, and a pinch of yeast nutrient. For this method, the hops do not need to be aged because the bitterness imparted by un-aged hops would be diluted when the starter is pitched into the wort. (However, keep in mind that hops have anti-bacterial properties, so keep the hopping rate low.)
After the 15 minute boil, I divided the still hot starter wort into three sanitized metal pots. To prevent insects from getting into the wort as it cooled, I covered each with a single layer of cheesecloth secured with a rubber-band. I placed starters in my backyard (at 42 °F/6 °C), living room (at 62 °F/17 °C) and basement barrel room (at 57 °F/14 °C). The following morning, with the wort cooled, I poured each into its own growler and left them at 62 °F (17 °C). I did not aerate the wort any more than what occurred as it was being funneled into the growlers. I immediately attached a stopper and airlock to each.
The first signs of fermentation took three days to appear in the starters, and even then the visual signs indicated only weak activity. I left the three starters alone for three weeks, thus providing adequate time for alcohol and acid production to inhibit enteric bacteria (like E. coli). Even after three weeks, I did not feel safe tasting the starters. I dumped out the “upstairs” starter because it smelled foul and was covered in black mold. The “outside” starter had a few spots of white mold and smelled spicy while the “barrel room” starter had no mold and smelled like over-ripe fruit.
Using freshly brewed starter wort, I doubled the volume of the two remaining starters. For this growth step, I crimped a piece of sanitized aluminum foil over the opening of each growler, shaking a few times per day to oxygenate. Both starters resumed fermenting quickly and smelled clean and pleasant. When fermentation slowed, I attached airlocks to limit oxygen exposure thus preventing the mold from reappearing. At this point I finally tasted the starter beers, and to my relief discovered that they had each developed a fruity yeast flavor and light lemony tartness.
I force chilled 5 gallons (19 L) of traditional lambic style wort to 65 °F (18 °C) using my wort chiller. I shook both starters and pitched 1 quart (0.95 L) from each into the cooled wort in a 6-gallon (23-L) fermenter. Visible fermentation took less than 24 hours to appear.
Making wild starters is no guarantee of success, since you will not be able to tell how the character of the wild yeast and bacteria will change with additional aging, but it will reduce the chance of producing an undrinkable beer. If you get a particularly wonderful culture, then follow the lead of lambic brewers by repitching your microbes into future batches rather than starting from scratch each time.
Fermentation
Whatever technique you choose, once the wort is inoculated, your work is complete for a year or two. Lambics are traditionally left in the primary fermenter so that the Brettanomyces can benefit from the nutrients ejected by autolysing (dying) Saccharomyces cells. I find that this enhances the beer’s rustic, funky character. If you want a cleaner character — think Flemish Red compared to a traditional gueuze — rack the beer off of the trub into another fermenter after the initial vigorous fermentation subsides.
While it lasted, the kräusen of my batch was composed of large, delicate bubbles. A light kräusen is a sign that the yeast strains at work are less flocculant than brewer’s yeasts. For the first few months the beer exhibited a strong tropical fruit aroma combined with moderate clove, but these faded as the beer aged. Gabe Fletcher described tasting a similar flavor progression from the spontaneously fermented beer he brewed while still Head Brewer at Midnight Sun (thousands of miles from where I live). At one year old, my beer has a light acidity and a wonderful aroma with hints of pipe tobacco, and spicy Brett funk.
Blending/Flavoring
With the wide variations in character that spontaneous fermentation produces, all commercial breweries blend batches and barrels to produce their final beer. Allagash Resurgam, the non-fruit version of their Coolship series, is produced by blending several vintages (for example 24-month, 18-month, and 6-month old). Russian River, and Jolly Pumpkin have similar blending programs to produce Beatification and Lambicus Dexterius.
You have to be daring to start several of these batches simultaneously, but blending is a requirement of producing a beer with the balance of a great gueuze. Try to inoculate batches in different locations or at different times of the year, to create a wide variety of characters to blend with. Even the best lambic breweries have barrels that are so acidic that their only use is in shining the copper kettles.
Spontaneously fermented beers can be flavored just as you would any other sour beer. Allagash produces three fruited versions Red (raspberries), Cerise (Montmorency cherries), and Balaton (Balaton cherries). Before you ask, founder Rob Tod has sworn off the idea of adding the ubiquitous Maine blueberry. CBC adds fruit to their imperial lambic to create Kriek du Cambridge (cherry), and Rosé de Cambrinus, which takes its name (and inspiration) from Cantillon’s cherry and raspberry infused Rosé de Gambrinus. Honey Badger is a similar concept to Hanssens Mead the Gueuze, although rather than blending with mead, Brewmaster Will Meyers adds honey to the base beer. Russian River made their first batch of Framboise for a Cure by aging Sonambic on raspberries. Rather than adding fruit, Jolly Pumpkin blends a small amount of Lambicus Dexterius into its light hoppy Bam Bière to create Bambic.
My plan is to add a few pounds of mulberries, harvested from the tree growing in my backyard, to half of the DCambic to impart their unique earthy fruit flavor and deep purple color. Local fruit will contribute wild yeast of its own, and could be added earlier in the process to increase the role these microbes play in the fermentation.
What Are You Waiting For?
As with most aspects of brewing sour beer, there is no single preeminent method for starting a spontaneous fermentation. What works for one location or brewer will not work for all. It is important to focus on the commonalities of the methods, ensuring a quick start to fermentation while avoiding too much early activity from Lactobacillus. Once fermentation starts, make sure that you heed the advice presented in “Sour Beer Orientation” from the November 2011 issue of BYO to monitor the progress of the microbes.
A quick overview of a plan to spontaneously ferment at home might look something like this: First, decide how much beer you want to produce and in how many batches. More batches will give you more potential different contributions to your sour beer blend, but also (obviously) are more work and each has a non-trivial chance of failure. Round up the requisite numbers of buckets, airlocks, etc., and be sure you have a place to store them long term. Fermentation takes many months at a bare minimum.
Second, find out when your overnight temperatures are likely to be in the low 40s °F (around 5 °C) and schedule your brew days. If you live in a rural or semi-rural area, you may also want to scout locations to let your worts cool or to set out starter worts to collect wild microbes to pitch later.
Although you could attempt to inoculate your batches by simply exposing them to the air as they cool, you will greatly increase your chances of success by gathering many samples of wild microbes and determining which have the highest potential.
On brew day, make your wort in the evening and let it cool overnight. Using cheesecloth or something similar to screen your wort will keep insects out. The next morning, transfer the wort to a bucket and add your wild microbe starter, if you made one. From this point onward, all you need to do is wait for the beer to ferment and sour.
This style of fermentation demands patience, blending and the willingness to dump beer, but with some skill and luck you can make a beer that is more exciting and rewarding than anything fermented with the relative safety of cultured microbes from a tube.
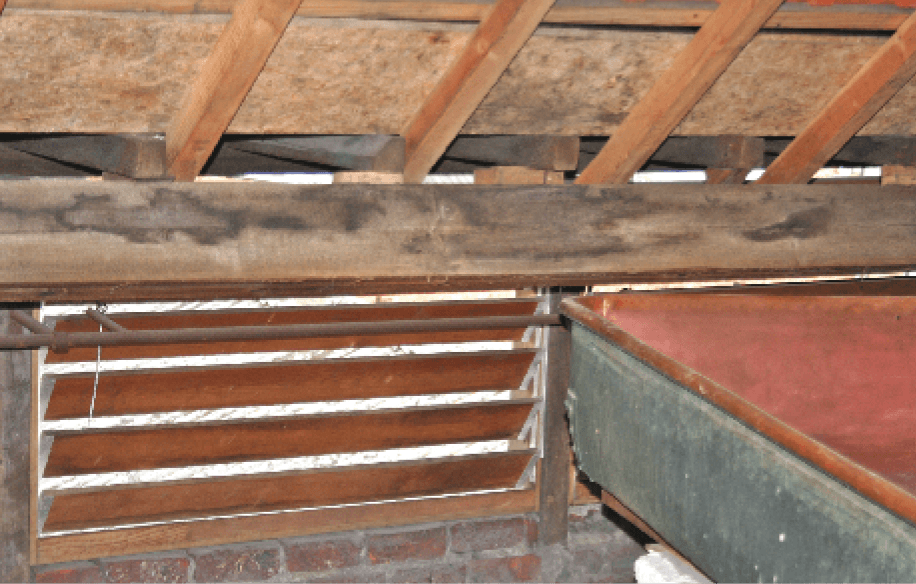
The coolship at Cantillon (the corner of which you can see at right) and the louvers that let in air to cool the wort. Some US brewers have now installed coolships for sour beer production, but homebrews can simply use any relatively shallow container, even their kettles.
DCambic
(5 gallons/19 L, all-grain)
OG = 1.050 FG = 1.004
SRM = 4 ABV = 6.0%
Ingredients
6.25 lbs. (2.8 kg) German Pilsner malt
3.20 lbs. (1.5 kg) unmalted wheat
3 oz. (85 g) three-year-old Willamette hops (195 mins)
Step by Step
Use a turbid mash or single infusion mash (see below). Boil wort for 3 hours 45 minutes with 3 oz. (85 g) of three-year-old Willamette added at 195 minutes left in boil.
In the primary fermenter, add 0.75 oz. (21 g) oak cubes that have been boiled for 10 minutes. Age in the primary fermenter until the desired flavor is reached and the gravity is stable. Carbonate to 3.0 volumes. This can be accomplished with the addition of sugar. If using the traditional method, blending old and younger batches, target a combined gravity of 0.003 higher than the gravity of the driest component (carbonation with this method can take a year of bottle conditioning to achieve).
Mash Option: Substitute flaked wheat for the unmalted wheat berries and use a single infusion mash rested at 158°F (70°C) for 45 minutes.
Extract Option: Substitute all of the grain for 5 lbs (2.25 kg) of wheat DME and 9 oz (.25 kg) of maltodextrin.