Wort Chilling
One of the first challenges a new brewer runs into is how to chill their boiling hot wort down to room temperature to pitch the yeast. I recall filling the bathtub with water and a few bags of ice in an effort to get my first batch of extract-produced homebrew cool enough so I could add the tiny packet of dry yeast. Initially it cooled very quickly, but those last 10 °F (5 °C) seemed to take forever.
Within a few months one of my first major equipment upgrades was an immersion chiller I made from some copper tubing I picked up at the hardware store. I wrapped it around a coffee can to make a coil and bought some fittings to attach it to my garden hose, creating a primitive copper immersion chiller. This system lasted some 20+ years before I finally upgraded to a larger brewing system and a plate chiller.
The basic physics behind wort chillers is easy to understand and drives the various designs, so I’m going to cover the physics up front before we go into each design. There are four basic designs used by homebrewers: The ice bath, immersion chillers, counterflow chillers (often called tube-in-tube in the heat transfer world), and plate chillers, aka plate heat exchangers. Most commercial brewing systems use plate heat exchangers for wort cooling.
Before we dive into the science and design of wort chillers, let’s discuss some of the advantages of chilling your wort.
Why Chill Your Wort?
You can make beer without taking measures to actively chill your wort. There is a method called “no chill” where hot wort is transferred into a sanitized sealed container and left to sit overnight. The next morning it is transferred into a fermenter and yeast is pitched. I’m personally not a huge fan of “no chill” brewing for the reasons I’ll outline in the next few paragraphs, but it can be done, and you can still make great beer this way.
Setting aside “no chill” for a moment, there are some advantages to chilling your wort as quickly as possible. These include reducing the risk of infection, improving the clarity of your beer, and reducing the risk of off-flavors.
One of the primary reasons to quickly chill your wort is to reduce the risk of infection. As soon as the wort temperature drops below about 140 °F (60 °C), there is a risk that wild yeast or bacteria can infect your wort before you get a chance to pitch your yeast. The longer you spend in this “lukewarm” zone, the greater the risk.
A second reason to chill your wort is that it improves the clarity of your beer. Wort contains proteins and tannins that are a byproduct of both hops and malt. Some of these precipitate out as part of the “hot break” when you first start to boil the wort. However if you chill your wort quick enough you will also get a substantial “cold break” of proteins, tannins, as well as hop material that will precipitate out. This is what brewers call the “trub” or sediment that remains after you chill your wort. Since these proteins and tannins are a major cause of haze, reducing them at this stage will give you clearer beer.
Another reason to chill your beer quickly is to reduce the risk of Dimethyl Sulfide (DMS), which can result in a creamed corn off-flavor in the finished beer, and is a particular risk for lagers. DMS is formed by heating a chemical called S-Methyl Methionine (SMM), which is an amino acid formed during the germination and kilning of the malt. Fortunately, a vigorous boil will substantially reduce the DMS in the finished beer, but SMM continues to be converted to DMS well below boiling, so you don’t want to leave hot wort sitting around for hours after the boil. Chilling it quickly eliminates this risk.
The Science of Wort Chillers
All wort chillers follow the basic laws of thermodynamics, and these laws govern chiller design.
There are three ways to transfer heat between a hot object and cooler one: Radiation, convection, and conduction. When we look at something like a hot pot of wort, all three of these principles will apply, but conduction is the primary method used in wort chillers.
Radiation is the transfer of heat via electromagnetic waves. All objects radiate energy via infrared waves. For example, your hot pot of wort will radiate some energy to the surrounding area you could easily see if you looked at it through an infrared camera.
Convection occurs when a fluid, such as your wort, is heated or cooled. The heated fluid tends to flow away from its source, which is why hot air rises. Convection creates currents within fluids and gasses which transfer heat. Convection is going on inside of your hot kettle of wort, which is why you may get hot spots or cool spots within the pot as it boils or chills.
Conduction is the final heat transfer method and involves the direct transfer of heat between objects that are touching. Molecules at higher temperature collide with those at lower temperature increasing their kinetic energy. Metals also conduct electricity extremely well because they have free moving electrons that rapidly transfer energy between atoms. This is the heat or cool you will feel if you put your hand directly on a window or touch a hot surface, and is also the main method used to chill your wort.
While radiation and convection are occurring when you chill your wort, these processes are relatively slow. You could leave a hot kettle of wort open to the air and it will slowly radiate the energy away. Convection will eventually result in a constant temperature in the wort as it cools, and some energy will also directly conduct through the pot and into whatever is holding your pot, but it will take a long time.
The Conduction Equation
Since conduction dominates the overall design of chillers, let’s take a look at the basic conduction equation. This equation assumes that you have two materials at different temperatures like our wort and chilling water separated by a boundary material like the chiller itself.
Q = k A ∆T
Where:
Q = Heat transferred per unit time
k = Thermal conductivity of the boundary material used
A = Area of the boundary
∆T = Difference in temperature between wort and chill water
Put into words, the rate of heat transfer is simply a product of the thermal conductivity of the boundary material, area of the boundary, and the difference in temperature between the wort and chill water. Any of our modern wort chillers have wort at a hot temperature and use some kind of lower temperature water source such as water from a garden hose or faucet on the other side with a boundary in between, so the
equation applies.
When designing a wort chiller, the goal is to maximize the rate of heat transfer Q, since we want to chill the wort as quickly as possible. So let’s look at each of the terms on the right side of the equation to see how we might design a chiller that maximizes heat transferred.
The first term, k, is the thermal conductivity of the material used to separate the wort and chill water. For efficient heat transfer we might want to pick a material that has high thermal conductivity. For example, the thermal conductivity of an insulating material like a Styrofoam cup is very low at around 0.03 W/(m K), while stainless steel has a conductivity k of around 20 W/(m K) and copper can be as high as 392 W/(m K)
in conductivity.
Not surprisingly, most wort chillers are made from metal as it conducts heat well and is relatively easy to clean using chemical agents. Copper and stainless steel are the two metals most often used in both homemade and commercial chillers.
Because copper is such a great heat conductor it is frequently used
by homebrewers, though stainless dominates the commercial market. This is mainly due to the fact that stainless is resistant to corrosion when cleaned using commercial cleaning agents.
The next term in our equation is A, which represents the heat transfer surface area between the cold chill water and hot wort. If we can increase the area of the boundary, we can also increase the heat transfer. This is the principle idea behind plate chillers, which use multiple layers of thin metal in a sandwich to maximize the area between hot wort and cold water. Each layer is roughly the height and width of the chiller, so if you have a few dozen layers you can create the equivalent of a very large area for heat exchange Most commercial heat exchangers are built on this principle and larger chillers often just add more plates to an existing design.
The final term, ∆T, represents the difference in temperature between the wort and cooling water. The larger this difference is, the faster the heat exchange. So if we could, for example, pump ice cold water into our chiller the entire time it would work much better than lukewarm water from
the tap.
If we consider the consequences of ∆T on a real world chiller, several other facts come to light. For example, hot wort cools more quickly than cool wort because of the higher ∆T. As the wort chills, the ∆T between the wort temperature and the chill water becomes smaller, so the heat transfer rate, Q, becomes smaller. That’s why something like an immersion chiller will drop the temperature very quickly at first, but may become agonizingly slow as you get near room temperature.
If we consider ∆T from the perspective of chill water flowing through our chiller, the chill water temperature is also heating up. So chill water entering one end of our chiller may be nice and cold, but it will heat up as it runs through the chiller, thus becoming less effective. This is not a bad thing, as the water has already absorbed a lot of heat from the wort, but in a design like an immersion chiller it will result in hot and cold spots in the wort. This uneven cooling creates significant challenges for immersion chillers as adding length does not always result in faster cooling.
A final consequence of ∆T is that we want to maximize the flow of chill water through our chiller, while limiting the flow of wort. Pumping more chill water through is usually a good thing as chill water absorbs heat and carries it away from the wort. However in something like a counterflow or plate chiller we’re usually trying to regulate the flow of hot wort so we can achieve a target temperature on the output of the chiller.
Obviously the design of real-world chillers is a complex subject as real flow rates, temperature changes, manufacturing, material, cleaning, cost, and maintenance considerations come into play. However the first principles represented by the conduction equation above are the driving force in chiller design. The underlying thermodynamics are the main reason why most chillers fall into a few simple design types.
The Ice Bath/Cold Water Method
Many of us started our brewing hobby with a simple extract kit. Lacking a chiller, most of us either added cold water directly to the wort if we did a partial boil, bringing the total volume up to the desired volume, or immersed our pot or fermenter in a bathtub full of ice water. Let’s take a look at the effectiveness of those two methods.
Adding cold water directly to the wort to chill it can be done with many extract kits that use a partial batch boil. There is a slight risk of infection when adding tap water directly to the wort, but you can pre-boil or use filtered/bottled water to mitigate it. Obviously you need to chill the water you are adding as it won’t reach room temperature quickly if you add lukewarm water.
The problem with the direct addition of cold water is that our old friend ∆T kicks in. Consider, for example, a volume of wort at 212 °F (100 °C) mixed with an equal volume of chilled water at 39 °F (4 °C), the temperature of the typical refrigerator. Since the volumes and heat capacity of the two additions are the same, it is pretty easy to show that the temperature of the mixture will be the average of the two temperatures, which is:
(212 + 39)/2 = 126 °F
or
(100+4)/2 = 52 °C
So the wort is still well above room temperature, and too hot to pitch the yeast. It will take a long time for that wort to reach a good pitching temperature if no further measures are taken to cool the wort.
Taking your pot or fermenter and immersing it in a bath of ice water is a more effective technique. If we recall that metal is a better heat conductor than glass or plastic, the boil pot may actually be the best choice for this method. Assuming you have enough ice to keep your bath of ice water near freezing, you will get a steady transfer of heat from the wort to the ice bath over time until you reach your target temperature.
The main concern with this method is that you will need to stir both the wort and ice bath to avoid getting hot/cold spots near the boundary. Also you do have a fairly small area, A, in contact between the wort and bath when we compare it with something like a plate chiller, so this method can take more time than a dedicated chiller, and obviously you need a lot of ice. For example, a 12-inch diameter, 12-inch high pot (0.3 x 0.3 meters) has roughly a volume of 5.8 gallons (22 L) but the area, A, of the pot bottom and walls is 565 square inches (0.36 square meters), which we can compare against other alternatives.
The advantage of this method is its simplicity. You can use a deep sink or bathtub as your ice water bath, and you need no extra equipment other than a few bags of ice and some patience.
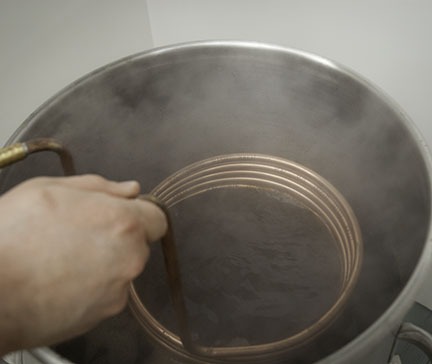
The Immersion Chiller

The next step up for most brewers is a simple immersion chiller. This is typically made from a long length of copper tubing wrapped into a coil of some kind. If you are going to build your own, I recommend using at least 3⁄8-inch (9.5 mm) inner diameter tubing as the smaller tubing restricts the flow of chill water too much. You also need appropriate fittings to adapt the chiller to a garden hose or kitchen faucet. Some commercial models are also made from stainless steel tubing for easier cleaning.
To use an immersion chiller, you immerse the coil in your kettle and then flow cold water through the coil. The chill water is coldest where it enters the chiller, so you will create a “cold spot” on either the top or bottom (depending on which direction you drive the water) as well as near the chiller boundary. You can occasionally gently stir the wort to avoid hot and cold spots.
The effectiveness of the immersion chiller depends on the same three terms we discussed earlier, k, A, and ∆T. All things being equal, a copper chiller will transfer heat more quickly than a stainless steel one, and is also considerably more effective than trying to immerse a stainless pot in water. If we look at typical area, A, for a chiller, consider a 1⁄2-inch (12.7 mm) outer diameter tube that is 25 feet (7.6 m) long. The raw area of the outside of the tube is 473 square inches (0.3 sq. m), which is comparable to the total area of the immersed 5.8-gallon (22-L) pot we considered earlier.
Considering ∆T, most tap water is not quite ice cold, so immersion chillers do tend to slow down considerably as the wort approaches room temperature. However, some immersion designs do include a second stage coil into what is called a “two stage immersion chiller.” In this design, a second coil is added up front and immersed in a pot of ice water. The idea is to pre chill the chill water entering the main coil, so you get faster cooling. This can be particularly effective if your tap water is a bit warm or you want better performance when the wort approaches room temperature.
Overall the performance of a typical immersion chiller can be quite good, particularly for small batches at or below the 5-gallon (19-L) range. Larger batches may need a bit more chilling power. In addition, immersion chillers are relatively simple to clean and maintain, and are also very affordable. Finally, since the chiller works in the kettle before you transfer your wort to the fermenter, you are able to leave most of the trub behind in the pot. This can be a substantial advantage since a lot of proteins, tannins, and hop material precipitate out of the wort as you chill it and most brewers want to separate this trub material from the wort
before fermenting.
Counterflow Chillers

A counterflow chiller is similar in basic design to an immersion chiller. Typically they are large coil designs, often using thermally conductive copper tubing as the inner layer. The difference is that a counterflow chiller has a second outer tube built over the inner one. Wort is typically pumped or siphoned through the inner tube while chill water is pumped in the opposite direction through the outer tubing. The name “counterflow” comes from the fact that the wort and water are pumped in opposite directions through the two tubes.
The reason for the counterflow design is to have the coldest chill water contacting the coolest wort first. At the other end of the tube you have the hottest wort contacting the warmest chill water. As a result you get a reasonably “average” ∆T over the entire device, giving good performance on both ends of the device. If you restrict the flow of wort and have cold enough chill water you can chill the wort to room temperature in a single pass through the chiller. Further you can regulate the temperature of the wort by adjusting the flow of wort through the chiller.
The thermal performance of this chiller is going to be just a bit better than an immersion chiller in terms of overall cooling time, as the materials’ area are similar but the counterflow design increases ∆T performance slightly. Most brewers do enjoy being able to chill their wort in a single pass, however, and you can increase the size of the chiller to improve
chill times.
One disadvantage of the traditional coil-shaped counterflow chiller is that it is more difficult to clean. Since the cooling is taking place in the chiller, bits of trub, proteins, and tannins precipitate out in the device. Typically you need to backflush the chiller immediately and run cleaning fluid through it to avoid clogging. In addition, a lot of the trub that precipitates out ends up in the fermenter. So unless you have something like a conical fermenter that lets you separate the trub during fermentation, you are going to end up with more hop and grain material in your fermenter than you would with an immersion chiller.
Plate Chillers/Heat Exchangers
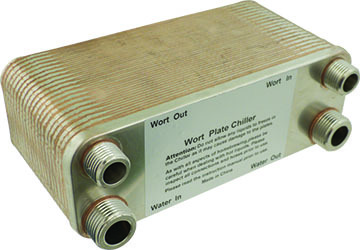
For commercial and larger homebrew batches, a plate chiller is usually the design of choice. A plate chiller is designed as a sandwich of thin stainless plates, often several dozen of them. Wort travels one direction through the plate, while chill water travels the opposite direction, filling alternate layers with wort or water. Since chill water and wort travel in opposite directions, the ∆T advantage we described for a counterflow chiller applies, and the wort is chilled in a single pass by limiting the flow of wort or limiting the flow of chill water.
The advantage of a plate chiller is primarily in the large area, A, used. Consider a homebrew design like the Blichmann Therminator, which has 40 plates each with a dimension of roughly 7 x 3 inches (17.8 x 7.6 cm). The area covered by the 40 layers is approximately 840 square inches (0.54 sq. m), which is almost twice what many of the other designs provide. In addition, this design offers a good chill water flow rate, so you can chill 10 gallons (38 L) of wort in a single pass in less than 15 minutes.
Commercial chillers and heat exchangers use a similar, albeit scaled up, design, that allows increased wort and chill water flow with even more plates.
While plate chillers have excellent performance and are scalable to larger batch sizes, they do have some disadvantages. Like a counterflow chiller, they do dump trub precipitates directly into the fermenter, so they are best used with a conical fermenter if you want to keep your trub and wort separate. Also, the trub can get stuck in the thin plates of the chiller, potentially even plugging it up. I strongly recommend trying to prevent trub from going into the chiller and back flushing your plate chiller immediately after use followed by a thorough cleaning. They are also more expensive than many other homebrew chiller designs.
Conclusion
Chilling your wort quickly has some significant advantages including improved clarity, lower risk of infection, and reduced risk of off-flavors. Quickly chilling your wort and pitching your yeast can also shorten your brew day. Which method you use to chill your wort is very much a personal choice. Only you can balance the time, cost, and effort involved. Even simple methods like an ice bath can be very effective if you have enough ice on hand, though an immersion or counterflow chiller can be easier to work with depending on your setup. For large-batch brewers, a large counterflow chiller or plate chiller will usually work best in terms of time and setup, and virtually all commercial-size breweries use variations of the plate design.


