Yeast Slants, Candi Sugar, & Cold Crashing
Q. I’ve homebrewed for many years but shifted to small batches these last 5 years. I’ve always brewed with dry yeast due to cost. But I want to expand beyond English ales and S-04. I’m getting ready to start my yeast bank and am trying to find information on pitch rates and small-scale yeast starters. I brew batch sizes between 1–2.5 gallons (4–10 L). I’m thinking I can buy a package of liquid yeast, make 7 or 8 slants, and pitch in a 2-gallon (8-L) batch and have enough to brew all year with those slants.
Lee Nagel
Branson, Missouri

A. I think I am following your plan and will rephrase so that what follows is clear. You want to buy a single liquid pack, “borrow” a bit to prepare 7–8 slants, and use the balance for your first brew. When you go to brew again, you will take a slant, make a propagation, and then pitch. This is the part that is a bit unclear. Slants are typically used multiple times where an inoculation loop is used to transfer a bit of yeast into a flask with wort or onto a Petri dish. You could use fewer slants, but I will roll with one slant for each brew and offer a hack on saving a step when using the slant.
The short answer is yes; you have a solid plan to reduce yeast costs per brew. For what it’s worth, you can also make slants by starting with a slurry made from dried yeast and treating the same as a liquid culture. This answer may be all the information you need to confirm your plan, but I will take the opportunity to provide more information about what this method looks like to brewers who have not made slants and who may want to give this a try.
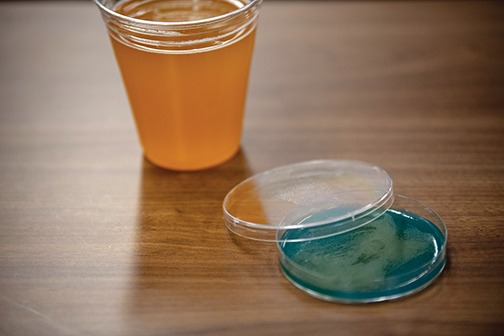
Let’s start by defining a slant. In micro jargon, a slant refers to some sort of solid growth media prepared in a test tube that is allowed to solidify at an angle. The growth media is usually made by purchasing powdered media that include nutrients, agar (a carbohydrate that forms a gel after boiling and cooling), vitamins, and minerals. Specialty growth media may contain selective compounds that select for certain organisms, inhibitors that prevent growth of certain microbes, and/or indicators, such as pH indicators and stains, that help microbiologists understand more about what is growing on the media.
In the brewing world, slants are primarily used to store yeast for intermediate durations by applying cells to the surface of the slant with a loop, allowing a “lawn” to grow on the surface of the slant, then transferring to a refrigerator for storage. Slants are often covered with sterile mineral oil to prevent water loss from the media during prolonged storage; this method allows slants to be stored for many years without issue. Because the yeast applied to a slant is typically taken from a pure culture, the most common growth media is wort agar, a general-purpose media commonly used to grow yeast and mold.
A good rule used to determine propagation volume is for the final wort volume to contain 10% yeast slurry. Discussions about microbiology are always done using metric terms, so I will stick to milliliters and liters for clarity. In your case, you will want a prop volume of about 750 mL to pitch a 2-gallon (8-L) batch. I brew 5-gallon (19-L) batches and would need a prop volume of about 2000 mL. I round to convenient volumes because it’s much simpler to use increments of 100 or 250 mL when assembling basic lab supplies and these are indeed rules of thumb where close enough works well enough.
I like starting with the pitch volume because that helps plan the propagation schedule. The general method followed for yeast propagation is to use 1:10 dilution steps. In your case, that final 750-mL propagation volume is made by adding 75 mL of growing yeast slurry to 675-mL wort. A quick start to yeast activity is important when propagating yeast, just like it is during beer fermentation, because maintaining sterile conditions is impossible without specialized microbiological equipment and methods. This is true at home and in most yeast labs because of the transfer steps involved. The bottom line: Don’t make the first step too dilute because it risks the chance of growing unwanted microbes.
Adding a single colony from a Petri dish to 10–25 mL wort is a typical first step. However, slants have a lawn of yeast, not single colonies. This works to your favor because you can make your first step from slant to wort into 75 mL by picking up the equivalent of about one peppercorn-sized “scoop” of yeast from the lawn. At this point, you can save your slant for another prop or throw it away. You should see yeast activity in your flask within 1–2 days and will want to transfer the entire 75 mL into your 675-mL flask in two to three days. At the end of day five, it’s time to pitch into your 2 gallons (8 L) of wort.
For 5-gallon (19-L) brewers like me, our prop volumes are 200 mL and 2000 mL. Going from a slant to 200 mL is too big of a jump, so we need to start out with 20 mL. One way to do this is to make up a 20-mL starter in a flask. Another way is simply pouring 20 mL of wort on top of the slant. For this to work, properly sized test tubes (~50 mL) containing ~15 mL of media are required. This is the time savings hack mentioned earlier.
That’s about all the specifics I think are needed to answer your question, though key techniques omitted that readers should be aware of are media preparation, wort/media sterilization, proper use of inoculation loops, and proper transfer techniques. These are all critical for successful micro work. The good news is that none of these methods require much specialized equipment, and they are all relatively easy to perform at the proficiency required for success in the homebrewery.
Q. I have a basic question that has been gnawing at me for a while and sources online haven’t answered it to my satisfaction. What exactly is candy sugar/candy syrup?
Ben Smith
Augusta, Georgia
A. Candy sugar (or “candi” sugar as it is commonly spelled) has a long history in Belgium because of the busy trading port of Antwerp. Until the 19th century, Europe did not produce sucrose, what is now known as table sugar, and relied on sugar imports. According to history about this trade found on Candico’s website, Venetian galleys brought the very first cargoes of cane sugar into Antwerp in 1317. And it is in this area where sugar processing in Belgium turned into a specialized industry serving confectioneries, bakeries, coffee cafés, and, of course, breweries.
There are three forms of candi sugar used by breweries: Rock sugars, free-flowing and semi-soft sugars, and liquid sugars (sometimes called candi syrup). Contrary to basic definitions about candi sugar found scattered around the internet, these are not different forms of the same basic raw material. The solid sugars are the oldest types and are what were produced by Belgian sugarmakers for centuries. Chemically, these products are all based on sucrose from sugar cane or sugar beets (sugar beets are what brought sugar to Europe in the 19th century). Sucrose is a disaccharide made up of glucose and fructose. Unlike maltose, a disaccharide containing two molecules of glucose, sucrose is a non-reducing sugar and is unable to react with amino acids and proteins in the Maillard reaction because the reactive part of glucose that binds with an amino acid in the first step of the Maillard is bound to fructose. This means that when cane and/or beet juice is heated, color development through the Maillard reaction does not happen. This is why colorless sugar crystals can be produced by boiling off sufficient water to result in crystallization.
And this brings us to the first type of candi sugar used by brewers; crystallized cane and/or beet sugar. This type of candi sugar is sold in large, irregular lumps, commonly called rock sugar, or as free-flowing granules. If the latter sounds like common table sugar, it’s because they have the same chemical composition. Colorless candi sugar is a handy ingredient to boost beer ABV without adding other flavors or boosting body from unfermentables.
Clear rock sugar can be used for the same purpose but is not commonly used by commercial breweries these days because it takes longer to dissolve and is more difficult to handle. Although rock sugar is not commonly used in commercial brewing, many people associate rock sugar, aka rock candy, with candi sugar. Although crystalline candi sugar and rock candy are both forms of sucrose, some candi sugars contain sugars other than sucrose and are colored.
Colored types of candi sugar either contain molasses and/or are processed to allow color development from Maillard and caramelization reactions. Like the Maillard reaction, caramelization is a non-enzymatic browning reaction. But unlike Maillard browning, caramelization does not require amino acids or reducing sugars. In the case of sucrose, caramelization occurs at temperatures above 338 °F (170 °C). If sucrose syrups are acidified and heated, the bond joining glucose to fructose can be broken to form invert sugar. Because glucose is a reducing sugar and able to react with amino acids above certain pH values depending on the amino acid, Maillard reactions are possible. The bottom line is that a wide range of colors and flavors can be made by adjusting process conditions, making candi sugars more than just a clean source of fermentable sugar.
This is where the range of products grows. Caramelized candi sugar tends to crystallize because sucrose solutions that are hot enough to caramelize also contain too little water to remain liquid when cooled. However, when sucrose is “inverted” by acid hydrolysis and then concentrated, liquid candi syrups can be produced because glucose prevents sucrose crystallization upon cooling. Invert sugars can also be cooked to develop color, often after increasing pH, resulting in a wide range of syrup colors. Table 1 shows differences among candi syrups produced by Tiense Suiker in Belgium.

Hopefully that sheds some light onto the ins and outs of candi sugar. It’s definitely an ingredient that is useful in brewing many Belgian beer styles. Picking the right one is up to you.
Q. I’m pretty new to the homebrewing hobby so I’m still learning the lingo. I keep seeing the phrase “cold crash after fermentation is complete” in many recipes and I can infer that it means to cool the beer quickly. But is there more to it?
Ian O’Mally
Worcester, Massachusetts
A. Cold crashing is a topic that seems to have become hot lately with more and more mentions in social media groups about this catchy brewing term. Like many trending homebrewing topics, cold crashing is a term borrowed from craft brewing jargon.
Back in the old days when lager beers were aged in cold cellars stocked with ice during the winter, cooling from fermentation to cold lager temperatures took time because tanks were air cooled. Lager fermentation and aging practices changed following the advent of commercial cooling in that brewing was not limited to cooler months. However, lager tanks were still air cooled because tanks equipped with cooling jackets and coils had not yet been commercially used for brewing. In the days of air cooling, beer cooling was a slow process where tank temperatures typically dropped just 1–2 °F (0.5–1 °C) per day. This equated to 10–20 days between lager tank filling and arriving at the final lagering temperature. I am focused on lagers here because ale brewing historically did not include deep cooling.
Enter the modern era of brewing beginning in the middle of the last century when stainless steel tanks were first used, and cooling jackets became a common feature. The brewing process started to change where cooling efficiency improved and production times gradually shortened. Although established commercial breweries with cold lager cellars did not abandon their existing cellars, they did begin building fermenters with cooling jackets (as opposed to internal coils) and the use of beer chillers became increasingly common. Fast forward to today, brewers of all types typically cool to 28–34 °F (-2 to 1 °C) before clarification (if performed) and packaging.
Because all modern commercial tanks are equipped with cooling jackets, brewers can rapidly cool a tank from fermentation to cold-aging temperatures in 24–36 hours. Some brewers refer to this practice as deep cooling, because the beer becomes very cold, and others call it crash cooling because it occurs very quickly. “Cold crashing” is a smash up of both terms. What’s so special about this process? For the commercial brewers it’s all about time and money. In practice, however, some brewers prefer stepping down beer temperatures gradually because of concerns about off-flavors related to shocking yeast during rapid chilling. Whether this is a legitimate concern or not is a different question, but this concern means that not all brewers are in a race against the clock. Aside from time savings, I cannot find any data showing that rapid beer chilling improves beer quality versus slowly chilling to the same temperature.
That’s what cold crashing is, but what does it mean to the homebrewer? Unless special effort is taken to slowly reduce the set point of a refrigerator or a fermenter, cold crashing is going to happen at home because our batch sizes are small and cool very rapidly. Brülosophy did an Exbeeriment titled “Cold Crashing Speed: Immediate vs. Gradual in a Munich Helles” in 2020 indicating no sensory difference between the two test beers.
When I was a young brewer, we would say something like “transfer into a keg for secondary, toss the keg into the fridge after fermentation is complete and the pressure is where it needs to be for natural carbonation, wait long enough for the chunky stuff to settle, then enjoy.” These days, brewers say “pressure ferment your lagers, forget about secondary because that’s what dad did, cold crash it, and tap it.” To this grumpy old dude, looks to me like the same basic thing using a more modern name!


