Yeast Wrangling
You become a yeast wrangler the first time you homebrew. It’s not really a choice you make. The yeast wrangling life chooses you.
We all have different reasons why we got into homebrewing: Whether it was to theoretically save a few bucks, have a hobby that your friends and family can also enjoy, or explore your love of beer in a hands-on way.
Regardless of how we got here, we’ve all managed to become talented Jacks and Jills of-all-trades in pursuit of the best tasting homebrew. All it takes is a touch of engineering, a dash of chemistry, a dab of microbiology, and then mixed together with a heaping dose of creativity.
As the Chief Yeast Wrangler of Bootleg Biology, people are often surprised when I tell them I don’t have a formal background in the sciences. There are few things more empowering than being self-taught and pursuing your passion using your innate skills, a morsel of knowledge, and a whole lot of ambition.
Bootleg’s goal since day one has been to show people that they already have the skills and tools required to become yeast wranglers in their home. Propagate your own yeast? Yep. Source yeast from the wild? No problem. Isolate a pure culture and use it to ferment award-winning homebrew? Easy peasy.
Unfortunately, the poor yeast cell is often the unsung hero of fermentation. Microbes are my life so I am clearly biased, but I believe yeast is the most important ingredient in any alcoholic fermentation and it doesn’t get the attention it truly deserves. Often we’re so focused on our experimental hop profiles or building the perfect malt bill that the yeast is then thrown in as an afterthought (this also happens with our winemaking and distilling comrades).
At Bootleg Biology, our goal is to push the limits of the beer world through yeast and bacteria cultures. Ferment a lager-like beer at 95 °F (35 °C) in two days. We got it. Quick sour a beer using Pediococcus? It’ll blow
your mind.
Once you’ve realized that you’re already a yeast wrangler and put to use some of the skills I cover, you’ll be making some of the best homebrew of your life!
Harvesting Yeast & Bacteria from a Previous Batch
What you’ll need: Sanitizer, alcohol, airlock, sterile water (store-bought or boiled at home), clean Mason jar or flask, open flame, and gloves.
When to harvest
You’ve already made 5 gallons (19 L) of fantastic tasting homebrew fermented with a lab-grown homebrew pack. So why try to even harvest yeast? Shouldn’t you just leave dealing with yeast to the pros so you can stick to making the beer?
The good news is you’ve likely already doubled the number of yeast cells you started with. They’re right there under your beautiful beer ready to be put to use again. Reusing yeast not only saves you money but uses less resources and is an essential skill for any brewer.
If you already have dreams of opening your own brewery, reusing yeast for multiple generations is one of the simplest tools you have for saving money. Professional brewers will often repitch their yeast between 5 and 15 generations. So it isn’t just that first batch in which you can harvest your yeast, but many times. There’s no perfect rule for knowing when to dump your yeast. The two biggest reasons are loss of viability or contamination. With a good process in place both should be minor concerns.
A few rules of thumb when it comes to harvesting yeast from homebrew:
Only repitch yeast with at least 80% viability (see sidebar about doing a cell count on page 47). If you’re unable to count viable yeast cells, that’s OK! Most slurry will be healthy enough to reuse if harvested within a week or two after the beer hits terminal gravity except for styles listed in the
next point.
Avoid harvesting yeast from high-gravity beers (1.070 and higher), beers with low pH (3.5 and lower) or poor nutrient ferments (high percentage of adjuncts, or non-malt ferments). If you want to brew these beers, harvest two containers of yeast from an average-strength beer to create a yeast tree. One branch will continue and be used for typical beers and the unhealthy branch can die out by being used to ferment your high-gravity or sour beers.

How to harvest yeast
Contamination is always a concern when homebrewing and even more so when you plan to harvest yeast. This is not the time to play fast and loose with sanitation! Luckily, you’re a homebrewer and so you already know how to be sanitary.
If you already have experience with a closed fermentation system you’ll have the greatest chance of avoiding contamination. Using CO2 to push beer and purge containers of oxygen also has a side benefit of preventing microbes floating in the air from getting into your harvested yeast.
1. Crash your beer for at least one or two days at refrigerator temperatures when fermentation is complete to allow the yeast to flocculate and fall to the bottom of your beer.
2. Prepare a sterile or sanitized clear glass container for storing yeast (make sure it has double the capacity of your yeast slurry volume). Mason jars or flasks are made of borosilicate glass so can handle heat sterilization in an oven or pressure cooker or simply by being filled with boiling water. Place a lid on the sterile container until you’re ready to use.
3. If you have a glass or clear carboy, inspect the bottom to see the height of your yeast slurry. Rack your beer out of your carboy, if possible use CO2 to create positive pressure inside of the carboy. Ensure you leave enough beer to keep the yeast covered. (If you’d rather not harvest your yeast, you can simply rack fresh wort if your next batch is ready to start fermenting on top of your yeast slurry and still get good results.)
4. Cover the opening to your carboy once it’s purged with CO2. Now it’s time to get shaking! As safely as possible, agitate your carboy so the yeast is no longer clumping together or at the bottom. The beer and yeast mixture should become a thick liquid but not the consistency of peanut putter. If your beer was a light color, the yeast slurry should now be a tan/
creamy color.
5. You should be aiming for 2 to 4 quarts/liters of beer/yeast slurry per 5 gallons (19 L). Set up your yeast storage container next to a gas flame, candle, or oil lamp. Using a freshly sanitized racking arm, move the slurry from the carboy to your container. If it gets stuck, don’t stress! Shake up your carboy again to break up any thick clumps (especially a problem with English yeast strains). You can add sterile water to increase the amount of liquid. If you continue to have problems, sanitize the neck and opening of your carboy and directly pour it into your yeast storage container while agitating.

Storage and washing
You did it! No more dumping those beautiful yeast cells down the drain or using them to feed your compost bin. You’re a modern Prometheus stealing fire from the gods.
It’s time to inspect and care for this amazing yeast gift.
1. Refrigerate your clear yeast storage vessel for at least one day. Wait to proceed until you see obvious layers of different colors forming before proceeding to the next step.
2. You should now see an obvious layer stratification. Roughly the bottom layer is heavy denatured proteins and other heavy organic matter, the top layer is typically lighter organic matter like hops and residual beer, the middle layer should have a pronounced tan/creamy color.
3. Sanitize the lid and neck of your storage container. Underneath a flame, open the lid and pour enough sterile water to roughly double your slurry volume. Again refrigerate your container to allow the solids to separate. If your yeast storage vessel doesn’t have any headspace, prepare a container with the sterile water that’s twice the size and pour the yeast storage vessel contents aseptically into the larger container.
4. After another day you should see even starker contrast of layers and colors. Prepare another sterile container. Near a flame, carefully pour the top liquid layer into a container and dispose. The top layer should now be your happy yeast culture. Carefully pour this thick layer of yeast into your new sterilized container being careful to not agitate the very bottom layer so that it won’t get into the
new container.
5. Keep the washed slurry refrigerated until you’re ready to use. If storing your yeast in a hard container with a tight lid, occasionally loosen the lid to burp it and release CO2 pressure. Even at cold temperatures yeast can be active enough to produce CO2. Too much CO2 can be toxic to yeast or burst a glass container.
How much yeast is enough?
Without performing an accurate yeast cell count using a hemocytometer or expensive laboratory equipment we’re going to do some educated guess work. But that’s OK! There’s a “game of horse shoes” element to any yeast pitch cell count methodology. Let’s just get close enough to an ideal pitch
rate to have a healthy fermentation.
In general, we’d expect about 1 quart/liter of dense yeast slurry (no liquid) to be harvested from a 5-gallon (19-L) batch. Each yeast strain has a different cell diameter and grows to a unique cell density, so you’ll naturally see variation depending on which culture you’re using.
The simplest way to proceed is to assume that you harvested enough healthy yeast cells from your 5-gallon (19-L) batch of beer to make two more equally excellent batches of homebrew. Inspect your yeast storage vessel’s volume markers to determine your total volume of slurry and divide in two to decide how much to pitch in a future batch.
A little bit of additional yeast knowledge will help take your harvested yeast repitching to another level. At Bootleg Biology we’ve discovered that you can estimate cell density based on its origin or species:
Brettanomyces: Highest
Pure wild yeast, saison, some Belgian cultures: High
English & German ale yeast: Normal
Lager yeast: Low
This is a rough approximation of cell densities, but you can use this as a rule of thumb for repitching your yeast slurry. For lagers, pitch the whole slurry because these cultures have a low cell density and high cell count requirements. For saisons, ease back on the amount of slurry you’re
pitching especially because underpitching often leads to more expressive yeast character. Brettanomyces primary fermentations work best with lager pitch rates, so pitch all your harvested slurry. Even though Brett has the highest cell density of these cultures, it’s a very slow fermenter so pitching more than half of the harvested slurry will help ensure a healthy fermentation.
Harvesting from Bottles, Cans, and Other Containers
You’ve mastered harvesting yeast from a batch of homebrew. That’s a useful skill that will serve you well as you continue to improve as a brewer and push your creativity to the limit.
What if using commercially available yeast and bacteria isn’t enough to push your brewing to the next level? Perhaps you know a brewery is using a house yeast strain no one else has and it just might be the secret ingredient to nailing a killer clone or winning Best in Show.
Bootleg Biology houses the Local Yeast Project, which is our internal passion project to source wild yeast from every postal code in America. Brewers often approach us and say they brewed a batch of beer using a yeast they captured from the wild that they want to contribute to the Project. But through time or neglect the only source of that yeast lives on in an old bottle of homebrew.
What then, do we give up on that culture? No! We’re yeast wranglers. There are few problems our yeast skills can’t solve. Let’s get to work.
Before we spend our time trying to recover a yeast or bacteria from a bottle, let’s make sure we’re not wasting our time. Not all packaged, fermented beverages are good candidates for harvesting. Just as when we discussed earlier what types of beers are not ideal to harvest from (high gravity, sour, low nutrient/high adjunct) these are also the types of beers that prove to be the most difficult to harvest from.
Before digging into each packaged beverage try to find out if the beer has been pasteurized or filtered (sometimes the label may indicate this, or the brewery’s literature on their website may give you clues). Those packaging techniques are becoming more common for craft breweries due to the increase in high final gravity beers that struggle with shelf stability. Save yourself some time and avoid these.
When Bootleg Biology was starting up, some of the first bottles we attempted to harvest unique yeast strains from were Belgian lambics because they rarely disappoint. It’s not unheard of to find viable cultures in bottles that are decades old.
Keep in mind that these beers are very acidic and so are inhospitable to everything but the hardiest cultures. We most often find Brettanomyces and Pediococcus in lambic bottles, but sadly most Saccharomyes and Lactobacillus cultures don’t survive the long period of time in a harsh environment. American sour brewers sometimes add Champagne yeast to their bottles at packaging to better help naturally carbonate, which may show up in any harvested dregs.
Freshly packaged beers are often a good source of viable cultures. There was a period of time when the only way to clone Heady Topper was to physically acquire a can so that you could harvest the “Conan” dregs. It’s worth mentioning that some brewers will use a different yeast to bottle condition than they do for primary fermentation (either to protect their proprietary strain or because they are looking for a more flocculent and alcohol-tolerant yeast than is used in primary). So keep in mind that the yeast you harvest may not always be the yeast you are after.
Beers marketed as “keller” often have an abundant amount of live yeast still in the beer. Yeast wranglers are able to source previously unavailable yeast strains simply by pocketing a few ounces of real ale or keller lager when no one is looking.
The saddest beer in the world is a dusty bottle sitting at room temperature for years on a bottle shop shelf. Be realistic about expectations when working with these types of beers. Save yourself some anguish and avoid attempting to harvest brewer’s yeast or lager cultures from a container that is more than a year old.
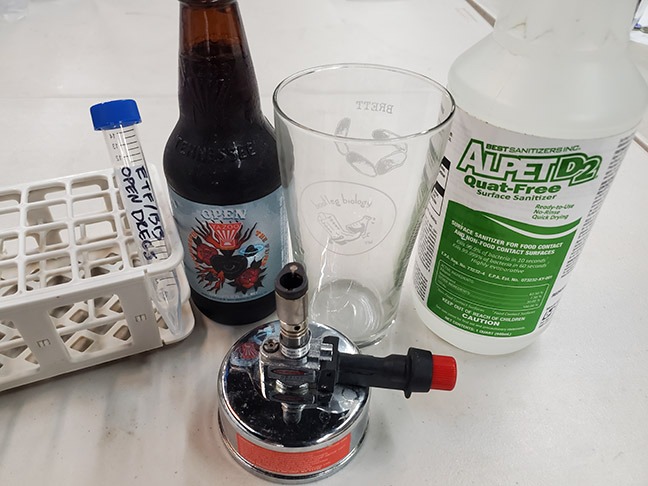
What you’ll need: Alcohol, airlock, clean Mason jar or flask, open flame, gloves, low-gravity starter wort, stir plate, and stir bar.
1. Store the bottle (or can, though it’s much easier to harvest yeast from bottles due to their transparency and convenience of sanitizing the neck opening) upright in a refrigerator before attempting to explore its contents. It’s best for any viable cells to flocculate to the bottom before harvesting and to reduce the chance of gushing when opening
the bottle.
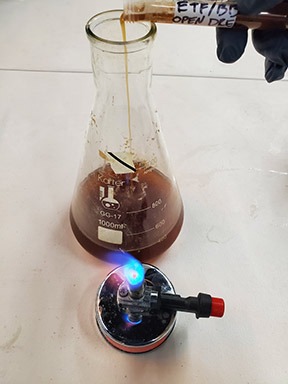
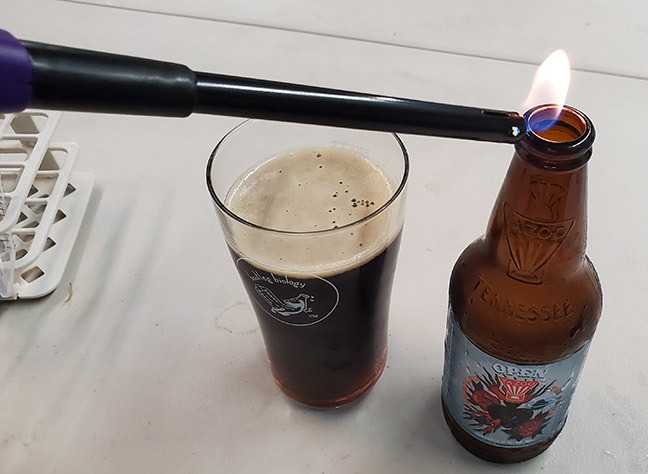
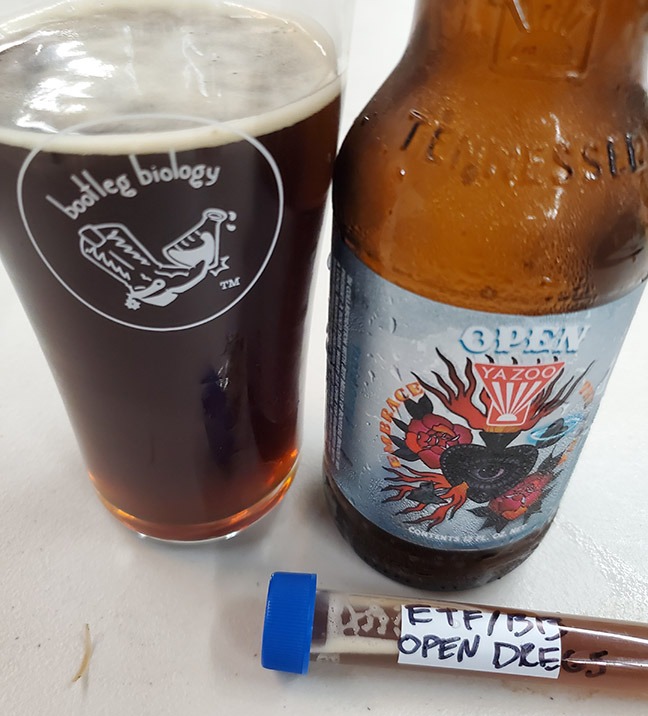
2. Near a flame, spray the bottle’s cap and neck as well as your bottle opener with alcohol. Gently open bottle, spray with alcohol, flame, then pour most of the beer into a glass (enjoy!) but leave enough liquid to cover the bottle dregs. Even in brown bottles you should still be able to see thick, clumpy matter at the bottom.
3. Gently agitate the bottle to mix up any yeast slurry that has congealed to the bottom of the bottle. Spray and flame the opening of the bottle again, then pour the dregs into a sterile or sanitized container.
4. If you’re excited to start experimenting with your dregs, skip the container part and pour the dregs directly into a low-gravity starter (~1.020) and put on a stir plate. There may be very low viability in the bottle dregs so it may take days on a starter to see any activity. Once the starter appears tan/cream colored, or you see signs of fermentation, you’ve harvested viable yeast! You’ll know if it wasn’t a success if the starter never changes color, CO2 isn’t produced, or the gravity doesn’t drop. If that happens, it’s time to try again!
At this point you’ll have to use your knowledge about the original beer to determine what microbes you’ve harvested and whether they’re a pure or mixed culture.
To brew with your dregs simply make a standard starter between 500 mL to 1 L in volume using the cell density guidelines mentioned previously.
If you’d like to learn more about making agar plates and isolating yeast to create a pure culture, which is beyond the scope of this article, check out the DIYeast section of Bootleg Biology’s website: https://bootlegbiolo
gy.com/diy
Harvesting Bacteria (Sidebar)
Can bacteria be harvested from a quick/kettle sour? Yes! Kettle sours are basically the same as a giant starter. As with harvesting yeast, good sanitation is important to prevent contamination. When souring with a pure, lab-grown culture, contamination will be obvious if there are significant amounts of CO2 activity or there is a large gravity drop (souring bacteria will drop wort gravity 1 or 2 points at most).
Timing is everything. Rack 500 mL of soured wort into a sanitized container about 18 to 24 hours into the souring process or before the pH drops below 3.6. Lactic acid, while being a food source for Lactobacillus, is also toxic over time and significantly decreases its viability. Keep harvested bacteria stored in a refrigerator for up to two to four weeks. 500 mL is more than needed to sour a 5-gallon (19-L) batch and helps account for any viability loss from the initial souring process. If the pH dropped quicker than expected, you can always harvest a larger volume of soured wort or add a gram of calcium carbonate (chalk) per liter to raise the wort pH.
There is no need to freak out if no slurry is visually present. Bacteria are so small they typically are not apparent in harvested wort other than creating a generally cloudy appearance.
Counting Yeast Cells (Sidebar)
What is a hemocytometer and do I really need one? A hemocytometer, used with a microscope, is a helpful tool for visually counting the number of living and dead yeast cells in a slurry to determine accurate pitch rates. A defined amount of dyed slurry is placed on the glass slide’s counting chamber (the microscopic grid marks; dead cells turn blue and living cells stay clear). Most brewer’s yeast can be counted on a hemocytometer with a basic light microscope that has at least a 10x lens. Because yeast slurry is so thick, it typically needs to be diluted at least once or twice to produce an accurate count. Detailed instructions on counting cells with a hemocytometer are easy to find online.
Do you need to count viable cells to safely repitch slurry? Nope! Many craft brewers harvest and repitch based on their personal experience with individual yeast strains. Repitching based on the weight or volume of harvest slurry is often accurate enough to have a successful fermentation.
Conclusion
You did it! I knew you could. You’ve got the right tools to harvest, store, and repitch yeast and bacteria cultures, which will take your brewing to a new level.
Don’t forget that you can use these skills with any kind of fermented food or beverage that contains “live cultures.” Want to sour a beer with kimchi? Do it! Want to ferment a beer with sourdough “hooch?” I like what you’re thinking!


