Build a Hop Transducer

For all the hop-lovers in the world, Dogfish Head has inspired an innovation in hopping and dispensing. (Enter Randall . . .)
In a recent New York Times article, Sam Calagione, president of Dogfish Head Craft Brewery in Milton, Delaware described a unique addition to brewing apparatus. Dubbed “Randall, the enamel animal AKA an Organoleptic Hops Transducer,” the device pushes chilled beer through pounds of fresh hops, adding hop aroma to any brew.
Why an enamel animal? The apparatus is said to leave the enamel of drinker’s teeth feeling gritty. This is an exciting addition to brewing, and to home brewing. It’s also one of those forehead-slapping “why didn’t I think of that” things.

What Sam envisioned, then produced (they are for sale, direct from Dogfish Head), was a large amount of fresh hops placed between keg and tap handle. We won’t speak for Sam, but the chosen vessel looks to us like a large water filter that is filled with hops. Beer flows in, ultra-hopped beer flows out. Genius!
Our homage to Randall takes its cues from photographs published, and a bit of intuition. The concept is simple, beer comes into the filter casing where it encounters fresh hops. Filter media prevents chunks of hops from flowing out — brilliant simplicity.
In our attempt to recreate this “hops transducer,” we considered that homebrewers typically use 5 gallon Cornelius kegs, so we sized the filter body accordingly selecting a typical “whole-house” filter.
In our first attempt to clone Randall, it took a pound of hops, an afternoon and three gallons of Harper’s Grove Street Pale Ale (give or take a pint or two) to discover how to improve our hops transducer clone.
The filter media itself should pass on all of a beer’s flavor without removing any hop oils, or aromas (commercial breweries are rumored to filter so finely that flavor molecules are affected) so charcoal filters were ruled out —we will use these for filtering brewing water only. A bit of research with hops producers yielded information suggesting that filters in the 15–30 micron range (i.e “sediment filters”) should work perfectly for our version of Randall.
Dogfish Head uses a piece of CPVC pipe with lateral slits cut into it, which is a great idea. As beer enters the filter body from the top, it will migrate through the path of least resistance. With a sediment filter, the entire body is permeable. That means, if the hops are not packed perfectly, beer will flow through any hole or gap without contact with the hops — meaning no direct flavor addition.
In our first pseudo-Randall trial, beer sped through a portion of the hop bed that was void. The result was inevitable: no additional hop flavor. More hops packed into the filter cavity seemed to be an adequate solution — but it wasn’t. We needed to ensure that beer had to pass through a majority of the hops before it could exit.
Randall (we think) avoids this problem by slotting its PVC tube “at the bottom.” Thus the beer must flow downwards through many inches of packed hops before it has any chance to exit. We emulated this by inserting a tightly-fit tube into the interior of the filter, extending to the half way point of the filter. This meant that any beer dispensed would have to flow down through the hops, picking up flavor, before crossing the filter. The result? Much improved hop aroma and flavor in the beer.
A fellow homebrewer, Jack Adkins, came up with an additional procedure applicable to either device. Pack the bottom half with hops flowers to 1 inch (25 mm) above the filter insert, or slots if using PVC pipe. Fill the remaining cavity with crushed pellet hops. Jack’s reasoning is that pellets have crushed lupulin glands; hop flowers’ lupulin glands are buried deeply within and not readily exposed to the flow of beer. Hop pellets are readily available and the hop flower bed will provide filtration whether you use a PVC tube or a sediment filter. This should generate maximum flavor and aroma even for low-alcohol beers.
One note, all this messing around with the beer tends to strip much of the CO2 from the beer, resulting in a very creamy pour.
There you have the basic necessities: a water filter with clear body to impress your friends (and yourself), a filter to keep the beer clean and adapters to connect the keg to filter and the filter to dispensing tap. Total project time may be under one hour and cost you $60–$70, including your first hop charge.
Materials and cost
filter body, whole house $40
filter media, 20-30 micron $7.50/2 adapters: FIP hex bushing
2 each 3/4” x 1/2” $6.00/2 adapters: FIP hex bushing
2 each 1/2” x 3/8”, $3.50/2 barbed fittings barb to MIP adapter:
2 each 3/8” x 3/8” hose (or size of your input and output hoses) $3.50/2
hose, teflon tape, keg output fitting $5
picnic tap $3
support base: scrap plywood and metal, paint, sandpaper, nut and bolt, hops $10
Tools and equipment
wrenches or adjustable wrench
knife or tubing cutter
table saw (or use precut plywood)
hammer and glue
Step by step
Select a filter body. Most home stores carry a variety. Whole-house filters are normally inserted in the main cold water line and have inlets and outlets that are 3/4”. Be sure you can purchase the correct filter media: 20–30 microns in filter size and the coarser the better. There are “standard” sizes in filters and bodies, so you are free to choose.
Step one:
Wrap three turns of Teflon tape around the threads of both a 3/4” to 1/2” and a 1/2” to 3/8” reducing adapter (sorry, we didn’t have a metric-sized filter body or parts to evaluate.) Screw one of each into the inlet and outlet until finger tight. Depending on your keg system, your beer lines are likely 3/8” in internal diameter.
Step two:
Wrap the threads of two 3/8” x 3/8” barbed adapters with Teflon tape and screw into the other adapters. If you use a hose with a different internal diameter (i.d.) use the corresponding barbed fitting. Once you’re sure you have the correct inlet and outlet configuration, firmly tighten the fittings.
Step three: Measure your filter and cut a length of tubing (PVC or other inert substance) that is 1/2–3/4 of the total length of the filter. The o.d. (outside diameter) of this tube must closely match the i.d. (internal diameter) of the filter. Slip the tube into the filter body until the top of this tube is flush with the filter body. The filter housing top will nudge the tube downwards a bit, so be certain the internal tube is a minimum of 1” from the bottom to allow the beer to flow.
If you decide the Dogfish Head design is for you, cut a length of PVC tube precisely equal to the length of the filter, and with an i.d. the same as a commercial filter’s i.d. It must seal top-to-bottom and around the top’s penetrating nipple. Cut radial slits into the bottom third of the pipe.
The remaining plumbing consists of attaching inlet and outlet hoses to the barbed fittings. Be sure to use clamps, as it is likely you will be using higher than normal pressures to push the beer through extra length and resistance.
Step four: Cut two 24”-48” lengths of 3/8” i.d. beer line. Slip two stainless steel clamps onto each line.
Step five: Attach your keg connector to one hose and clamp. Attach the other end to the inlet side of the filter body and clamp.
Step
six: Attach your faucet or picnic tap to the second hose and clamp it down. Then, attach the other end to the outlet side of the filter body and clamp this as well.
Some filters have optional stands or attachment points. The particular one we purchased did not. Since you and your beer-drinking friends are certainly going to want to watch the action, you are going to need to find or construct a support stand of some sort. I had scrap plywood, so quickly made one.
To make a support stand exactly like mine (though I encourage you to be creative and toy around with your own stand-making ideas) start with a rectangle of 3/4” plywood.
Step seven: Cut a 10” x 10” rectangle of plywood. Cut two 5” x 5” rectangles of 3/4” plywood (miter one edge of each if you have the equipment. It’s just for looks.)
Step eight: Draw a filter body-sized circle in the center of the large rectangular piece of plywood.
Step nine: Connect the two small rectangles at a 90-degree angle and place the larger rectangle as shown.
Step
ten: From beneath, nail the angle to the base. I used glue and ring nails for all applications and predrilled the nail holes.
Step
eleven: Bend a piece of aluminum bar stock to an angle similar to the body of your filter. It will likely not be a perfect cylinder. Drill a hole in the foot of the aluminum bar, place the filter into its corner and fit the bar to provide a clamping action. Mark this location and drill a hole into the support base.
Step twelve: Attach the bar to the base. Make sure that everything is nice and secure; you’d hate to have the support collapse in the midst of a demonstration or party.
If you are so motivated, stain, varnish, or paint the support system. Now comes the fun part — adding hop flavors to your beer. Dogfish Head says that beers with a good alcohol content seem to extract the most flavor from fresh hops, so tap a nice IPA or Pilsner. Fill the 3/4” space between filter and wall with fresh hops, add crushed pellet hops up to the top, and let the fun begin!


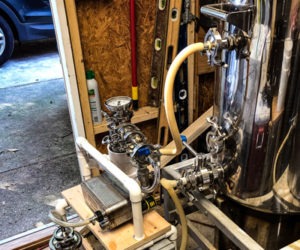
(Top): The clear filter on the left allows you to see the beer run through it. Much cooler!
(Bottom): The inlet and outlet configuration.


(Top): Here is the keg connector and faucet tap ready to transduce some hops.
(Middle):
Here you can see the two small rectangles assembled at the appropriate
90-degree angle and the predrawn circle marking the spot for your
filter.
(Bottom): Here you can see the aluminum bar attached to
the base. The idea is that this bar will have a clamping action on the
filter and hold it upright.