Balancing A Draft System
Q: I have read that numerous homebrewers use around 6 ft. (1.8 m) or less of tubing to pour their beer. Every time I have tried this length, I get a crazy amount of foam. I stumbled upon this website and it has most beers in the 11–12 ft. (3.4–3.7 m) of tubing range. Since I have started using these lengths, I have had a balanced system. Why can some brewers have a balanced system with half the length of tubing that I can? Thanks for the help, Mr. Wizard! For reference, I use 3⁄16-in. (5-mm) vinyl tubing and picnic taps.
— Chris Wagner • Cincinnati, Ohio
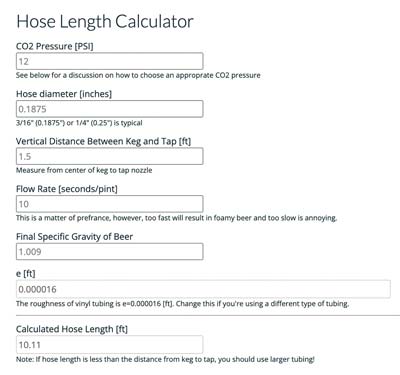
A: For starters, thanks for the great link. Mike Soltys, PhD. is the brains behind the hose length calculator you referenced and he has taken a fluid dynamics approach to beer line calculations using the Bernoulli, Darcy Weisbach, and Swamee-Jain equations to develop his very cool tool!
Pouring beer on draft and determining the ideal line length is a function of several variables, with the most significant being beer carbonation level, beer temperature throughout the system, especially in the warmest area, change in liquid elevation, pouring rate, and pressure drop across the system (keg coupler, beer line, any restrictors or reducers, and the faucet/tap itself). Soltys’ tool accounts for these variables, but does not take into account pressure drop/flow restriction across the beer faucet, changes in beer temperature from beer storage to beer faucet (for example with systems where part of the line is not properly insulated), glass temperature, glass surface roughness, and pouring technique used by the person pouring the beer. His tool is designed to determine the line length to balance the variables listed above and it’s really intuitive to use.
Let’s switch gears and discuss your situation for a moment. In my experience and the experience of many others who have written about balancing draft systems, you should be able to pour 38 °F (3 °C) beer normally carbonated to about 2.5–2.6 volumes using 6 ft. (1.8 m) of 3⁄16-in. (5 mm) tubing without excessive foaming. If you consistently are having problems with these conditions, consider checking or replacing your secondary CO2 pressure gauge (usually a 0–60 psig gauge) and reviewing your pouring technique . . . problem solving must begin with the obvious. If your pressure gauge is reading incorrectly, you could be consistently over-carbonating your beers and not knowing it.
Pouring draft beer into a cool, wet glass produces much less foam compared to pouring beer into a warm, dry glass. And pouring beer into a rough glass may result in foaming whether or not the glass is cold and wet or warm and dry. Another important technique is to fully open the beer faucet when pouring and to pour beer down the side of the glass at a ~45° incline.
When I start pouring a beer, I will immediately stop pouring if the first couple of ounces are foam and wait until the foam has collapsed into beer before continuing with the pour. Beer/bartenders often struggle with pours that begin foamy and can save so much consternation and loss associated with foaming if they simply let their problematic pours settle before continuing. Why does this work? Well, many beer systems are cooled up to the point where the beer line connects with the beer faucet, leaving about 6 inches (15 cm) of metal between the “tail piece” shank and faucet that is not cooled.
The beer in this section of the system warms over time and can result in straight foam for the first bit of a pour, especially when the time between pours is extended. Some bartenders will shoot the first bit of beer to the drain before pouring, and that method also reduces beer loss because foam creates foam and the small sacrifice is usually a good investment.
In your case, using a longer line solved your problem and I am leaning toward your carbonation and/or serving temperature for fomenting foam.
Let’s go back to Soltys’ hose length calculator. An interesting addition to his calculator is the time taken to fill a pint; a handy way of expressing flow rate. The two examples below show beer in a keg with 12 psig of CO2 pressure. The carbonation level in the beer is not given because the temperature corresponds to beer temperature. Let’s assume the temperature is 38 °F (3 °C); referring to a carbonation table this beer contains 2.57 volumes of CO2.
Note that the only differences in the two examples are flow rate (seconds per pint or spp) and calculated hose length. You can balance the system using 6 ft. (1.8 m) of hose when the flow rate is 7.5 spp (seconds per pint) and you can also balance the system when flowing at 10 spp through 10 ft. (3 m) of line. That’s cool, but how do you change the flow rate through the line?


In practice, most beer faucets have no flow control so you get what the system dictates when the faucet is opened. And the beer either foams or does not foam based on how it enters the glass. As long as the beer flows smoothly, foaming will be minimal. If the velocity entering your glass is too fast to prevent foaming, you can slow things down by using a longer section of draft line, holding the faucet above the keg to increase the vertical lift (easy to do with a picnic tap, but impossible when the faucets are fixed to a bar or the side of a keezer), using a flow control faucet (much more common these days than in the past), or working on pouring technique. Like just about everything else in brewing, there is no single solution to determining “the correct” draft line length! I hope this helps solve your problem as opposed to presenting you with more.


