The DIY In-Line Oxygenator
As homebrewers, we have control over many of the physical processes used to make our beer. It’s been known for some time that after boiling (and then chilling the wort) it is highly beneficial for the yeast to be pitched to a well aerated/oxygenated media. The fermentation life cycle (and ultimately the beer quality) will benefit in the following ways:
1. Reduced total fermentation time
2. Shorter lag time (the time it takes for fermentation to start)
3. Better attenuation
4. Improved yeast life cycle
There are several common methods homebrewers typically use to aerate the wort. Most of us are familiar with the rock-and-roll method of vigorously shaking the fermenter to add air. This has the advantage of requiring no additional equipment. Although a plastic bucket is safer, there are concerns with repetitively rocking a full glass carboy.
Parts List

1. (1) Kleinhuis Liquid Strain relief fitting NPT 1⁄2” (fit to outflow of counter flow chiller or kettle)
2. (2) large brass nuts (to fit 1⁄2” NPT)
3. (2) large O-rings sized to fit 1⁄2” NPT
4. (1) 1⁄2” NPT stainless steel tee
5. (1) stainless steel 1⁄2” NPT Male x 1⁄2” barb fitting
6. (1) 0.5 micron barbed (or shaft) stainless steel air stone
7. (2) small O-rings (R04) sized to barb of air stone (+ extras)
8. (1) 1⁄2” NPT male x 3⁄8” stainless steel barb fitting
9. thread seal tape

Note: the above lists only the parts needed to build the inline oxygenation apparatus. It does not include: O2 tank, regulator, hoses and sanitary air filter.
There are various adapters (both commercially sold and homebuilt) that when installed on the end of a hose leading into the fermenter will “splash” the wort to aid in aeration. Another method makes use of an aquarium air pump and air stone. These assorted air introduction methods work to varying degrees. The downside to these methods is the air we breathe is mostly nitrogen and only 20.9 % oxygen. Also, air may contain contaminants if not properly filtered. If higher O2 saturation levels are beneficial to the fermentation it makes sense to use pure O2 for this purpose.
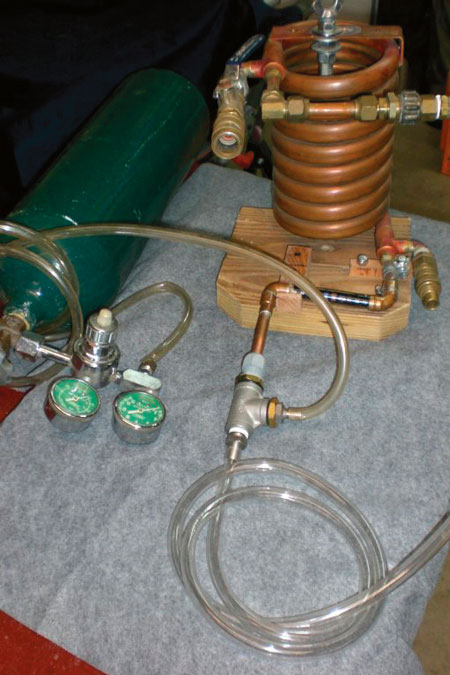
At the top of the performance list is direct injection of the wort from a 100% oxygen source. Although, over oxygenation is a concern, the general consensus is that there is little possibility of this occurring in homebrewed beer as homebrewers do not achieve commercial-level brewing temperatures and pressures. Typically a small O2 canister and screw on regulator with a hose and air stone are used. The regulator is turned on low and the air stone is submerged into the fermenter containing the wort creating a steady stream of tiny O2 bubbles. This infusion of pure O2 raises the dissolved oxygen level to assist the yeast in their all important work. Personally, I use a steel 40 cu/ft tank with a dedicated O2 regulator (see photo). This may seem like overkill, but it was obtained in a trade, and I was glad to make use of it. The volume of this tank makes it unlikely I will be running out of oxygen any time soon. The 2-gauge regulator has one gauge that makes it easy to see and set the gas flow consistently from batch to batch. The other gauge measures the gas volume in the tank.
A potential downside to this “dunk in fermenter” method is the stream of bubbles may not be equally dispersed throughout the fermenter and might not permit other areas of the fermenter to be oxygenated to the same concentration. Additionally, this method adds extra time to the brew session as it’s performed after the wort is already in the fermenter.
In an effort to improve on this (and because I am a gadget guy) a DIY in-line oxygenator was built. It is installed on the “out” side of the counter flow chiller (CFC). It injects oxygen into the wort as it moves from the CFC and into the fermenter. Adding oxygen to the wort as it moves to the fermenter ensures that a more even adsorption of oxygen is made, and saves a bit of time as well.
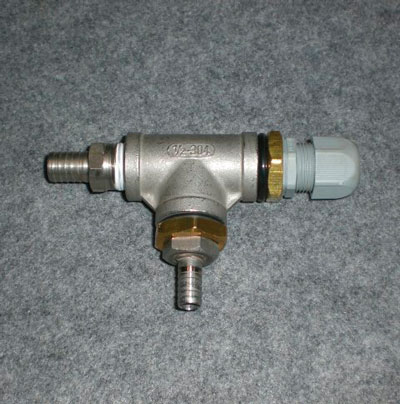
Unlike some commercially-sold versions available to homebrewers, this DIY in-line oxygenator is designed for easy breakdown by hand or with an adjustable wrench. This makes the task of cleaning it after use relatively simple. Remove the apparatus from the CFC, disassemble, rinse thoroughly, soak in your regular cleaner, rinse and air dry until the next time. Note: it’s recommended that air stones are only handled by the shaft. There is a possibility that the oil in our skin can be transferred into the stone reducing performance (and increasing the chance of contamination).
Cleaning Prior to Use
Boiling the air stone for 15 minutes prior to use ensures it is sanitary and no bacteria remains alive to adversely affect the brew. The rest of the parts are soaked in Iodophor or Star San and then reassembled for use.
Future Upgrades
I am considering removing the two small O-rings and silver soldering the air stone barb into the 1⁄2“ SS fitting. This will ensure there are never any leaks from this point. Caution: if you decide to do this be sure that the air stone itself does not get heated or the barb may become unsoldered/brazed from the stone and can pull out! Wrapping the stone with a small length of wet cloth should keep the stone cool enough to prevent this.
I plan to replace the brass nuts for SS. A planned future upgrade includes replacing the “stick on” temperature gauge with a small digital temperature gauge.
Safety First
All fittings should be thoroughly degreased and cleaned prior to assembly. Any grease that remains that comes in contact with oxygen can cause a fire, and any grease or residue won’t help your beer either. Additionally, any ignition source in the presence of pure O2 is hazardous! Be certain all flames are out prior to using pure oxygen.