Build 2 Easy Keg Gadgets: Projects
This month we’ll tackle a couple of easy projects that will make your summer beer drinking easier and more pleasurable.
First is a way to answer the burning question “Is my kegged beer carbonated? And is it carbonated to style?” Kegging is very cool, very easy and — once you’ve popped the bucks for kegs, regulator and CO2 tank — highly portable. But getting the right dispensing pressure can be tricky. We’ll rescue you.
The second project, also keg-based, will make flavoring kegged beer — whether with dry hops or your own blend of spices — cleaner and even a bit more predictable.

Pressure Gauge
Cornelius kegs offer brewers convenience in storage, carbonation and ease of transport. You may carbonate beer in kegs with the addition of sugars (cane, corn, molasses, brown sugar, maple syrup and etc.) or direct carbonation with CO2 gas. Piece of cake.
When it comes time to dispense, achieving the correct dissolved volumes of CO2 is not as clear-cut. For each type of beer you must measure both temperature and pressure. Then a table tells you what, at a given temperature, the gas pressure on the beer should be. For example, the tables tell you that for an English pale ale you should have 2.2 volumes of CO2, and a Bavarian weissbier should have approximately 3.0 volumes of gas.
The difficulty is measuring the pressure accurately. (For a complete chart, see “Carbonate with Your Keg” in the May 2000 issue of BYO. For an explanation of carbonating in the keg see the May-June 2002 issue.)
If your CO2 gauges are like mine (0-100 psi or 0-7 bar), they are difficult to read at low pressures because useful pressures occupy only a small percentage of the measurement range. Where’s my magnifying glass? What if you had a gauge designed to read low pressures, a gauge that would connect directly to your keg?
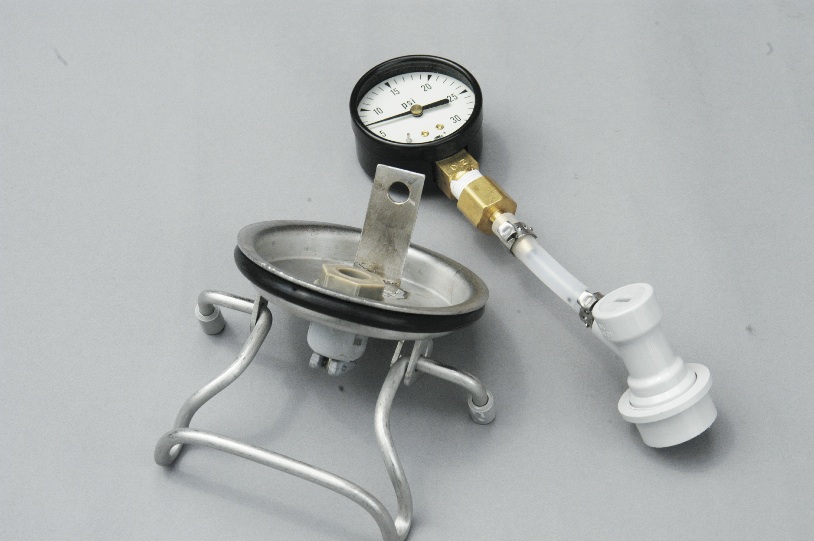
To create such a device is both simple and inexpensive. All that is required is a spare gas-in connector (ball-lock or pin-lock depending on your keg,) a piece of hose, two clamps and a pressure gauge in the desired pressure range.
Step-by-Step
Select either a 0–15 0r 0–30 psi pressure gauge (0–1 or 0–2 bar) and brass or nylon barbed fitting. Mine came from a large industrial supply house. Scrounge or purchase a gas-in connector and some new, freshly-sanitized hose.
Wrap the gauge’s threads with Teflon tape or other pipe dope and tighten barb to gauge.
Push the tube onto one fitting and clamp with an Oetiker or some other clamp. Thread a second clamp over the tube, insert the other barbed fitting and clamp.
Done! To use the gauge, just attach the quick connect to the gas-in line of your keg. I rushed out to discover that my nice Old Speckled Hen clone had 6 psi pressure at 39°F (3.8 °C) or 1.96 volumes of gas. According to the chart, an additional 2 psi would make for perfect carbonation. At last I know.
Remember that it takes a while for carbon dioxide to dissolve into beer. Pressure readings taken before the beer and gas are at equilibriumwill lead you to overestimate the level of carbonation. Wait at least a day with the beer under CO2 pressure before making the final adjustments to your beer’s carbonation.
Keg Lid Hanger
Do you dry hop your beers? Many of us take a crack at pumping our pale ales as full of the aroma of fresh hops as we know how. Dry hopping in secondary is common, as is dry hopping in the keg. Having struggled with fishing a hop bag out of the neck of a glass fermenter (never again!) and having had my racking cane clog with both pellets and leaf hops, I’ve decided that dry hopping absolutely must be done in buckets or kegs.
Hops float and a mesh bag full of hops will float atop your beer forever, failing to properly infuse the beer with flavor. The answer is to weight the hop bag, commonly with a chunk of stainless steel or glass; anything that is inert and easily sterilized or sanitized will work. What’s not obvious is the chore of fishing a hop bag out of a keg.
We kicked this problem about in our homebrew club and Dean McCracken suggested welding a stainless steel hanger to the underside of a keg lid instead of reaching in with a sanitized hook. Cool. And it’s easy, requiring only some silver solder, flux, a bit of stainless steel (preferably 316, food grade stainless) and a heavy duty soldering iron.
Step-by-Step
Begin with stainless scrap sheet stock of decent thickness. Cut a length to approximately 1” (25 mm) wide and 2” (50 mm) and be sure to file all the edges smooth. Drill a hole 1/2” (123 mm) on center from one end and bend the tab. That’s your hanger.
To drill stainless you should use either cobalt or titanium drills. Start with a 1/8” or smaller drill and work your way up in several steps. Run your drill slowly and use cutting fluid.
Clean the underside of your keg lid, picking a spot midway between the purge valve and the lid’s edge. (You don’t want to melt the plastic valve, so remove it.) Apply several drops of flux. This cleans the keg lid chemically.
Clean and flux the tab and apply heat from your soldering iron to the tab, pressing gently. When both pieces of metal are sufficiently heated, the solder will flow under the tab and form a void-free bond. I like silver soldering better than spot welding because it should make it impossible for any bacteria to hide under the tab as the two metal pieces become one.
To be honest, I cheated. My soldering iron would not provide sufficient heat. So, I preheated and tinned (applied a thin coating of silver solder) the tab. While the tab was hot from the torch, I applied the tab to the keg. I then applied the soldering iron, both as a way of holding the tab in place as well as heating, and heated the assembly a bit with the torch.
Next I applied the solder, flowing it beneath the tab. Do not apply solder when using a torch; the flame will melt solder and you’ll get a “cold” or ineffective joint. Solder must flow. If it doesn’t, cool and clean everything and start over. Once joined, clean the lid according to the directions that come with your flux. This is critical unless you like corrosive and poisonous chemicals in your beer. I used abrasive cleaner and hot water followed by a day-long soak in PBW.
This was so simple I think I’ll convert all my kegs. I never know when I’ll want to dry hop or put a little more coriander and fresh orange peel into my beer. There’s another benefit besides ease of retrieval — you can adjust hang-height to limit the time your addition stays in contact with the beer. By that I mean that tying the hop bag close to the lid. About 12–16 pints of beer later, the hop bag will be hanging free of the beer, limiting contact time. In this way you can control the addition of flavors.


