Build These 4 Tap Handle Designs
Homebrewers are notorious for demonstrating that if there is an ingredient that can be ingested, it can be used in brewing beer. Well, a different take on that line of thinking is if there is an object that is the right size, you can make a tap handle out of it. Whether it’s an old trophy from Little League baseball, a piece of driftwood that washed up on the beach, or emptied yeast vials — as long as you can attach a threaded insert to it and it fits, it can be displayed on top of your kegerator to help dispense homebrew.
We asked readers to share their homemade tap handles on social media and then picked four of our favorites to share details about how their handles were made and offer advice for how others can make handles in a similar fashion.
Since the basic concept of any handle is the same (drilling a hole and inserting a treaded socket into it to screw onto your faucet), let’s first do a quick run-through of that process.
Almost all American tap faucets are standardized with a shaft to fit a 3⁄8”-16 threaded insert (3⁄8”-16 means the diameter is 3⁄8”, while 16 represents the threads per inch). There are two common options of how to make a handle fit this shaft — the most basic is inserting a 3⁄8”-16 female threaded insert directly into your handle, which will then screw onto the external threaded shaft for mounting the handle. The second is screwing a hangar bolt into your tap handle with 5⁄16”-18 male threads sticking out from the bottom, which will be screwed into a ferrule with 5⁄16-18 female threads on the top and 3⁄8”-16 female threads on the bottom. You can then screw that ferrule onto the shaft to mount your handle. The difference in appearance between the options is whether you want the look of the tap handle butting up to the faucet or seeing a shiny ferrule separating the two (An example of a handle with a ferrule is on the left, and one without is on the right at the bottom of this page).
If you go with the first option, once you have selected your material to turn into a handle, drill approximately a 1⁄2-inch hole 5⁄8 inches into the bottom of the handle and then screw or hammer the brass insert into the hole. The reason we say approximately a 1⁄2-inch hole is because some material may require a slightly larger or smaller hole depending on how hard it is and whether it can be screwed in. It’s important that this hole is in the center of your handle and drilled as straight as possible so that your handle stands straight. If you have a drill press, that is the easiest way to accomplish this, but a hand drill will work with some patience and concentration.
If you are going with the hangar bolt and ferrule route, pre-drill a hole of approximately 1⁄4-inch, insert the hangar bolt, screw on the ferrule and you’ll be pouring homebrew in no timenot expected that too many readers will replicate any of these handle designs to a T, but, as with most DIY projects, seeing what others have done is a great way to glean ideas and motivation to customize your own project.
SPINDLE TAP HANDLE
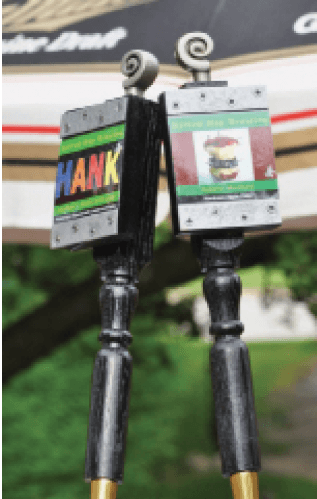
I used a wood deck spindle cut to 11 inches (28 cm) in length. I was able to make one handle from the top and another from the bottom of the spindle. Spindles work great because they have an area that is flat at one end to mount the faceplate and a decorative turned detail in the middle. For the faceplate, I used a 3 x 4-inch (7.5 x 10-cm) piece of pine board.
With the spindle in a vise with the flat end up, I drilled a small hole for the knob in the center of the top of the spindle. After turning the spindle around in the vise I used a larger bit to drill a hole in the center of the spindle bottom for the hangar bolt. After test aligning the faceplate on the flat area of the spindle I positioned the mending plates on the ends of the faceplate. If the faceplate is cut just right, the mending plates should be flush to the edge of the faceplate on three sides. Then I marked the inner edges and drilled small shallow pilot holes in the faceplate for the mending plate screws.
To attach the faceplate I applied glue to the spindle where the faceplate would be be attached and drilled holes directly through the faceplate and into the spindle between the marks I made for the position of the mending plates.
I spray painted the mending plates with hammered silver paint and the spindle and faceplate assembly with the black paint. When all of the paint was dry, I assembled the finished tap handle by screwing the mending plates to the faceplate.
Using pliers, I screwed the hangar bolt into the bottom of the tap handles and the ferrule onto it. Then I screwed the decorative knob to the 8-32 screw that’s threaded on both ends and screwed the knob to the top of the tap handle.
The finishing touch is designing, printing and laminating 21⁄2 x 3-inch (6.3 x 7.5-cm) labels. With labels in hand, I can loosen the screws on the mending plates, insert a label beneath them, and screw them back tight again to hold the label of the homebrew I’m pouring securely.
— Kevin Wojdak
MATERIALS:
• Stair spindle or table leg
• Pine wood (for faceplate)
• 3-inch (7.5-cm) wide steel mending plates
• Knob (purchased from WoodworkerExpress.com – Amerock Swirl’z Knob in Weathered Nickel)
• Threaded screw with no head to attach the knob to the handle
• Wood screws
• Wood glue
• Spray paint
• Beer tap handle ferrule and hangar bolt
• Laminated Labels
TOOLS:
• Saw
• Power drill/screwdriver
• Vise
• Pliers
• Pencil
• Tape measure
NATURAL WOOD TAP HANDLE
I’ve found that the simplest way to make my tap handles is to pay attention to what nature has out there and just try to enhance it in a way that makes it easy for anyone to recognize the uniqueness of it. The first tap handle I made (on the right in the bottom picture) was literally given to me by nature. I found it as a piece of drift wood floating in the lake while camping several years ago. While my family wondered why I was dragging a stick home I immediately could see a tap handle that would complement my beer fridge and my homebrews. This one took very little to make ready in that I just had to adjust the length with a band saw and tap in the threaded faucet fitting. After that it was just a few rounds of sanding by hand — beginning with 80 grit sandpaper and finishing with 150 grit. Finally I applied three coats of polyurethane clear finish. All in all it was relatively easy to complete in just one weekend.
I came across my second handle as I was stacking firewood and found this piece of oak that had a hole through it where a limb had grown and long since fallen off. I wondered whether with the bark removed and the wood trimmed up if there would be enough material to make something and what would it look like. I knew I had to be patient in that this tree had been cut down not long ago and while being a few months old might make good firewood, it doesn’t leave enough drying time for woodworking. So this chunk of wood sat in my garage for the next year (much to the annoyance of my wife who felt I had enough projects hanging out in the garage already). After enough time had passed, I felt it was ready. In a project like this a band saw is your best friend. The challenge is to take an irregular piece of wood and try to make it somewhat regular or at least something close to a rectangular piece of stock. I had to first freehand the piece through the band saw roughly squaring it up until I had a rectangle that was approximately 3-inches (7.5-cm) wide on each side and 16-inches (40-cm) long with a weird hole in the middle of it. I then had to freehand draw a profile shape that I wanted the handle to have. Then I was back to the band saw carefully cutting out my design.
Next I mounted it upside down to my saw horses and sanded it down with a belt sander. This made quick work of the flat sides, but I still had this hole in the center that had some bark attached and irregularities in the surface that I didn’t want to sand flat. In this case I used a small hand held sand blaster. While it made a mess in my driveway, it did allow me to etch away a small layer of material from this area without ruining the character of the wood. After some final hand sanding and 6–7 coats of polyurethane finish it was complete. I think it turned out well and gives the illusion that you are looking into the grain of the wood.
— Sam Hedrick
MATERIALS:
• Wood
• Sandpaper
• Polyurethane
TOOLS:
• Band saw
• Sand blaster
LATHE-TURNED TAP HANDLE
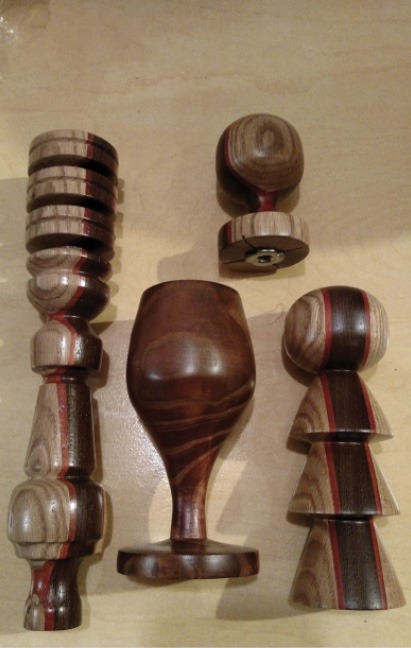
I am a bit of a lathe enthusiast and have come up with a common theme for my tap handles. The brown wood in the center is Wenge, the orange wood is Paduck, and the outside is good old American oak salvaged from a home remodeling project. The Wenge and oak were 1 x 6 inch (2.5 x 12 cm) boards, while the Paduck was 1⁄4 x 6 inches (If gluing different wood types together, try to group them in similar hardnesses. Putting soft pine next to hard oak can make it very easy to chip the wood if being overly aggressive).
I started by gluing them together with wood glue, one layer at a time and allowing each to dry 24 hours before doing the next. I used 3 pipe clamps to clamp the wood together, squeezing as much glue outas possible. Once all the layers were glued, I essentially had a 3 x 6 x 12-inch (7.5 x 15 x 30 cm) block of wood. I used a large miter saw to half the board length-wise to give me two 12-inch (25-cm) long blanks.
I then shaped the handles using a lathe. Once done turning the handle, I smoothed the wood with sandpaper while the handlewas still on the lathe, using finer and finer grades of sandpaper to make it smooth. Due to the nature of the lathe, there will be a small nipple or profusion at the ends of the handles (as you can see in the top picture). While one end will be the threaded end, the other end needed to be sanded down once it is removed from the lathe.
After inserting a threaded nut, I applied stain to my handles with a rag (do not try to apply the stain directly to the handle, it can cause slight discolorations due to running). After a second coat of stain I applied coat of clear lacquer in the same manner as the stain, let it dry, lightly scuffed the entire handle with Scotch-Brite and applied a second coat.
I did the long honey dipper looking handle first (on the left). My inspiration for it was to create a handle that was somewhat ornate, easy to grab, but had a solid feel to it. The second handle I did was the ball hitch (top right), which I set as a challenge for myself to create a near perfect sphere.
My dad, who is a former shop teacher and very competitive like me, saw the ball hitch and complimented me on it. I threw him a bit of shade and asked if he could do better than me by making a uniquely shaped tap with a ball hitch on top. Two hours later, I got a text picture from him of a Christmas tree and ball hitch tap handle (bottom right)! He also created the tulip glass tap handle as the Best of Show Mead trophy for our local homebrew contest, Land of the Muddy Waters. After fawning over it, I unexpectedly won it back.
As a final design note of caution — double check the height and width limitations where your handles will be. This is especially true if you dispense from a fridge door!
— Justin Brooks
MATERIALS:
• Various woods
• Wood glue
• Sandpaper
• Stain
• Clear lacquer
TOOLS:
• Lathe
CHALKBOARD TAP HANDLE

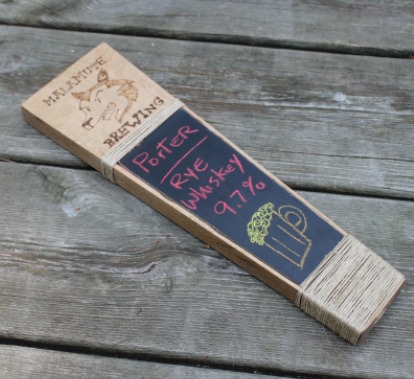
This was my first attempt at a custom beer tap handle and turned out to be a really fun learning experience. My concept was to create a handle with a chalkboard insert and my personal homebrewing logo. After a quick run to my local big box home improvement store, I was ready to get started. I knew I wanted a classic trapezoid shape handle with a large area for the chalkboard. I settled on 3.5 inches (9 cm) at the top, 2 inches (5 cm) on the bottom and 12-inches (30-cm) long as my final dimensions for the wood and 2.75 x 1.9 x 6.25 inches (7 x 4.8 x 16 cm) for the chalkboard insert. This left me plenty of room for the logo at the top and drill room at the bottom for the tap insert.
After marking the overall dimensions on a block of maple I used a band saw to cut it out. Next I cut out the piece of chalkboard using a jigsaw. To help prevent the edges of the chalkboard from chipping I covered the outlined edges with blue painter’s tape. Once the chalkboard was cut, I placed the board on the tap handle and traced an outline before using a router to cut out a recession for the chalkboard. A few passes with the router and I was in business, the only problem was that the corners were still round. To fix this I used a small wood chisel and hobby knife to square off the corners. I was now ready to sand. I slightly rounded over all of the handle edges for grip comfort and smoothed out a few bumps left by the router.
Now it was time for the finishing details. First up was the tap insert. I used a drill press and a forstner bit to make the hole and then added a couple of drops of wood glue to make sure the insert stayed in place. On to the logo! I wanted this handle to have a rustic look, so I decided to use a wood burner to finish my design. I sketched the logo and type using a pencil and then switched to the fine tip for my wood burner. I slowly went over my pencil lines, making sure to burn deep enough to withstand repeat handling. To shade in the darker areas on the dog I switched to the flat shading tip.
Happy with the logo and the feel of the sanded edges, I cleaned the handle and applied three coats of stain. After letting that completely dry I gave it another light sanding and cleaning. Next step was to glue the chalkboard in place. For this I used wood glue and about eight spring clamps to hold it down. I let this dry overnight and then added the final detail, the wrapped twine at the bottom, which is held in place with a couple of drops of hot glue on the ends.
— Jay Kincer
MATERIALS:
• 4 x 12 x 3⁄4-inch maple
• Bulk sheet of chalkboard
• Spool of small diameter twine
• Wood glue
• Sand paper (medium and fine)
• Oil-based stain
TOOLS:
• Band saw
• Jig saw
• Router
• Drill press
• Forsner bit
• Wood burner
• Small wood chisel brewer’s marketplace


