Build a Burner Igniter: Projects
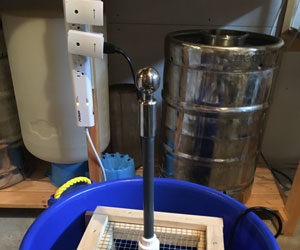
 For the last two weekends, I’ve been fortunate enough to return to my back porch “brew house.” One consequence of outdoor brewing is having the flame of my propane burner blown out by the wind. This always seems to happen when I have put the long-nosed butane match away downstairs. So I thought, why not make igniting the burner as easy as pushing a button? What brewer wouldn’t want that?
A search at my local home-improvement store produced two similar products, replacements for the spark generators that come with every propane or natural gas grill. Both appeared to be a solution to having a safe and effective method of lighting my propane burner.
Charbroil (a division of the W. C. Bradley Company) responded to my inquiry with two igniters designed as universal replacements for gas grill spark igniters. They were a universal fit igniter with sideburner (#4984685) and an electronic igniter (#4984683). These electrodes have a long wire (the actual electrode) protruding from a ceramic fitting. This wire is long enough to reach across the typical “Cajun cooker” burner rings.

One igniter uses piezoelectric principles to generate sparks. Squeeze a piezoelectric crystal (usually quartz) and it generates electricity — a spark rather like static electricity. The electronic igniter uses the same kind of solid-state electronics as a gas-fired furnace, water heater or stove. Low voltage from a battery is converted to very high voltage for a spark.
Either should work well. Both are meant to be used on a grill and we all know from experience that grills are left out all year around. This should guarantee some weather proofing and water- and wort-resistance. I decided to install the electronic igniter because I like electronics. If cost is an issue, the piezo model is about eight bucks cheaper and it works just as well.
After laying out the parts, I decided to place the igniter module as far from the heat as practical. In grill installations, the igniter module is outside of the “oven” so I put my igniter low on a support leg of my burner. I used one of the replacement brackets supplied with the igniter kit; you might choose something different. The bracket fit nicely against any leg.
Step by Step
Drill two 1/8″ pilot holes through the center of one leg and then through the supplied bracket. Then drill a 3/16″ shank hole through both and use 3/16 x 1″ #6 bolts and nuts. Your mounting holes should be half of the leg thickness or less, so as not to compromise the strength and stability of your stand.
If using the supplied bracket, fit the igniter module into its slot and secure with the provided nut. If using the piezo igniter, drill and shape the appropriate hole and then snap the igniter unit into it.
No bracket is provided for mounting the electrode, so you must build one. I chose aluminum for a variety of reasons. It is easy to bend, readily available in small pieces, has a high heat rejection and is non-rusting. The bracket is bent into a simple “U” shape with two long legs. One leg will be bolted to the burner windscreen and the other will be drilled for the electrode.
By using 1-1/2″ wide stock, I hope to prevent spillage from gunking up the electrode as well as covering it from flame backwash. The design and placement should provide some cooling as air rushes up to the flame.
Cut 10–14 gauge aluminum sheet 1-1/2″ wide by 6″ long (14–18 gauge steel is an alternative).
Measure the length of the electrode, plus 3/8″ extra for the wiring, then subtract your windscreen-to-burner distance. My result placed the end of the ceramic ferrule 1/2″ from the burner ring, enclosed by a metal “U” roughly 2 x 2 x 2 inches.
Drill two 1/4″ mounting holes into one leg of the bracket for mounting to the wind screen. At the other leg, drill a 5/16″ hole for the electrode. (When I test-fit the assembly, the first location was incorrect, so now I have some extra holes drilled in my burner leg.) The electrode needs to be near the bottom of the “U.” This will place the electrode near the burner while keeping it below the flame. Though the electrode body is designed to work in a hot environment, it is not meant to be directly in the flame.
To secure the electrode, you’ll need to drill a second hole through the bracket and either tap it for a 1/4″ bolt, or bolt in a 1/4 x 1/2″ nut and bolt.
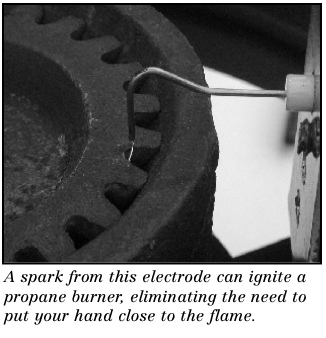
The bracket is then fitted to the windscreen. A pair of vise-grip pliers marks the location for bending the electrode, which is obviously too long (see the figure at left).
According to the directions included with either replacement, a sideburner electrode should be suspended in the air 3/8″ from the burner. A friend did this and placed the electrode 3/8″ from the edge of the burner ring. Guess what? There’s no gas flow there! The tip of the burner must therefore be 3/8″ from a gas port. Charbroil includes a plastic gauge to help position the electrode. The plastic gauge sits next to the bent electrode. I made a round bend (which can be seen in the picture on page 55) to allow some extra wire after I cut the electrode. Mark your electrode just below the top edge of gauge. Be sure to count the air space of the burner orifice in your 3/8″air gap. Then cut the wire.
Finger-tighten all your nuts and bolts. If using the electronic igniter, install the battery. Charbroil includes one wire for this kit; the ground side of the circuit is provided by the main electrode, which completes the circuit. For this installation I made my own ground wire (white wire) using 6″ of high temperature 14-gauge wire and two 0.125″ connectors, available at any Radio Shack. The grounding ring is supplied. Piezo models provide both wires, but may require some adaptation for use on a propane burner. After tightening all nuts and bolts, and connecting the electrode and ground, I pushed the igniter button and immediately got a spark. A bit of repositioning and it struck exactly where I wanted, making me one happy, happy brewer. Now I can spend more time brewing and less time wondering where the butane lighter is. I also no longer need to worry about sizzling my knuckle hairs when I light the burner.