Build a Continuous Sparging System: Projects

What you’ll need you can pick up all the parts for this project in a single trip to your local hardware store:
- 11/4-inch PVC pipe (3 feet or ~1 meter)
- 11/4-inch PVC four-way pipe connector (Fig. 1)
- 11/4-inch PVC pipe caps (4)
- 1/2-inch FPT to 1/2-inch hose barb
- Standard 6-inch (15 cm) shower arm (Fig. 2)
- Low-flow (2.5 gpm or less) shower head with flow control valve (Fig. 2)
- 1/2-inch ID vinyl tubing (4–6 feet or ~120–180 cm)
- Teflon pipe tape (1 roll)
- Sand paper, medium grit (optional)
- 100% silicone caulk (optional)
The above list assumes that you already have a hot liquor tank (HLT) to hold the sparge water. If you do not have an HLT, you can pick up a 5 or 10-gallon round cooler and a ball valve at the hardware store while you are collecting the rest of the parts for the project. Remove the cooler’s plastic spigot and install the ball valve — now you’ve got an insulated HLT. As far as tools go, you’ll need a drill, a small hacksaw or coping saw and an adjustable wrench or pliers.
If you’re looking to move from extract brewing to all-grain brewing, you’ll need to become intimate with the details of sparging. In a nutshell, sparging is the process of rinsing the grain in order to extract as much sugar as possible while leaving behind grain husks and other particulate matter.
Continuous sparging, or “fly” sparging as it is often called, is a very common sparging method used by homebrewers.
There are a number of commercially available products designed to aid in the process, most commonly in the form of sparge “arms” that distribute water to the grain bed via a gravity-fed rotating arm (not unlike a lawn sprinkler). But why pay for one when you can easily build your own?
The old rugged cross
Using the PVC pipe and four-way connector, we’re going to make a simple four-armed fixture to suspend the shower arm and head above the grain in your mash tun. This project assumes that you are using a 5-gallon (19-L) round igloo-style cooler as a mash tun, but it can easily be adapted for use with a square or rectangular tun.
First, we’re going to drill a 3/4-inch hole in the center of both sides of the flat part of the PVC four-way pipe connector.
Use a drill with a paddle bit or small hole saw to get the job done. Once you’ve got the two holes drilled, insert the shower arm through each hole to check for a firm fit. If the holes are two small (which is likely), you can widen them with either medium-grit sand paper (the slow way) or with a Dremel Tool with grinding/sanding drums (the fast way). The ideal hole size will be just big enough to allow the shower arm to be pushed through but will be tight enough to hold it snugly. If your holes are a bit too large, you can either start over with a fresh four-way connector (you did buy two just in case, didn’t you?) or you can easily caulk the shower arm in place. Once you have the holes at the proper size, remove the shower arm and put it aside.
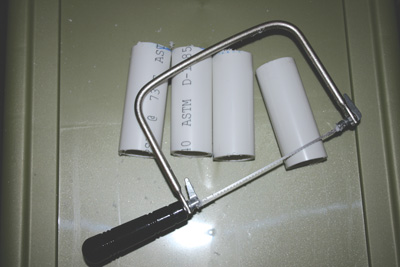
Next, cut four 6” (15 cm) sections of PVC pipe (or use longer sections as needed for a rectangular mash tun). A hacksaw or coping saw will make quick work of the job.
Insert the four sections into the four-way connector. Finish off by applying the end caps to the piping. Optionally, you can caulk all the connection points for a more permanent fixture, but provided that everything fits snug, this is not necessary. Not using an adhesive also allows the fixture to be taken apart for easier storage.
A call to arms
Now it’s time to bring everything together. Insert the shower arm through the holes in the center of the fixture, with the angled portion of the arm sticking out of the top. Apply a liberal amount of pipe tape to both threaded ends of the shower arm (Fig. 5). Without the tape, it will be very difficult, if not impossible, to achieve leak-free operation.

Screw the hose barb into the pipe thread on the angled end of the shower arm. Hand tightening will likely not be enough to get a good seal, so use an adjustable wrench or pliers to tighten. Next, screw the shower head into the pipe thread on the straight end of the shower arm. The shower head has a rubber gasket in its connector threading, so hand tightening should be enough to eliminate leakage. (Fig. 6)
All that remains is to connect your HLT to the sparge fixture via a section of 1/2-inch vinyl tubing (Fig. 7).
If you prefer, you can use 3/8-inch high-temp tubing. With a little coaxing, it will fit snugly on the 1/2-inch hose barbs on both the HLT and sparge fixture.
Parts substitution
The above project parts list is almost infinitely configurable. You could use smaller diameter PVC pipe and fittings, for example. And you could easily spend half an hour at a big-box hardware store just sorting through your options for shower heads. Just make sure that the shower head you choose has a flow rate control valve. This will allow you to have maximum control over the sparge speed. For this project, I used the Europa Elite shower head, a commonly available and inexpensive (about $10) model. You could even use some type of garden sprinkler head, so long as you make sure that it is safe for use with potable water and won’t impart chemicals or metals.
A decision of gravity
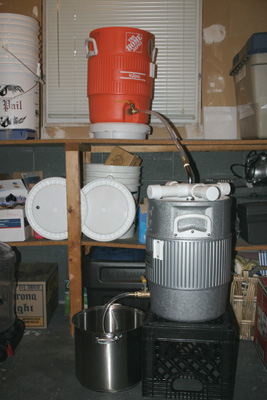
Your new continuous sparging system operates solely with the help of gravity, so you’ll need to position the HLT at least a foot or so above the mash tun. Putting the HLT higher above the mash tun will generate faster flow, but in continuous sparging, faster is certainly not better. Since you’ll be collecting wort as you sparge, a three-tiered setup is ideal (i.e. – HLT at the top, mash tun in the middle, kettle on the bottom, (Fig. 8). You’ll have to experiment with the system in order to find the ideal set-up in your brewing space.
 Go with the flow
The goal in continuous sparging is to have an equilibrium of hot fresh water coming in the top of the mash tun and sugar-laden wort flowing out to the kettle (Fig. 9).
The fresh water added to the top of the grain slowly makes its way through the grain bed, picking up fermentable and non-fermentable sugars (and also flavors and color) on its way down and out through the mash tun to the kettle.
By using an HLT with a ball valve and a sparge fixture with a flow control valve (on the shower head), you can fine tune the flow going in to the mash tun to match the outflow. Sparging with too high of a flow rate will negatively impact extraction efficiency. A low-flow shower head has a theoretical maximum flow rate of 2.5 gallons per minute, but this is at 80 psi. Your gravity-fed system doesn’t create near this pressure, so your flow rate will be fine.


