Build a Draft Beer Fridge: Projects
 This month’s project, which I’m calling the DraftErator, is a refrigerated box just for keeping beer at optimum dispensing temperature. While a refrigerator is designed to have many levels of coldness, and to be opened on a regular basis, our box is designed to hold four undisturbed kegs at about 45° F.
Think of a tiny dorm fridge sitting atop a well-insulated box. Drill out the bottom, force cool air down into the box, add a tap handle or four and you’ve created our DraftErator.
Step by step
I made my cabinet from 1/2” MDF. It’s insulated with 1.5–3” of expanded polystyrene home insulation and sits on casters for easy movement. Atop is a dorm fridge I purchased for $25. Materials run the cost to nearly $120, not including dispensing taps and lines.
If you don’t have a power saw, relax. Most home improvement stores will cut your MDF for a couple of bucks. If you go when the employees are bored, not on Saturday afternoon, it might be free. I based the interior volume on 8.5 x 25” Corny kegs and left about 5” of headroom for attachments, hoses and air shafts.

Box
Cut all MDF panels (see dimensions in sidebar) for the sides and back. Screw on 2 x 2” support rails — two for the back, one each for sides. Each support provides something for screws to attach to, because MDF’s end grain just isn’t sturdy enough. And where we do screw into the MDF end grain, you absolutely must pre-drill. A bit of construction adhesive, carpenter’s glue, or silicone seal applied to every joint will provide extra security.
Attach two supports (the frame of the box) to the back panel. Apply one support to each side panel. Attach the side panels to the back with the sides’ end flush with the back surface. Pre-drill and screw together. You should now have a three-sided “box.”
Set the bottom onto the supports, pre-drill and screw in. Be particularly careful with any end-grain screws. Repeat with the top and you’ll have a five-sided box, open in front.
Attach a couple of 1 x 2” boards to the bottom at the outside edges for skids. This gives the sides something to rest on and provides air space underneath. It also serves as support for the casters underneath.
While the box is open, caulk all the seams with silicone or other caulk. Leaks will make the refrigerator compressor work harder.
Attach very short casters: two fixed at rear, two swivel at front. I got four 1-5/8” swivels for $6.50.
Insulation
Once the box is complete, cut three pieces of insulation to the size of between-support dimensions and glue each piece to its interior position. You must use special glue or adhesive meant for this task. Ordinary adhesives contain solvents that melt polystyrene.
Next, cut the floor and top insulation. It will have to be notched to fit around the supports. Cut a floor panel from 1/8–1/4” luan plywood or any other similar sheet stock. The floor panel provides a sturdy base for your Corny kegs; insulation is soft and your kegs would tip if they rested on it.
Door
The door (it should be a single piece; not shown in photo) needs insulation, hinges and a closure hasp with lock. It also needs a gasket to keep it airtight. I used ordinary soft weather stripping, which fits tightly. Locate your door and add a gasket to all four sides of the box. Add a latch and a handle. Be sure your screws aren’t longer than the panel is thick! If so, cut them.
Now would be a good time to paint everything. Or at least paint the top before attaching the refrigerator.
Cooling section
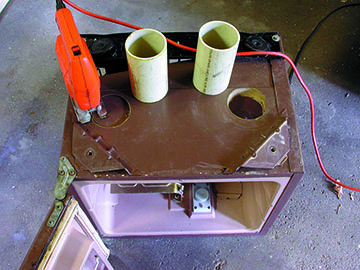
Set your refrigerator atop the box in preparation for permanent attachment, leaving an inch behind for air flow. Cut attachment blocks or angle iron for securing the fridge to the box. Once the fridge is ready to attach, remove it and turn it upside down. Mark and cut holes for 3” pipe. I predrilled with a 1/2” drill and cut the steel bottom, fiberglass insulation, and plastic inner panel with a saber saw.
Don’t worry about cutting a coolant line. With ancient designs like this dorm fridge, the coolant entry and exit pipes should be clearly visible. Old refrigerators and tiny ones have only the ice box as a cooling surface.
Once the holes are cut to a nice snug fit, return the refrigerator to its rightful place atop the box and secure it. Set in the pipes and use silicone caulk to secure them. You now have two large air transport holes betwixt refrigerator and box chamber.
Convection will move air, but a fan will do better. I had a nice little pie-plate fan laying around that seemed perfect for this project. Any small fan that can be attached to your ductwork will do. I used long screws to attach the outlet or breezy side of the fan to the inside top of the DraftErator box. This will push air up into the refrigerator chamber and back down into the box.
Wire Fan
I decided to plug the axial fan directly into the main electrical system so it would recirculate air continuously. The alternative was to relocate the refrigerator’s temperature probe into the cabinet and wire the fan to the compressor. These fans cost under $30 and are part of almost every commercial electronic device (copiers, vending machines, overhead projectors and the like), so you should be able to salvage one with no problem.
Now all you need to do is add a few taps, as you would to a jockey box or fridge, which is a project of its own.
Thom Cannell writes the “Projects” column in every issue of BYO.
Parts list with sizes
- MDF (top and bottom) 24-3/8 x 24”
- MDF (front and back) 24 x 33”
- MDF (sides) 25 x 33”
- pine rails (4) 2 x 2 x 31-1/2”
- insulation (back) 20-7/8 x 31-1/2”
- insulation (sides) 21 x 31-`1/2”
Tools required: Saw, drill and bits,
screwdrivers, saber saw with metal-
cutting (24-tooth) blade, caulking gun
- MDF $19.00
- 2 x 2” pine $4.50
- insulation $13.50
- weather strip $5.00
- runners (skids) scrap
- casters $6.50
- axial 4” fan $25.00
- pvc or other pipe
- (2-6” sections) $2.00
- insulation adhesive $4.00
- 1-1/2” galvanized deck screws — 1# $4.00
- 1” sheet-rock screws (for casters) 16 $1.00
- hinge(s) $7.00
- hasp or latch $1.50
- door handle $0.98
- refrigerator (used) $25.00
Tap items, available from any
homebrew store:
- hose 3/16” (per foot) $0.40
- manifold (5 port) $24.00
- shanks (per) $17.00
- faucet (per) $23.00
Sidebar on shank attachment, plumbing, manifold, etc.
Once your box is built you’ll have to decide where you want the draft spigots, right side, left side, or on the front of the fridge. Here’s how to install spigots and a manifold for distributing the necessary CO2.
Draw a horizontal line across your chosen side. Measure in the thickness of supports plus back (or sides and seal surfaces of the fridge) and subtract it from either end. Now divide the remaining space by the number of taps and don’t forget to allow for the diameter of the pipes and their large escutcheons. Also allow room for large home made backing plates on the inside to prevent crushing the insulation.
Shanks are the big shiny pipes that go through the wall. They’re available in many lengths and two styles. One style requires you to purchase the correct tail piece and connector fitting. The other, which we used, comes with a barb fitting already attached.
Shanks come with escutcheon plates in front and large nuts behind. Back each shank up with a, 2”x3” piece of 1/4” plexiglass or other rust-free material or attach a piece of material large enough for all taps before drilling multiple shank holes.
Drill the required shank holes-they’re 7/8” in diameter-with a hole saw or spade bit. (If you’re drilling through steel, use a hole saw.)
Once the shank is pushed into the box and tightened up you’ll need to assemble the faucet/tap/spigot, whatever you chose to call it. The tap male end is splined and can be inserted into the shank at any angle. To fasten the knurled collar of the shank to the tap you should buy a special faucet wrench. Or wrap a thick rubber band around the nice shiny chrome and use an adjustable pliers or water pump wrench. You can get away without covering the surface once or twice but you’ll scratch or mar the finish very soon.
Now you must drill one more hole for the CO2 line, it’s 1/2”. Your home brew shop can supply a gas manifold to distribute CO2 to each keg. This will consist of a gas inlet from the supply, manifold, and gas lines and connectors to each keg. Now connect kegs to taps with ball-lock or pin-lock connectors and 24” of 3/16” beer line and guess what? You’re done.


