Build A Hardwood Beer Box: Projects

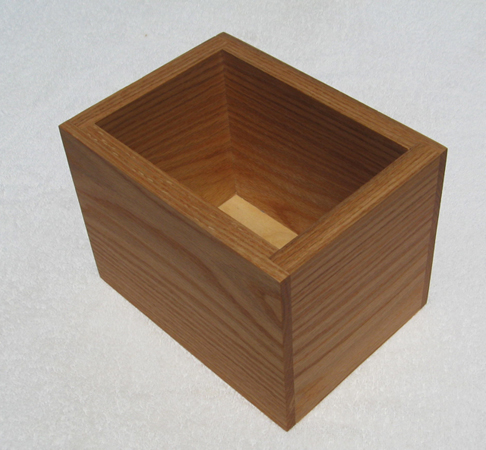
Homebrews displayed in a homemade six-pack box like this make great gifts for your beer-loving friends.
Homebrewers are always looking for ways to improve their craft and enhance their homebrews – both in the beer and in their hand. Many people like to create new equipment and recipes. Others use their artistic skills to create custom logos and bottle labels to enhance the presentation of their beers. Me, I like to work with wood, so after creating my own logo and labels I decided to create unique boxes to carry six packs of 12-ounce bottles of my own brews. I have found that the boxes are not only handy for transferring beer from place to place, they are also a great way to giftwrap a six-pack of homebrews.
Woodworking has been a hobby of mine for several years, so I decided right from the start that the box must be made of wood. I’ve experimented with several different designs and box joinery styles. I’ve used oak, cherry, walnut or elm for the sides, but the wood species is really up to the individual builder. I’ve built these boxes using dovetail joints, box joints or rabbet joints, but for this story I went with rabbet joints as it makes construction fairly simple. (A rabbet, also known as rebate, is a recess or groove cut into the edge of a piece of machineable material). Cutting dovetail or box joints, for example, is more difficult. The sides of my boxes are either 3⁄4-inch or 1⁄2-inch thick. The boxes with thicker sides are heavier, but look better than boxes with thinner sides in my opinion. I use 1⁄8-inch thick plywood for the box bottoms and bottle dividers.

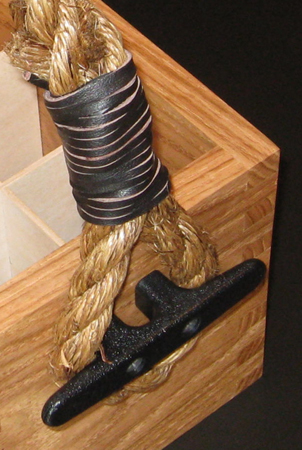
In addition to the structural design I settled on, I also wanted my boxes to have an old-time nautical look, so I chose manila rope for handles. My original design had rope ends tied to inexpensive cabinet drawer pulls attached to the box ends using half hitch knots, but the half hitch knots in 3⁄4-inch rope ended up being bulky, so I’ve since switched the design to include eye splice knots. The eye splice knots are wrapped with leather shoelaces to tighten the knots and give the box a better look. I’ve also swapped out the inexpensive cabinet pulls in favor of 41⁄2-inch (11-cm) black plastic boat dock cleats to further enhance the nautical look.
The following instructions include details on how to build my 6-pack beer box with 3⁄4-inch sides using rabbet joints. If you enjoy working with wood, this is a fun project to show off your homebrews at your next family gathering or homebrew meeting. And if you aren’t familiar with woodworking, this shouldn’t be too much of a challenge with a little guidance from a friend with some woodworking experience (and hopefully some tools, too!)
Parts and Supplies List
- 1-inch x 8-inch x 3-foot (~ 2.5 x 20 cm x 91 cm) hardwood
- 1⁄8-inch x 12-inch x 18-inch (~ 0.125 x 31 x 46 cm) plywood
- 5 ft. (1.5 m) of 5⁄8-inch or 3⁄4-inch manila rope
- (2) 72-inch (183-cm) leather shoelaces
- (2) 4 1⁄2-inch (11-cm) plastic dock cleats
- electrical tape
- masking tape
- (4) 15⁄8-inch black drywall screws
- wood glue
- danish oil (or other finish)
- furniture wax
- sandpaper
Tools
- table saw
- band clamp(s)
- measuring tape
- scissors
- phillips screwdriver

1. Cutting the box panels
First, rip the side/end material to a width of 61⁄2 inches (16.5 cm). Then crosscut two end pieces at 57⁄8 inches (15 cm) long and two sides at 91⁄8 inches (23 cm). Then cut rabbet joints in the ends of the side panels with a router or table saw. The rabbet joint should be 3⁄8-inch (1 cm) deep by 3⁄4-inch (1.9 cm) wide.
Cut a slot in the inside faces of the side and end pieces to hold the plywood bottom for the box. I make the groove 1⁄4-inch (0.64 cm) deep and 1⁄4-inch (0.64 cm) above the bottoms of the side and end pieces. If necessary, make another pass with the table saw to remove just enough material to allow a semi-snug fit for the bottom. Then cut the 1⁄8-inch (0.32 cm) thick bottom plywood piece to 55⁄8-inch x 81⁄8-inch (14.3 x 21 cm). Thoroughly sand the inside faces of the end and sides.

2. Box assembly
Woodworkers’ glue holds the box together. First, apply masking tape to the inside of the end and side panels along the inside side/end joint lines. The tape should not extend below the top of the bottom groove.
Slip the bottom plywood into the groove and dry fit the entire box together to see if everything fits ok. Trim the bottom if needed to get a tight dry fit. Make sure that the masking tape is properly placed. The tape pieces should meet at the inside corners, but not be pinched by the bottom or sides. Apply a thin layer of glue on the ends of the end pieces and on the rabbet joints of the side panels. I do not glue the bottom. Assemble the sides, ends and bottom, making sure that the assembly is square, then clamp the assembled box. Carefully remove the masking tape to remove any glue squeezed out during clamping. Wet and remove any glue that may be left on the inside of the box. Let dry overnight.
3. Finishing the box
Thoroughly sand the outside of the box making sure that the corner end grain is smooth and flush with the ends. Also make sure that all glue remnants are sanded off. A fine crack may remain along the outside of each rabbet joint. I minimize these cracks by sanding a glue/sawdust mixture into the crack, sanding smooth until the cracks are filled and glue is gone. This practice will produce a more attractive joint. The box may initially be wobbly sitting on a flat table surface. Simply put a large sheet of sandpaper on the surface and move the box back and forth over the sandpaper until the box sits flush on the table. The top of the box can be sanded in the same manner. I do not sand the plywood bottom.
I normally apply Danish oil and wax to my oak, cherry, walnut and elm boxes, but almost any type of finish will do. I do not apply oil to the plywood bottom. Wait a few days and then apply a furniture wax to all surfaces.

4. Bottle dividers
I make bottle dividers out of 1⁄8-inch (0.32 cm) plywood. Cut one piece to 41⁄2-inch x 75⁄8-inch (11.4 x 19.4 cm). Cut two more pieces at 41⁄2-inch x 51⁄8-inch (11.4 x 13 cm) each. Cut two slits half way through the width of the longer piece at 21⁄2-inch (16.4 cm) from each end. Cut one slit half way through the width of the smaller pieces at the middle of the pieces. The slits need to be slightly wider than 1⁄8-inch (0.32 cm). Piece together as shown to the right by aligning the slits in the long piece with the slits in the short pieces. Install in the box for a test fit. Trim dividers as needed, and apply furniture wax.

5. The handle
The handle is manila rope, 41⁄2-inch (11.4 cm) plastic boat dock cleats and leather shoelaces (72 inches/183 cm long). Start with a 5-foot (~1.5 m) piece of 5⁄8-inch (1.6 cm) or 3⁄4-inch (1.9 cm) diameter manila rope. Unravel 6 inches (15 cm) from one end and wrap electrical tape around the ends of each of the three rope strands. Wrap tape around the rope at 6 inches (15 cm) from the end to prevent further unraveling. Create an eye splice knot making sure that the inside of the eye is 2 inches (5 cm) wide (go to www.animatedknots.com/splice/index.php for more detailed instructions). I do two tucks for each of the strands, then I cut off the excess strands and wrap the splice with electrical tape. Rough fit the rope assembly to the box to determine where to begin building the eye splice knot for the opposite side. (My rope handles are 27 inches (69 cm) long from outside to outside of the eye splices after both eye splices are tied.) Tie the second eye splice, cut off excess rope strands, and wrap the eye splice with a band of electrical tape.
6. Finishing touches
Wrap shoelaces over electrical taped portions of the rope as shown above. The shoelaces are both decorative and helpful in stabilizing the eye splice knots.
Slip the plastic boat dock cleats through the rope “eyes” and attach to each end of the beer box. I tend to attach mine about 2 inches (5 cm) from the top — using the 15⁄8-inch black drywall screws.
Finally, when you have everything put together, load the beer box with six of your favorite home-brews and enjoy — or load it with beers to bring to give away!