Build a Keggle: Projects
 If you’ve been thinking of making the step up to 10-gallon (38-L) batches, you probably experienced sticker shock after shopping for high-volume brew kettles. A 15-gallon (57-L) stainless steel kettle with a ball valve will cost you upwards of $200, but you can make your own for about half that. You’ll need a 15.5-gallon (half-barrel/59-L) Sankey-style keg, a weldless kettle fitting kit (unless you know how to weld or have a local welding shop that will do the work), and some basic power tools. The end product is commonly referred to as a “keggle,” since it is a keg-to-kettle conversion.
The ethics of obtaining kegs
If you want a used keg (which I recommend, strictly on a cost-savings basis), the best place to start looking is at brew pubs or craft breweries in your local area, which may have kegs that are a little too dinged up to continue a useful life as pressurized beer containers. Since we have no need for a keg that is 100% fit for standard high-pressure usage, these will work fine. You can also order reconditioned or new kegs from vendors like Sabco.
What is NOT cool to do is take a keg from behind a restaurant or just keep a keg from a party after paying the deposit. The restaurant or local liquor store is not the owner of the keg — the brewery who filled the keg is the owner. And the deposit does not generally cover the cost of replacing a keg. If you take a keg in either of the above ways you’re costing the brewery a lot of money, and subsequently helping to drive up the cost of high-quality beer. It’s a disservice to craft brewers and beer enthusiasts alike. Also, it’s stealing. Get your kegs the right way.
Safety precautions
As with most DIY projects, protective eyewear is absolutely required. And given that there are flying, red-hot metal particles involved in this project, I highly recommend safety goggles instead of just glasses. In addition, hearing protection is also recommended. Cutting and grinding metal is very loud and can cause hearing damage. A cheap pair of earplugs will protect your hearing and make the project a lot more comfortable to complete.

First step: vent the keg
 Unless you bought your keg reconditioned, you must bleed off the interior pressure. Even empty kegs aren’t really empty, in most cases. There will be a small amount of stale beer and a decent amount of pressure still inside. YOU MUST RELIEVE THE PRESSURE ON THE KEG BEFORE ANY CUTTING OR DRILLING. Failing to follow this guideline could result in serious injury.
My preferred method for safely depressurizing a keg is to lightly tap a small nail between the valve and the rubber bung (Figure 1). It is advisable to cover the top of the keg with an old towel to prevent a geyser of funky, stale beer from reigning down on you or shooting up in your face. You can also wedge the blade of a flat-head screwdriver between the valve and bung to bleed off the pressure. You can also hook a tap to the keg and just open it . . . that is if you have a tap.
Marking and cutting the top
Use a permanent type marker (a Sharpie, for example) to mark the guideline for the cut. One easy way to do this is to tie one end of a string around the marker and the other end around the center valve on the keg. This low-tech method yields a very nice circle that is pretty close to perfect. If you’ve got a really steady hand, you can also just lean the marker against the inside edge of the outer rim and run it around the circumference of the keg.
 A common diameter for the opening on a keggle is about 12 inches (30.5 cm). I went with 10 inches (25 cm) as the initial cut on mine, then I ground and filed the edge smoother, which widened the opening a bit more. This is totally a personal preference.
For doing the actual cutting, you have a few options. The most elegant choice is a plasma cutter. If you know someone who owns one of these, this is the best way to cut a super smooth opening with minimal fuss. If this isn’t an option (which is the case for most of us), you can also use an angle or die grinder or various types of rotary tools. Just to compare results, I used a RotoZip rotary tool for about half of the cut and a Dremel rotary tool for the other half. For both tools, I used their respective heavy duty metal cutting/grinding wheels (part # RZMET2 for the RotoZip and part # EZ456 for the Dremel). I also tried using my air grinder, but my compressor isn’t nearly powerful enough to keep the grinder going long enough to make the cutting worthwhile. But if you have a compressor you could do it this way as well.
The smaller the diameter of the cutting/grinding wheel, the smoother a cut you can make. The tradeoff is that smaller wheels also take longer to do the cutting. In my tests the Dremel (with a 1.5-inch wheel) took about three to four times as long to cut the same distance as the RotoZip (with a 3.5-inch wheel), but the resulting edge was smoother and required less grinding and filing to make it safe for human contact. Either tool did an adequate job, however. Expect to use two or three of the RotoZip wheels and six or more of the Dremel wheels to complete the cut. Buy double what you think you’ll need, just in case.
 You can also use an angle or die grinder to cut out the keg top. This project is an excellent excuse to purchase more power tools. Experiment with different methods to find the best result.
Once you’ve got the top out (Figure 2), you should smooth out the rough edges around the opening. Take extra care during this step, as the steel will be very sharp. I used an angle grinder as a first step to wear down the edge (Figure 3). I followed this up with a finer grinding stone attachment on my Dremel and some manual sanding with very coarse sand paper on a sanding block. My resulting edge in these photos, while not the prettiest in the world, is smooth to the touch and safe for general brewing use. The opening doesn’t need to prove Pi to 20 decimal points in order to have a working brew kettle, but it does need to be safe for handling.
Adding the ball valve
Now we’re going to add a weldless bulkhead and ball valve to round out the keggle. If you plan to go with a welded connection, you can skip this section and consult with the welder. Most homebrewing gear uses 1⁄2-inch threaded fittings, so just make sure you standardize on that when welding.
Several homebrew suppliers offer weldless kits that include the bulkhead and the ball valve. I opted to use Norther Brewer’s bulkhead-only kit (catalog #7551) and a Blichmann 3-piece stainless steel ball valve (available from many suppliers). I chose this combination because all of the parts that touch the wort/beer are stainless steel, and the Blichmann valve can be broken down for cleaning. You can use any bulkhead setup or ball valve you like.
 For a 1⁄2-inch bulkhead, you’ll generally need a 7⁄8-inch hole. However, you should always follow the manufacturer’s instructions, so if their guidelines give a size other than 7⁄8 of an inch, go with what is stated in the instructions.
Mark the spot for drilling a couple inches up from the bottom seam of the keg. The inside bottom of a keg is sloped, so the closer to the bottom you drill, the more of an angle your valve will sit at when attached. Each type and shape of keg varies as to the degree of slope, so make sure you don’t drill the hole too low. In my experience, it’s better to go a little too high than too low, because you can make up for a high valve with a dip tube.
Drilling the keg
Drilling stainless steel can be frustrating sometimes, to say the least. The approach I take is to use a center punch to mark the initial hole, then use a 1⁄8-inch twist bit to make a pilot hole, and then widen the hole up to the proper diameter with a step bit (Figure 4). You can get inexpensive step bits from Harbor Freight and most big-box auto parts stores such as AutoZone.
 The keys to drilling stainless steel are: use lubricant (3-in-1 oil works fine), drill at slow to medium speed, and use a lot of pressure. Lubricant is very important when drilling stainless steel, as it is critical not to get the metal too hot. If it gets too hot, the steel will harden and become virtually impossible to work with. Use the oil liberally, and reapply as necessary during the drilling process. You’ll know it’s time to apply more when you see the oil evaporate in a small puff of white smoke. At that point, stop drilling and apply more oil.
Instead of a step bit, you can use a hole saw. Some brewers have used hole saws with excellent results, but my experiences have been hit or miss.
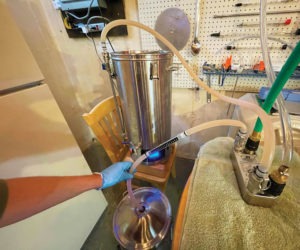
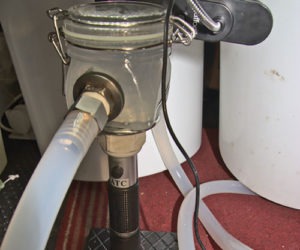
 Follow the manufacturer’s instructions for installing the bulkhead fitting, (Figure 5) and then attach the ball valve (Figure 6). At this point, you could either add a hose barb fitting to the ball valve or connect more complex plumbing, depending on your brewery setup.
Clean that keggle!
Once you’ve done all the cutting, grinding, drilling, and filing, the inside of the keg is going to be nasty. Rinse it thoroughly with water to remove all of the drilling lubricant and metal filings. Follow up with an overnight soak in warm water and Powdered Brewery Wash (PBW). Rinse thoroughly, and you’re ready to brew.
Forrest Whitesides brews beer, plays guitar, and would love to get a Northern New Jersey brew club up and running. He thanks Mike Ashley, for loaning him ethically acquired kegs to complete this project.