Build a Multiple-Bottle Filler
Bottling just takes too long. Wouldn’t you like to have a multi-head bottling machine, like the pros? Unfortunately the models at the commercial breweries can cost upwards of $20,000. We believe you can build a multi-head bottling machine for under $50!
Bottling, using the familiar “bottling bucket” just takes too long. That’s mostly because we fill bottles singly, and each fill takes 15–25 seconds depending on size of the bottle. What if we could use familiar and inexpensive “bottling wands” to create a multi-head bottling machine?
I know it can be done — when I assisted at the now-defunct Lansing Brewing Company, owner Brad Throop could hand-fill six bottles at a time. How he could hold and manage six bottling wands I didn’t understand, but he would bottle cases and cases like this.
For our version of a bottling machine, we will continue to use a bottling bucket. While pumping beer from a fermenter or other container is attractive, it would first have to be degassed of dissolved CO2 — increasing the risk of oxidation. Our machine will allow you to continue transferring beer gently from fermenter to the bottling bucket and adding priming sugar or sucrose tablets.
There are three portions to the bottling device: the frame or stand, the dispensing manifold with bottling wands and the bottle-centering device. Let’s get started!
Tool list:
hammer and brads
saber saw and/or table saw
drill motor and drills
C-clamps
hole saws (optional)
Parts List:
Plywood
1/2” CPVC water pipe
2 end caps
T fitting
3/4” x 1/2” threaded plug
1/2” x 3/8” brass barb fitting
Glue, brads
3/8” beer tube (if needed)
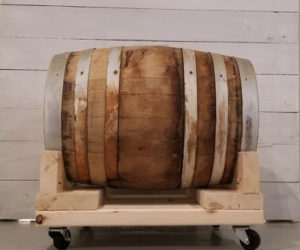
Bottling stand or frame
Our bottling frame is a three-sided structure with a bottom, made of 1/8” birch plywood. Its uprights are secured in homemade wooden angle brackets, and its base is attached with nailers. The nailers also permit a loose fit bottle centering device which can be tailored to fit different bottle diameters.

Assembling the manifold requires cutting and drilling this CPVC water pipe and securing its connection with glue.
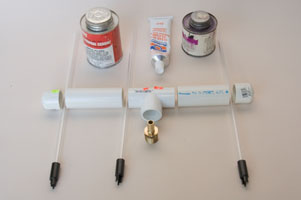
Manifold
The manifold is nothing more than three bottling wands held in a length of PVC (food grade) pipe. A “T”, two pipe lengths, end caps and an inlet fitting are the required materials. It is critical that the bottling heads are aligned, and well sealed.
Heads
The bottling “heads” are three full-length bottling wands. Obviously you could use four, or even six. The question becomes, could you fill the manifold quickly enough? The answer is yes, but only if you change your bottling bucket to dispense through a 1/2” line (obviously changing the manifold inlet as well.)

The support structure shown here is secured at the bottom with nailer blocks and is tall enough to allow for 12” bottles and wands.
Designing the stand:Bottle height
The tallest bottles that I use, punts (dimpled bottom), are for highly carbonated Belgian-style beers. Those bottles (without their corks and wire tops) are just short of 12” tall and roughly 3.25” in circumference.
This height, then, establishes my distance from the bottom of the bottling wands and the bottle tops, and the distance between the wands (aka heads). That is, approximately 4” on center, and the manifold must rest with the tips more than 12” above the bottom of the support structure (the bottling wands are 12” long).
Bottle centering device
You don’t have to, but if production speed is your goal, fooling with placement of bottles every time is just silly. You could draw and paint different sized circles on the bottling stand for placement. Why not cut out one or more centering panels?
Most brewers use different sized bottles and should make room for all of them. The 12” punt bottles here are the largest we used.
Cut a sheet of thin plywood to fit into the bottling device and mark the centers of each of your wands. Measure the bottom of this bottle style and cut a circle around each center. Then when it comes time to bottle, be it Belgian-style with 3 1/4” bases, longnecks for competition (2 3/8”), or my preferred bail-top bottles (3 1/16” and 3 3/8”), accurate centering will be almost automatic. Of course having hole saws of the appropriate diameter would be a huge help!
Building the frame
We used 24” panel plywood (to account for the 12” bottle-height and the 12” bottling wand) and arbitrarily picked 8” as a reasonable front-to-back depth.

In order to make a strong support structure, homemade angle brackets can be built to brace the frame at its corners.
Thus you need two side panels 24” tall and 8” wide. The back is 24” tall and 16” wide and the bottom measures 16” x 8”. To join the side panels to the back you will need a homemade wooden angle bracket.
Cut two 2” x 2”s to 24” in length, and rip a channel 5/8” deep. You could also use aluminum angle bracket, or build one out of 1” x 2”. Later, the section ripped from the 2×2 will then be used as the nailer to secure the bottom to the sides and back.
Once all panels and angle brackets are cut, you’ll need to cut out a very narrow and tall “U” just wider than the manifold into each side panel (5” from the rear edge and 12” deep if you’re following our directions.) Face the side panels together to insure mirror-image perfection. If you try to assemble and cut, you may be in for a bad experience despite repeated measurements.
Glue the back panel to the angle brackets, then glue and nail the side panels. Leave 1/8” of the homemade angle bracket exposed so that the bottom can be inset (this is optional.) Once the three panels are assembled, attach nailer blocks to the bottom and attach to the side panels. This completes the support.
Bottle locator
Cut two panels (or more) that will fit inside the bottling frame and rest on the nailer blocks. They’ll be approximately 8” x 16”. Measure 5” from the back of each panel and draw a line. This is the plane for the bottling heads. Find the center of the panel and mark. Then, with a compass, draw a circle with a diameter equal to your most common bottle. Measure outwards 1” from the outer circumference and mark. Then draw circles to that mark. You will have three points and three circles. You should then use these center points to mark and drill your bottling head outlets on the manifold.
I used a second panel for this, drilling 1/16” holes through the panels, then attaching one panel to the manifold with tape, and drilling pilot holes into the manifold. Now you can cut out the circles for your bottling locator. I used a saber saw and wished for hole saws. Your saber saw-cut circles will probably be a bit ragged. No worries, wrap a piece of sandpaper around a bottle of slightly less diameter and smooth out the imperfections. This is also the easiest way to get perfect sized locator holes without a hole saw of requisite diameter.
Manifold and bottling heads
The manifold consists of a 3/4” T fitting, two 9” lengths of 1/2” pipe and two end caps. You also need a threaded adapter plug and a brass 3/8” x 1/2” barb fitting. The total length must be long enough to extend beyond the bottling frame; it hangs between fillings.
To start, cut two 9” pieces of 1/2” tubing (food grade) with a tube cutter, hacksaw or table saw. Smooth any rough edges with increasingly fine sandpaper. All of the admonitions against using scratched plastic fermenters apply to the all-plastic manifold. As the pieces are all interference (jammed) fit, I found it unnecessary to glue the pieces together. I did use PVC cleaner to remove all traces of process chemicals. You may choose to use glue, as the glue will “melt” many of the surfaces to smoothness, leaving fewer crevices for bacteria to grow. Remember, after use you must rinse and sanitize immediately.
After drilling pilot holes (or using those holes in the bottle locator panel) to mark the manifold, you’ll need to drill a 3/8” hole for each bottling wand. Drill with very light pressure; you want a near-perfect hole to provide a friction-fit for the bottling wand. Being precise is also critical; you need to position the wands so they easily insert into your bottles together, without interference.
Now, drill three 3/8” holes into the manifold. Gently remove any flashing or debris. Coat the end of each bottling wand with a food safe silicone seal (any NSF or aquarium rated sealant should be safe) and insert the wand into a hole in the manifold. While the sealant dries, be sure the wands are straight left-to-right and front-to-back. They must also be at identical heights from the bottle bottoms when the manifold is level. Once the wands are assembled and drying, do a trial fit to be certain you’ve positioned the wands correctly — you still have time for repositioning.
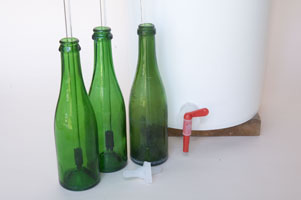
At bottling, I’d suggest the bottling bucket be positioned several feet higher than normal to provide more pressure, and thus more flow. Keeping the manifold full at all times is important. But don’t worry, the total volume of the manifold and wands is only a few lost ounces. Attach a 3/8” sanitary bottling hose to your sanitized manifold and bottle at a speed that rivals some microbreweries!