Build a Transparent In-Line Aerator: Projects
Every first-time homebrewer has read about the necessity of oxygenating wort. Beginners typically shake the carboy or introduce oxygen by splashing as wort is transferred into the fermenter. Soon you begin the search for easier ways to introduce oxygen to your wort. Then you discover aquarium pumps and air stones that can aerate your wort efficiently.
Finally, you can attach a stainless steel air stone at the end of a stainless steel tube and direct injection of oxygen into the wort. It’s a nearly perfect solution, relatively cheap and easy. Then the inevitable happens, you visit a microbrewery and see how the pros do it. They attach an in-line continuous oxygenation system directly to the output of their multi-plate wort chiller. Thus the idea is born — “Hey, I could do that!”
Yes, you can build an in-line oxygenation system and we showed you how in the December 2000 issue of BYO, but you couldn’t observe the process. Now, I have discovered clear, food grade schedule 40 PVC tube and all normal fittings — plus FPT (Female Pipe Taper) adapters with 1/2″ thread that are available at a modest price.
Note: Gases dissolve in liquids and they dissolve better when the liquid is chilled and under higher pressure. When the pros do it, the oxygen is being forced into a wort chilled to 45–70 °F (7–21 ºC) in a system that is pump-pressurized to 15 pounds per square inch (PSI) or greater. If you use a counterflow wort chiller, you can pump your wort through the chiller and thus pressurize the system, but probably to only 1–2 PSI, thus the concentration of oxygen in the wort may not achieve theoretical maximum. My argument is this: how could this oxygenation method be less effective than using an oxygenating stone thrust into the wort once it is in the carboy? Brew Your Own Technical Editor Ashton Lewis says “The oxygen in wort is usually considered to be at atmospheric pressure and any added pressure in the line would be a boost. We aerate after our wort chiller and the wort flows into a tank with no top pressure. My guess is that the pressure in the line is pretty low and homebrewers should not be hindered by not having pressure beyond 2 PSI.”
Another consideration is the sintered stainless steel gas stone itself. Stones are available sized according to gas passage, typically 2 to 0.5 microns. Each produces different gas bubble sizes. While smaller bubbles from a 0.5-micron stone dissolve better, the larger bubbles from a 2-micron stone are easier to push into a pressurized liquid.
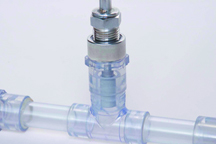
The commercial oxygenator — wort inlet, wort outlet and port for the sintered air stone — sounded like a T fitting to me. Connecting a barbed or other fitting to the inlet and outlet was a total no-brainer, the catalog had end caps and the aforementioned 1/2″ x FPT fittings. Fortunately, the nylon or brass barbed fittings fit the FPT fitting (but if they didn’t, I could self-tap an end cap with a brass barb fitting).
Finding an easily installed air stone was a greater challenge. My air stones are small and connected to 3/8″ outer diameter (o.d.) stainless steel pipe. My idea was to cut one down and use a compression fitting. However, in my shopping around, I found that Beer, Beer and More Beer makes a 2 micron air stone welded to a stainless steel 1/2″ MPT fitting — a perfect fit!
All I would need to build the project would be a T fitting, three end caps or FPT adapters, the air stone, some tubing and glue. Once all the parts were on hand, it looked like a one-hour project. There is always a “gotcha” lurking somewhere, isn’t there? Mine was the tubing to join the slip-fit T and other fittings.
Clear tubing is sold only in 10-foot lengths; I needed less than one foot. Solution #1, buy 10 feet of clear tube, which I did for this project. Solution #2, any white or gray Schedule 40 1/2″ tube will fit. You or a buddy probably have some lying around. If not, it’s only a couple of bucks at your home store.
Tools and parts:
You need minimal tools for this project, a tubing cutter or hack saw, a ruler, and an adjustable wrench. The parts list is short, a clear plastic T, three 1/2″ x FTP fittings and some Teflon tape, two barbed or other 1/2″ fittings for inlet/outlet, an air stone, 8–12 inches of 1/2″ Schedule 40 tubing, and the required PVC glue. Use clear tubing cement for a nice appearance.
Once all the pieces are assembled, cut your joining tubes to length. I decided to add a bit of extra length to the in/out ends of the T, and the length of the air stone required a near-flush fit, a 11/2″ tube section.
Cut the tubing — clear or colored — to length and smooth the cut edges. Every brewing text points to crevices as hiding places for bacteria so smooth the surfaces with several grades of sandpaper. Then clean the surfaces with PVC plastic cleaner before assembly. PVC glue literally melts the plastic before evaporating and proper application will leave a nearly seamless joint.
Apply glue (we did not for clarity in photos) and assemble like any PVC plastic plumbing with a 1/8-1/4 twist. Apply Teflon tape to your brass or nylon barb fittings, or quick-disconnects if you’re using them, and insert into the FPT fittings. Tighten approximately 1/2 turn beyond finger tight.
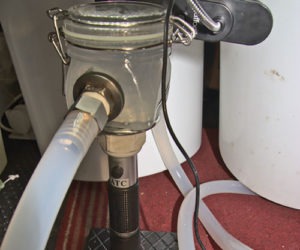
That is it — you’re done. Connect to your normal wort output and start the oxygen flowing as fresh wort cascades from your kettle.


