Build an Electric Mash Stirrer
I have been brewing beer since 1984 and each batch was different in one way or another. The changes were made in an attempt to improve on the last brew. Several years ago I tried a couple of all-grain mashes. The use of rudimentary equipment (a lightweight kettle on an electric range) resulted in long hours of trying to hold a constant temperature and sparging with a watering can. When I compared the extra labor to the slightly improved results, I went back to extract and steeped grains that did not require mashing.
Recently I purchased an inexpensive mashing system that consisted of two plastic tanks, a rotating sparge arm, and an insulating jacket that was used on both the mash and sparge tank. I tried this system, and it works nicely. The insulating jacket is the key element because it keeps the mash temperature within six degrees for more than an hour. I have used it for the last five batches with excellent results. The brews were clearer and cleaner tasting than my previous efforts.

The one drawback to the system is that it is a simple infusion mash with no provisions for a protein rest or a mash-off temperature rise. The problem now becomes how to add heat to a plastic tank system in a controlled and measured manner.
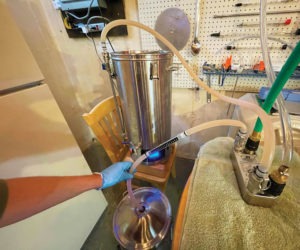
The solution is relatively simple. I mounted a 1,500-watt electric range element in the end of a PVC plastic pipe and have used it to stir the mash and raise the heat on my last four homebrews. The improvement in clarity was obvious. The heater is designed to operate on 220 volts, and the electrical connections must be sealed water tight. The figures show the layout and cross-section of the assembly.

Parts:
• 24-in. length PVC pipe, 1-in. inner diameter (ID), schedule 40, for the handle
• 8- to 10-in. length PVC pipe, 5/8-in. outer diameter (OD), for the standoff tube
• 5 1/2-in.-diameter 1,500-watt heating element from a discarded cook top range (a smaller element is acceptable but any larger will be awkward)
• 10-ft. length (minimum) flexible 16-gauge, three-conductor power cord (the length of the cord will vary, depending on how far your brew station is from a wall socket)
• High-temperature epoxy
• Polyester casting resin
• 4-in. by 2-in. junction box with two non-metallic connectors
• Double-pole, single-throw switch rated at eight amps or better
• Three-prong plug sized to fit your existing wall socket (15-amp or 20-amp configuration)
Putting It Together
1. Connect the heating element to the flexible power cord. From the heating element terminal there are two solid wires with screw connections. There is a ground tab welded on the outer shell of the element. Connect the two hot wires from the power cord to the two screw connections (there is no polarity problem, so it does not matter which wire attaches to which screw). Attach the green ground wire to the screw connection on the ground tab.
2. Seal both ends of the 5/8-inch OD pipe with a high-temperature epoxy. I found a muffler repair epoxy (F.W. Steel Automotive Repair Epoxy Putty) in an auto-supply store that cures hard as a rock and stays that way even when tested in an oven at 450° F. The smaller pipe protrudes one inch below the heating element to act as a standoff to prevent the element from touching the bottom of the tank.
3. Insert the heating-element assembly and standoff pipe into the one-inch ID pipe handle. Make sure the electrical connections are inside the pipe. The cord will run through the handle, and the smaller standoff pipe can terminate two or more inches inside it.

4.Tightly fill the end of the one-inch ID pipe closest to the heating element with epoxy. This seals the wires into the handle and keeps the standoff tube in place.
5.Once the epoxy has cured, pour a polyester casting resin down the pipe to completely encapsulate the electrical connections. In use the connection area is not immersed in the mash, but the casting resin will insulate and stabilize the connections as well as protect them should water be spilled down the tube.
6.Run the power cord from the handle to the junction box through a non-metallic connector. The length of cord between the handle and the box depends on your setup. It’s handy to have the box sitting on a nearby table while the stirrer is in use.
7. Cut another length of cord to go from the junction box to the wall socket. Connect the cord to the junction box.
8.Attach a double-pole, single-throw switch to the power cords through the junction box. Inside the junction box there are four connections to the switch. Depending on the switch, they will be terminals such as screws or push-on connections. Connect the hot wires from the stirrer cord to two terminals and the hot wires on the wall-socket cord to the other two. Connect the ground wire from the stirrer cord directly to the ground wire from the wall-socket cord and insulate them. Do not break the ground in the box.
9. Connect the loose end of the wall-socket cord to a three-prong plug. The plug will have three terminals, two for the hot wires and one for the ground.
Putting it to Good Use
When it is time to raise the temperature in your mash, insert the heating element into the mash with the switch off. Turn it on and move it slowly to stir the mash during the temperature rise.
You can raise the temperature to as many rests as necessary. A typical time/temperature profile for 10 pounds of grain in three gallons of water is:
00:00 Mash in with 140° F strike water, mash is 125° F
00:30 Start temperature rise
00:40 Start mash at 156° F
02:10 Start mash-off rise
02:20 165° F
I monitor the mash temperature with a digital dial thermometer that responds instantly and reads to the nearest 0.1 degree. The heating element is kept moving slowly during the temperature rise, ensuring a consistent temperature rise and a uniform temperature throughout the mash.
Kenneth Ray is a retired electrical engineer and avid homebrewer.
Could It Really Electrocute You?
The heating element is designed to survive hard knocks on top of the range and the shell is insulated by a high-temperature-rated ceramic. The application is similar to that of an electrical water heater where a similar element is surrounded by water.
Because the heat transfer is so efficient, the operation of the element immersed in liquid is actually less demanding and the surface of the element is much cooler than in its normal operating mode where it sometimes gets red hot.
It is important to keep the power off when the element is not submerged. This prevents the ends that are covered by epoxy from getting too hot.
It is important to be very careful whenever you are dealing with electrical connections.
Do not tinker with your wires, switch, or heating element while the unit is plugged in. The outer shell of the element is grounded by the green ground wire so the mash can never reach any dangerous voltage level.
The wires are fully encapsulated, so there is no chance of them coming into contact with liquid. The normal failure mode of the heating element, should a failure occur, is that of an open circuit and not a short to the element’s outer casing (the stirrer will stop working but will not shock the user).