Build a Cooler Mash Tun

Commercial brewing setups may split the processes of mashing and lautering into their own respective vessels (commercial brewers have a mash mixer or mash tun and a lauter tun, but there is not a third vessel for sparging; the sparge water does
come from a hot water tank, but that is not considered a brewing vessel), but for small-scale homebrewing, combining these functions into one is more efficient in terms of time, money and space.
There are two main functional requirements for a quality mash/lauter tun: the ability to hold the mash at a constant temperature for at least an hour, and a way to drain off the wort while leaving the crushed malted barley behind. The first requirement is very nicely accommodated by a typical insulated beverage cooler. And the wort separation (lautering) can be accomplished with the combination of a gravity-fed ball valve and a straining manifold made from copper pipe
and fittings.
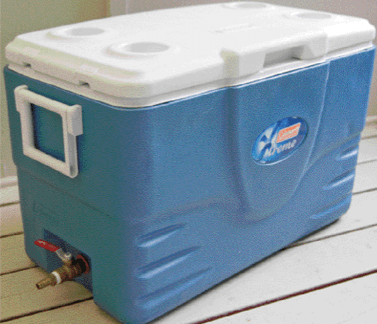
During the initial mashing phase, the grain and hot water mixture (the mash) needs to be held at a constant temperature for approximately one hour. A cooler with thick, well-insulated walls is ideal. Also, choose a cooler with a removable drain valve or spigot. I have had great luck with the Coleman Xtreme line of coolers. For 5-gallon (19-L) batch sizes, a 52-quart (49-L) cooler is a good volume that will allow even fairly high-gravity recipes with some headroom left over for stirring. That is the model used in this project.
Parts and Tools
Hacksaw
Sandpaper
Pliers
For the ball valve:
A “cooler conversion kit” from your local homebrew shop
or
• 1⁄2-inch FPT pipe coupling, approximately 3 or 4 inches long
• 1⁄2-inch pipe nipple, approximately 3 inches long (this may vary based on cooler wall thickness)
• 1⁄2-inch FPT ball valve
• 1⁄2-inch MPT to 3⁄8-inch hose barb adapter
• Silicone (or other food grade material) gaskets to fit
• Pipe tape
• Optional: small rubber sheet for cutting custom gaskets/o-rings
For the manifold:
• Approximately 5 feet (1.5 m) of 1⁄2-inch hard copper pipe (type M or type L)
• (4) 1⁄2-inch 90-degree copper elbow fittings
• (3) 1⁄2-inch “T” copper fittings
• (1) 1⁄2-inch 45-degree copper street elbow fitting
• (1) 1⁄2-inch copper male pipe thread adapter
If you plan to build your project with metric pipe, you will need to choose your fittings appropriately.


