Build a Recirculating Wort Chiller
Given that there are so many places in the world where fresh, potable water is a scarcity, I think the least we can do as enthusiasts of a water-intensive hobby is minimize water usage while brewing. One obvious place to start looking for water usage inefficiencies is the wort chilling process. This project, which turns a typical immersion chiller (the biggest offender in terms of waste water) into a water-recirculating chiller, can be a big help in warmer climates with warm ground water and also useful for reducing water usage.
I’ve been using a plate chiller for the past year and a half, which is efficient in terms of water consumption. However, I had growing concerns about properly sanitizing homebrew-sized plate chillers, and I was looking for an alternative. I admired a very clever pump-driven “whirlpool” chiller design by BYO contributor Jamil Zainasheff, but I didn’t like the idea of pumping the wort around for 15 minutes while it’s still hot. So, I considered recirculating the chilling water instead of the wort, a design change that would save a lot of water while using a cheap pump.
This project is a similar concept to the use of ice banks, which have been used in larger breweries for years. In these systems, cold water or glycol is frozen in large reservoir tanks. This allows the breweries to even out the cooling load and have much smaller compressors, saving money.
Project overview
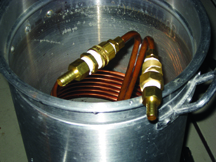
This project is built on three main components: a submersible or in-line pump, a standard coiled-copper immersion chiller, and a cold water reservoir (a plastic bucket or cooler). The reservoir is filled with water and ice. The pump is submersed in the reservoir and the other end is attached to the input side of the immersion chiller (which sits in the kettle, as normal). The output side of the immersion chiller is connected via tubing back to the reservoir, completing the circuit.

Parts selection
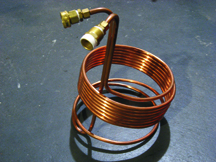
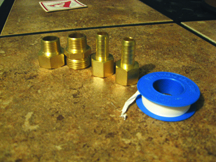
Other than a decent pump, all you need for this project is an immersion chiller, either a bucket or cooler (5-gallon/19-L capacity works fine), some vinyl tubing, and a few brass plumbing fittings to help connect everything. The most common type of immersion chiller is made from 3⁄8-inch copper tubing, but 1⁄2-inch copper will work as well.
Pump selection
Choosing the right pump is the most critical part of this project. If you already have a March model 809 impeller pump (as many homebrewers do), you can skip to the next section.
You need a pump that has an operating head pressure rating that exceeds that of the total head pressure exerted by the recirculating system itself (read on for a method to estimate system head pressure). This rating is given in inches or feet of head pressure, which in the broadest sense is any resistance exerted on the pump, be it gravity or other flow impediments like small-diameter system tubing, also known as friction loss. Head pressure is not just how high the fluid must be pumped and includes several other factors (read on). Head pressure is just as important as flow rate when selecting a pump.
To arrive at the approximate operating head pressure of your system, use this formula: System Head Pressure = A + (B / 10) + (C / 2) + (D / 4), where “A” is the vertical height in feet between the water level in the reservoir and the input connection of the chiller, “B” is the total distance in feet of the system (vinyl tubing plus chiller coils), “C” is the number of 90-degree bends in the system, and “D” is the number of miscellaneous adapters and plumbing fittings. All of those things are a factor in how much resistance the pump must overcome to move the water. (This handy equation was appropriated from www.azponds.com.) Note: The above equation assumes the use of tubing that is in the general range diameter as would be found in typical homebrewing setups (see below for more on how diameter effects flow rate). It will be fairly accurate for tubing from about 3⁄8 inches to 3⁄4 inches in diameter. Another assumption is that the tubing is smooth on the inside and not convoluted or corrugated.
Example: To pump your cooling water up 2.5 feet through vinyl tubing into a 25-foot immersion chiller with four 90-degree bends, along with four plumbing fittings, you’ll end up with a system head pressure of approximately 8.25 feet (or 99 inches). Your pump should have a head pressure rating between 10% and 20% higher than your system pressure to get adequate throughput. So for our example, you’d want a pump with a rating between 9.1 feet and 10 feet or more.
Some pump manufacturers will provide a table or graph, known as a pump curve, showing estimated flow rates at various head pressures. These are very useful in determining if a given pump will do the job you need.
Another factor is the difference, if any, between the pump’s output fitting diameter and the diameter of the tubing. A quick-and-dirty way to estimate the drop in flow rate is to calculate the percentage difference in diameter between the pump and the tubing and apply that to the flow rate. For example, a pump with a 1⁄2-inch output fitting pushing water into a 3⁄8-inch chiller coil will result in an approximately 25% drop in overall flow rate due to the added restriction of the smaller-diameter coil.
The pump I used when building this project is rated at 370 GPH, or about 6.2 gallons per minute (GPM), and has a maximum operating head pressure of 10 feet.
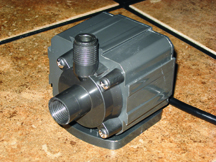
Again, these ratings are maximums under ideal conditions. My setup is almost identical to the example given above and I get a flow rate of about 1.25 GPM through the recirculating chiller at a calculated head pressure of 8.5 feet. As the head pressure of the system increases, the flow rate of the pump decreases. Outdoor pond pumps are a good and cheap way to go, and submersible sump pumps will also work quite well. Both are available at home centers, and pond pumps are available at most pet stores or online.
Chiller operation
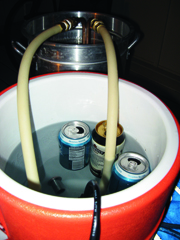
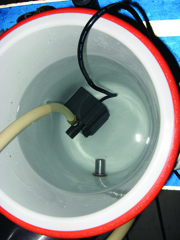
1. Prepare the reservoir.
A bucket will work fine, but a cooler will help it stay cold a bit longer as well as allow you to chill the water ahead of time and keep it cool until you’re ready to use it.
For ice, you could just use a couple of bags of ice from a local store, but that’s not the DIY spirit (and it costs more). As an alternative, you can fill about a dozen aluminum soda or beer cans and freeze them. I picked up this great trick from the Covert Hops Society brew club based in Atlanta, Georgia. You can also add salt to the ice water in the reservoir to drop the temperature a few more degrees. Why this works is outside the scope of this article, but Googling the term “freezing point depression” will give a good explanation.
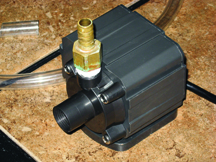
2. Ready the pump.
Attach some tubing to the pump’s outlet, which may require a fitting. I used a 1⁄2-inch female NPT to 1⁄2-inch hose barb fitting to make attaching the tubing easier.
It is unnecessary to attach anything to the pump’s inlet connection, and doing so will add to the system head pressure. Lower the pump into the reservoir, but don’t connect it to the immersion chiller.
3. Drop in the immersion chiller.
With 15 minutes or so remaining in the boil, put the immersion chiller in your kettle. This sanitizes the chiller and kills any bad things that might have piggybacked on the outside of the coils.
Now you can either start the chilling as normal with ground water and then switch to the chilling reservoir (see 4a below), or you can simply start off with a very large volume of ice in the reservoir and chill exclusively with the recirculated water.
4a. Chilling partially with groundwater.
Once the boil is complete, attach your groundwater source to the input side of the immersion chiller and move the outlet side away from reservoir. Chill the wort with groundwater as you normally would until the temp approaches about 100 °F (38 °C) or so. This will probably take about 10 or 15 minutes, depending on the temperature of your groundwater. You can collect some of this water to reuse later to clean your kettle and other equipment.
You’ve probably noticed in the past that dropping the wort temperature from boiling to about 100 °F (38 °C) goes pretty quickly — it’s those last 20 or 30 degrees that take so long. And it’s at this point that the recirculation system kicks in and does the heavy lifting to get your wort to a cool pitching temperature.
Now connect the pump to the input side of the chiller and make sure the outlet tubing is feeding back into the reservoir. Fire up the pump and let the cold water in the reservoir drop the temperature of your wort. If you can keep your reservoir water close to 50 °F (10 °C), your wort should be in the mid- to low-70 °F (21 °C) range (and possibly much cooler) in about 20 minutes, but many factors will effect how long it takes, including flow rate, chiller diameter, etc.
4b. Chilling Only with Ice Water
Rather than use groundwater to do the initial phase of the chilling, you can opt to increase the amount of ice in the reservoir significantly and chill the whole batch (down to about 70 °F/21 °C) with just recirculated water. This method can save a tremendous amount of water (more than the previous method), but requires more preparation and equipment to perform most efficiently.
For chilling five gallons (19 L) of boiling wort with this method, you’ll need approximately 44 pounds (20 kg) of ice. This is about five gallons (19 L) of frozen water, so if you freeze five 1-gallon Ziplock bags or about six 3-liter plastic soda bottles filled with water, you’ve got 44 pounds of ice. (If you’re interested in how these numbers work, try Googling “latent heat of fusion.”)
For maximum chilling efficiency, the water returning to the reservoir from the chilling coil needs to be evenly distributed over the mass of ice. Do this by attaching the outlet tubing to a sparging arm commonly used in continuous (fly) sparging setups (to build a sparge arm, see the November 2006 issue).