Building 3 Tiers to Beer
Being an avid homebrewer, I visit lots of brewpubs and breweries. Most brewpubs have seven to fifteen-barrel brew systems that are usually right in plain sight. (A barrel is 34 gallons/129 L.) If you’re a homebrewer, determining the function of the individual parts isn’t really that complicated. Most of the time the brewer, many times a former homebrewer, will gladly show you the equipment and answer any of your questions. Many pub breweries use three-vessel systems consisting of a hot liquor tank, a mash tun and a boiling kettle. A lot of pipes and valves connect the whole thing together, but it seemed to me that I could build a simplified system based on that set of vessels. It would be just like the pros use, but a lot smaller. Well, now I’ve done just that — and you can too.
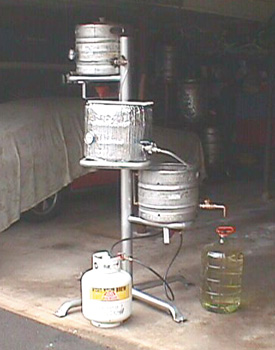
I’ve built quarter and half-barrel home breweries using commonly found items. The basic design of the system is a central pole with supports for each of the three vessels extending from the central pole. The hot liquor tank rests on the highest support, above the mash tun, and has a propane burner attached underneath it. The mash tun resides on the center support, above the kettle, which is also equipped with a burner. The supports are staggered 120° around the pole to even out the weight.
My material costs are a fraction of similar professionally-built homebrew systems, but I don’t figure in my time because projects like this are truly a labor of love.
If you plan on building your own brewing system, you must — most importantly — be a tinkerer. It’s not rocket science, but you do need a good working design and the desire to build it. Being a homebrewer, you’re likely already a tinkerer and have all the necessary fabrication skills. Everyday hand tools are all that are required for most of the project, but there are some specialized jobs that require professional skills, such as cutting and welding of the stainless steel kegs. Getting to know a dependable welder and plumber is a good idea. Their experience will save you a lot of time and money, and the results will be better.
Resourcefulness in finding the necessary parts is important. Flea markets, junk shops or your own garage are great places to start finding the necessary materials.
A complete list of the necessary materials for my system is below. Mine was designed with small casters as to make it movable. It had to fit under a 6’ 8” (2.0 m) doorway. The frame is six feet (1.8 m) tall without the hot liquor keg in place. The footprint of the bottom supports is around four feet (1.2 m) wide and four feet (1.2 m) deep. The weight of the frame without the kegs is around thirty pounds (14 kg). The details of your system — especially the overall height and spacing of supports — may differ from mine, depending on your needs, but the basic construction plan will work for any similar home-built brewery. Be sure to obtain your three stainless steel half or quarter barrel beer kegs legally. The ten dollar deposit required when you get a commercial keg is only a fraction of what these kegs are worth to the brewery. Most brewers and distributors have a few dented or leaky kegs around they would be happy to get rid of. Straight-sided Sanke kegs are the ones you want.
List of Materials
three half or quarter-barrel Sanke type stainless steel kegs (legal)
one steel tube 4” diameter x 6’ long (10 cm diameter x 1.8 m) (for the main spine)
three steel tubes 1 1/2” wide x 1/8” thick x 3’ long (3.8 cm x 0.32 cm x 0.91 m) (for supports)
two steel tubes 1 1/2” wide x 1/4” thick x 4” long (3.8 cm x 0.64 cm x 10 cm) (for legs)
— or —
three 3’ lengths of 1 1/2” steel exhaust tubing (0.91 m x 3.8 cm) (for legs)
four steel casters or wheels
misc. nuts and bolts
170,000 BTU burner castings
two 20-lb. (9.1 kg) propane tanks (home barbecue type)
gas lines, fittings and control valves
three 1/2” (1.3 cm) NPT brass or stainless steel ball valves.
three 1/2” (1.3 cm) NPT stainless steel couplings
five bimetal dial thermometers
two false bottoms (one for mash tun and one for boiler)
two magnetically coupled pumps (food grade, optional)
25–50 ft. (7.6–15 m) 1/2” (1.3 cm) copper tubing (for chiller coil)
copper elbows, misc. fittings
flexible food grade plastic tubing
stainless steel hose clamps
glass boiler-type sight tubes (optional)
lead-free solder
(Note: all frame tubing is exhaust pipe gauge thickness.)
Choose the brewery size — either a quarter barrel (7.5 gallons/28 L) or a half barrel (15.5 gallon/59 L) system — that is suitable for you. A quarter barrel system will allow you to brew 5 or 6 gallon (19–23 L) batches. With a half-barrel system, you can easily brew up to 13 gallon (49 L) batches.
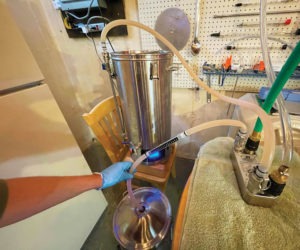
After finding the kegs, have your welder cut twelve-inch (30 cm) diameter holes into the tops of each keg. A plasma arc cutter works the best. (Or, see the accompanying story on page 48 for how to do this yourself.) The openings should be deburred to prevent injuries, or later on you’ll be brewing with band-aided fingers.
Try to be resourceful. The same welder that you’ve hired to cut the holes into your kegs can also weld your frame together and the couplings onto the kegs. Plan ahead so when you’re at the welding shop, everything gets done. You’ll want all the coupling locations marked clearly. They will be needed for attaching ball valves, sight-tubes (if wanted) and thermometers later on in the construction. Other than hiring a welder, you can do everything else yourself.
The spine of the brewery frame is a six foot (1.8 m) long piece of four inch (10 cm) diameter steel exhaust type tubing. If you have access to a tubing bender, the side barrel supports can be made by using one and a half inch (1.3 cm) diameter steel tubing. Your local muffler shop may have a tubing bender to make these up for you. Have him bend each three foot (0.91 m) length of tubing into a triangle with one foot (0.3 m) sides. The open ends of these pieces can be ground to fit and welded onto the main four inch (10 cm) spine. Otherwise you can bend triangles out of a three foot (0.91 m) piece of one eighth inch (0.32 cm) thick, one and a half inch (1.3 cm) wide steel flat stock. These three supports are to be attached to support the hot liquor, masher and kettle. If you use the flat stock, I recommend a reinforcing gusset attached from the outside section of each triangle to the center spine for increased strength. These will also act as attachment points for the burners.
Assembling your brewery’s stand is straightforward:

Bend the supports

Weld the supports to your central pole
Weld the brewery’s “feet” to the central pole

Attach the burners to their supports
As far as fabricating the legs to support the brewery, one quarter inch (0.64 cm) flat stock can be used. Cut four two foot (5.1 m) pieces of the flat stock, and weld them in a cross configuration. You can notch the bottom of the four inch (10 cm) spine and weld in the cross supports, or simply weld four two foot (0.61 m) long legs in a cross design. You may incorporate your own ideas for the supporting legs, but make sure they are strong enough to carry the weight of the entire system. You can fabricate the base of the stand with four foot (1.2 m) lengths of tubing as mine is, but make sure that the welds are strong. Also, ensure that the stand sits squarely on the floor.
The frame to support this whole system must be built to hold the weight of the kegs and their contents. Kegs full of mash water; fifteen or twenty pounds (6.8–9.1 kg) of grain and all of the other components may have a combined weight of two hundred pounds (91 kg). Make an extra effort at this building stage. You don’t want ten or fifteen gallons (38–57 L) of boiling wort to spill all over the floor or on yourself if the frame collapses.

The frame dimensions and support spacing you choose are important. I’ve designed these systems to fit into a conventional seven and a half foot (2.3 m) ceiling garage. Gravity is used to move liquids from vessel to vessel. The quarter barrel system’s boiling kettle is off the ground enough so you can simply drain its contents into a fermenter. In the case of the half-barrel system — where the boiling kettle is only six or so inches (~15 cm) from the ground — a pump may be needed to move the chilled wort into a fermenter. I’ve found that when I brew larger (10 gallon/38 L or more) batches on my half-barrel system, there’s usually another brewer around helping. When it’s time to get the chilled wort into the fermenter, we simply pick up the chilled boil kettle and place it on the middle level of the frame and let gravity do its thing.
If your brewing area is in a well-ventilated garage, the system could be built in as a permanent fixture. My system has casters installed so I can move it outside in the driveway.

After a suitable frame has been built, the next step is to attach the burners. My systems use 170,000 BTU burners like the ones you see on those outdoor turkey cookers. They produce a very hot flame and get brewing liquor and wort up to temperature quickly. The manufacturer of these burners also has the accompanying hose, valves, fittings, etc. I recommend using what the manufacturer recommends. It’s safer than making up your own gas lines and fittings.
Your system — whether it’s similar to mine or one of your own design — must use every possible safety precaution. Dangerous situations may occur when using flammable, noxious gases. When electric pumps, stirrers, mixers, etc. are used in close proximity to water; the same safety considerations must be followed. Reflected heat from burners, a splash of sparge water, or hot wort near a live electric wire are accidents ready to happen.

Attach your burner castings to the supports so there is about six inches (15 cm) of distance between the bottom of the keg and the top of the burner. You need a wide flame front that reaches and heats as much of the bottom of the keg as possible. Heat efficiency will be lost if the burners are either too close or far away. I attach the castings on threaded steel rods so you can adjust the burner heights, effectively allowing you to tune in your flame to heat most efficiently.
After the two burners are mounted to the supports in the upper hot liquor and bottom boiler positions, attach the fuel lines. My brew system uses a single twenty-pound propane tank split off with two valves, one to each burner. Next, attach the ball valves, pipes and fittings to your kegs. They must be made of brass or stainless steel. Beer is corrosive and would damage and pit regular steel or aluminum components. Heat would affect plastic or PVC. All three barrels will be fitted with half-inch (1.3 cm) ball valves. All these items are commonly found items at your local building supply.
False bottoms are needed in your mash vessel and boiler. Commercially made versions are available that fit nicely inside a Sanke keg. The ones in my systems have a small diameter stainless steel tube that can be attached to the inside welded in threaded coupling. Plumbing it in is simply using the right brass or stainless steel adapters.
With the quarter or half barrel systems I describe here, you can brew up to 6 or 13 gallon (23–49 L) batches of beer. They can be modified later, for example by adding a mash circulation loop and possibly a PID controller. For the do-it-yourselfer, building your brewing system may be almost as fun as brewing beer with it.