DIY Bottle Cap Designs

My own journey resembles that of many other homebrewers. I started brewing with extract kits and soon progressed to all-grain, fine tuning the grains, hops, and other ingredients for my own recipes. I assembled most of my own equipment and once I had run out of things to build, I focused on labeling my bottles with custom designs to share with others.
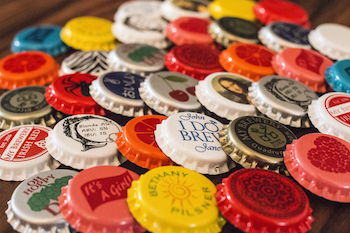
After creating my own labels, the last bit of real estate on the bottle that drew my interest was the cap. Many craft breweries have custom caps for their beers, and they add an elegant, professional-looking touch to a bottle of beer. Seven years ago, when I began searching for customizable caps, no options were available to the casual brewer. Aside from round adhesive stickers or purchasing 10,000 caps at a time from China, there was no middle ground that resembled high quality at low volume and low prices.
I tried custom rubber stamps, I tried screen-printing, and I’ve even tried pad-printing kits used for fingernail embellishment. None could deliver an easy, consistent, attractive result. It was certainly becoming the challenge I love to embrace. Weeks of searching uncovered the technique known as acrylic transfer that resulted in the look I wanted on a consistent basis with relatively little effort and equipment that I had to purchase.
Custom caps using this process offer a polished, professional look that will draw attention as they demonstrate you’ve gone the extra mile to showcase your beer with the added detail. On top of the attractiveness, the effort is the perfect adornment for beers served at special occasions, cellared beers, or gifts for those you want to impress.
Materials & Equipment
• Crown caps (lighter colors or metallic finishes)
• Laser printer or copier
• Standard, multipurpose printer paper
• Gloss fluid medium & varnish(available at most craft stores in the acrylic paint section)
• 1-inch (2.5-cm) foam brush
• 1-inch (2.5-cm) circle punch (optional, but recommended)
• Sealer (see step 5 for details)
 1. Layout & Design
On a computer, use your favorite graphics or word processing software to design the images or text to be applied to the caps. Short of your imagination, there are a few limits and considerations to keep in mind when creating your layout and design:
• Cap color: Light colors work best. If your image to be applied includes white features, then white caps will work best. Otherwise, the underlying cap color will need to be taken into account as white is the absence of toner in conventional printing.
• Image area: While standard crown caps are about an inch in diameter, plan for at least a 1/16-inch (0.16-cm) margin around the circumference of the image. Keeping a small space between the edge of the 1-inch (2.5-cm) paper round and the image allows for some room for error in cutting and application later on.
• Mirroring the image: Like most image transfer processes, since the image will be flipped onto the cap, you need to account for that in the final version of the design if the printer software does not have the appropriate setting.
 2. Print & Prepare
Using any laser printer or copier, print the final array of cap designs onto whatever paper is available to you that resembles standard, economy printer paper. Printing on thick stock or fancier presentation paper only adds to the difficulty of removing the paper from the design in step 4. This is due to the added strength and surface treatments often found in higher quality paper. One of the few times in life where cheaper is better!
I like to cut each row of cap designs into strips in preparation for the 1-inch (2.5-cm) circle punch. While the punch is optional, it adds efficiency to the process and the perfect round cut-out around the design aids in centering the paper on the cap in the step 3. If you don’t use a circle punch, you can use scissors to hand cut the paper.
 3. Apply Images to the Caps
Place one drop of the fluid medium onto the cap and use the foam brush to spread a thin layer across the entire cap surface. Place the paper round, image-side-down onto the fluid medium. Use your thumb to firmly set the paper in place and squeeze out excess fluid medium across the whole surface. Any spots that did not have the fluid medium applied or did not have proper pressure placed may result in weak or no adhesion of the image to the cap. The fluid medium dries quickly, but I recommend waiting at least 20 minutes before moving onto the next step.
 4. Revealing the Design
Place the cap under lightly running water and begin gently rubbing the paper away from the cap. This step may take some practice to avoid damaging the image beneath the paper, but if the appropriate material was used for printing, there shouldn’t be too much trouble. Avoid the temptation of scratching stubborn pieces of paper off the cap with your nail. The dried fluid medium is fragile and applying anything hard or sharp will lead to damaging the final image.
Once you see and feel most of the paper has been removed, set the cap aside to dry. After drying, you may see a white haze in spots over the image. This is the remains of the paper missed in the initial rubbing. I find that a damp finger offers enough friction to remove the remaining paper.
This process can be done in a bowl of water as well if water consumption is a concern, but I prefer the flowing water to help rinse away paper pulp.
 5. Sealing & Finishing the Caps
For the protection of the image and a real manufactured look, a sealant is strongly recommended. There are several options, but what you select should meet these requirements:
• Non-toxic when dried: Considering the caps’ proximity to your beer, care should be taken in selecting and applying any sealant, but there is a possibility (though remote) that errant sealer from spraying or other application methods end up on the underside of your caps.
• Flexible: As the cap is pressed onto the mouth of the bottle, cracking could appear around the shoulder of the cap near the crimped edge if a very inelastic sealer is used.
• Moisture-resistant: Beer bottles are often submerged in coolers or ice buckets and being able to identify the right beer by the cap alone from above is helpful.
• Non-yellowing: This is mostly a concern for bottles intended for aging or caps made far ahead of their intended use.
I like to use an aerosol gloss acrylic coating in a well-ventilated area for ease of use. If you are at all concerned by using aerosols, I’ve also had success brushing on another layer of thinned gloss fluid medium (see the manufacturer’s instructions for proper ratios). Thinning the fluid medium aids in leveling and reducing the appearance of brush strokes.
 6. Capping
It may seem trivial, but there is a consideration to take into account when capping your custom caps. Inside the bell housing of many homebrewers’ cappers is a ring that protrudes around the hole at the top (where the magnet extends in some models). This ring may create a dimple on the top of caps that have been crimped onto bottles. Especially when bearing down with force. In the process of making that dimple, it is possible that your cap’s image may be marred. Taking certain precautions like using less force can avoid this. To eliminate the possibility entirely, I recommend removing the ring by grinding it away with a rotary tool.

 1. Layout & Design
 2. Print & Prepare

