DIY Draft Trunk Lines: When you want to run long draft lines
Like many homebrewers who keg their beers, I started out serving from a chest freezer with a two-tap beer tower bolted to its lid. When the compressor on the freezer died I decided it was time to increase the number of taps so that I could pour more beer styles simultaneously. This led to a choice: I could either go with a collar keezer, keeping the freezer, kegs, and taps in my brewery, or I could build a bar in the finished part of the basement, but I would have to keep the freezer and kegs in the brewery. I decided it was time to build a bar.
With my old kegerator, the beer lines were coiled up inside with 8 in. (20 cm) of line sticking up into the tower. A bit of pipe insulation in the tower was enough to keep the beer cool all the way to the tap. To get my beer from the brewery freezer to my bar I needed at least 10 ft. (3 m) of beer line outside the keezer. With lines this long, the beer warms up as it flows to the tap. The carbon dioxide in the beer comes out of solution and every pour ends up a warm glass of foam.
To prevent this, I needed to build a “long-draw draft system” with a trunk line to keep the beer cool all the way to the tap. A trunk line is a bundle of draft beer lines with two extra lines to run a coolant through, such as a glycol solution. The bundle is wrapped in tape, with a thick layer of foam insulation around everything. The glycol lines form a loop with glycol pumped from a chiller, through the trunk line, around the taps to cool them, and back through the trunk to the chiller. With glycol-cooled trunk lines, the beer in the long-draw system stays as cool as the beer in the keezer. No foamy pours and the first pour of the night comes out as good as the last.
A trunk line is a bundle of draft beer lines with two extra lines to run a coolant through, such as a glycol solution.
Trunk line can be purchased readymade, but I figured that it would be fun to build my own. For the beer lines, I recommend using barrier tubing like BevSeal Ultra® or EVABarrier. This tubing has very low oxygen permeability, doesn’t leach plastic taste into your beer, and is easy to clean. With barrier tubing, you don’t have to dump the first pour of the night and you don’t have to replace your tubing going from a jalapeño-spiced triple IPA to a light lager.
When planning the route for your trunk line, remember that it’s not going to be very flexible so don’t try and push it through any tight 90-degree turns. You also need to make sure that the length of your beer line is balanced between the pressure in the keg and the distance to the tap and gain in height. There are lots of excellent beer line length calculators that can help with this. Once you’ve figured this out, you can cut your lines to length and start making the trunk line.
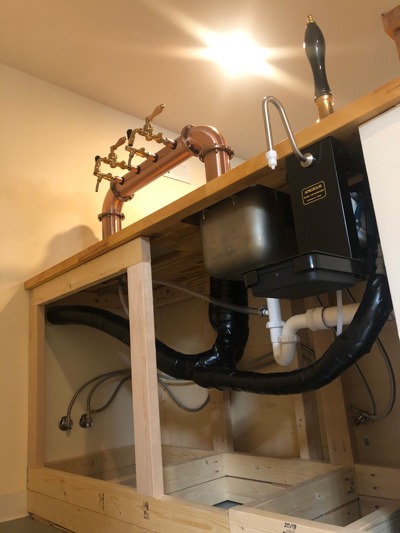
Once everything was assembled, I hooked the glycol lines up to the chiller that I use for my fermenter and the beer lines to my kegs and to my four-tap beer tower and my beer engine. I leave the glycol pump running 24 hours a day 7 days a week and without too much extra strain on my chiller, I get a crisp, cool pour from my bar every time.
It’s always a sad day when you go to pull a pint of your favorite draft beer and the faucet starts spitting foam into the glass. Always know how much beer is actually left in the keg with this awesome DIY scale with display functionality.
Brewing indoors has long been the goal for many, but when brewing larger batches a proper ventilation system is key. One homebrewer decided to go all-in crafting a hood vent from Sanke kegs that he cut in half and riveted together.
Subscribe Today!
Become a subscriber today and you'll receive a
new issue every other month plus unlimited access
to our full archive of backlogged issues.
This website uses cookies to improve your experience. You can opt-out if you wish.AcceptRejectRead More
Privacy & Cookies Policy
Privacy Overview
This website uses cookies to improve your experience while you navigate through the website. Out of these, the cookies that are categorized as necessary are stored on your browser as they are essential for the working of basic functionalities of the website. We also use third-party cookies that help us analyze and understand how you use this website. These cookies will be stored in your browser only with your consent. You also have the option to opt-out of these cookies. But opting out of some of these cookies may affect your browsing experience.
Necessary cookies are absolutely essential for the website to function properly. This category only includes cookies that ensures basic functionalities and security features of the website. These cookies do not store any personal information.
Any cookies that may not be particularly necessary for the website to function and is used specifically to collect user personal data via analytics, ads, other embedded contents are termed as non-necessary cookies. It is mandatory to procure user consent prior to running these cookies on your website.