Draftline Cleaner: Projects
Our tap line cleaner was built in about an hour for less than $50. Critical parts include a compression fitting, an FIP hose barb adaptor and a beer-out keg body connector.
Entering one of my favorite brewpubs, I stumbled over three oversized pressure vessels. They looked like five-gallon garden sprayers with Sankey (commercial) beer line fittings and a high pressure CO2 inlet. The brewpub was getting its draft beer lines cleaned.
I sat with the brewer, someone I know to be meticulous about line cleaning. “I thought I’d give it a try — the guy doing the line cleaning opened his own business after resigning as head brewer at Bell’s,” he told me. As we watched, aghast, successive strings of what looked like snake skins spewed out of an unused line. The clean lines produced much smaller blobs of debris, but they were unsightly all the same. The brewer was stunned and convinced that having lines professionally cleaned was “a very good idea.”

Watching this process, it dawned on me that I may have been mistaken in assuming my own beer lines and taps were clean. That night, I drained a beer line from a keg filled with stout and was taken aback from what I discovered. The dark beer had hidden a heavy deposit of beer stone (i.e. proteins from the beer that accumulate into a type of sludge.) I then unscrewed the cobra-head tap — it too, was filled with the same disgusting junk.
I disconnected all my kegs and took the lines and taps into the basement. There I made up some heavy duty cleaner, and commenced to connect a pump with a beer-out keg connector to clean my lines. Several hours later, the lines were sparkling clean and I felt the need to share the importance of line cleaning with you.
Keeping your lines clean and free from infection preserves your beer and its flavor. Making the cleaning easy and swift encourages frequent cleaning. Wouldn’t it be easier to take the cleaning to the beer fridge or kegerator? My goal was to make some sort of device that would do an equivalent job of line-cleaning as the professional’s equipment I saw that day.
The professional cleaning system consists of pressure tanks filled with various chemicals, typically a caustic, an acid and water. To push each solution through 10–300 feet of beer line, pros often rely on the brewery’s CO2 for the necessary pressure.
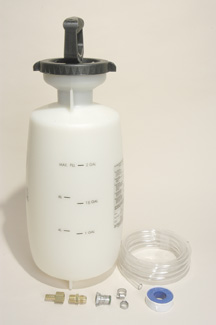
To translate this system into one that will be useful in a homebrewery requires a tank that can be filled with cleaning solution and then pressurized for delivery into draft lines. An ordinary garden sprayer, one adapted to connect to beer line equipment, fulfills our needs precisely. Do not, however, reuse a sprayer used for lawn chemicals. Head for the home store and select a new 2 to 3 gallon (7.6 to 11.4-L) hose-end sprayer. I found several models priced at $20. Look for a sprayer that has a molded-in barb fitting, it will make the connection stronger and much more convenient.
Once you have purchased your sprayer, determine the internal diameter (i.d.) of the hose that came with it. Mine was 3/8 of an inch. Then you will need to purchase 10 feet of hose for our project. Ordinary clear vinyl hose is rated at 55 psi at normal room
temperatures (approximately 70 ºF or 21 ºC). If you plan on using hot water with your cleaning solution (between 120–140 ºF), your best bet is to go with braided hose that is more durable and fit for higher temperatures.
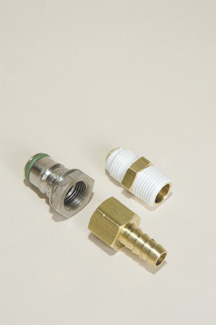
On your way to the store, stop at the local homebrew store and buy a new or used beer-out keg body connector (be sure to take it with you to the hardware store). Though our parts fit together, yours may differ in size; having the connector in your pocket for a trial fit is good insurance.
The gas-in and beer-out keg body connectors require different size barbed adaptors. Once you have hose and a sprayer, head for the plumbing department. You’ll need two brass pieces to connect the keg body connector to your vinyl hose (or braided hose if you went that way), a compression flare-to-MIP half union and a FIP-to-barbed-end connector. Note that the threads on the keg body connector have a different pitch (threads per inch) than either pipes or bolts. Compression fittings, fortunately, have the correct pitch and the half union will be able to connect your flare to the pipe fittings. Do a trial fit of your half union and FIP adaptor in the store to ensure it will work when you get back to your homebrewery.
The only other items you’ll need are Teflon plumbing tape to seal the pipe threads and two hose clamps. This is a very easy project. At home, cut anywhere between 6 inches to 6 feet of hose — the amount you will need depends on how and where you’ll be using the draft line cleaner. Slide an adjustable stainless steel hose clamp over one end and push it onto the barbed fitting on the sprayer. If you are using reinforced vinyl tubing, dip the cut end into very hot water or heat the end with a hair dryer to make fitting the hose over the barb easier. After you tighten the clamp, wrap each end of the half union with Teflon tape and assemble the pieces together tightly.
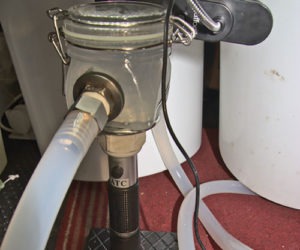
Slip a clamp onto the free hose end, push it onto the brass barb until the hose hits the bottom and tighten the clamp. Tada . . . your project construction is complete and you’re ready to clean those nasty lines!
Assembling the shiny bits is easy, as is pushing the beer line over barbed fittings.
To try out your new line cleaner, fill your sprayer with a couple gallons of water or cleaning solution and adequately pressurize the sprayer to push your cleanser through the length of draft line you are cleaning. To test your project, dispense a glass of brew before line cleanup and compare this to a freshly drawn pint through clean lines.

Finished Project