From Brew Pot to Brew Kettle: Projects
 One of the great things about building your own homebrewing equipment is that you can convert a piece of equipment that you already have into something you find more useful — for example, if you have an extra brewpot, but you could actually use a kettle, you can follow a few simple steps and have the equipment you need, which is great if you don’t want to spend money on something brand new.
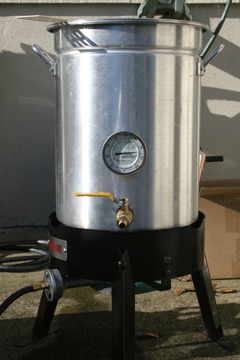
Modifying an existing aluminum or stainless kettle by adding a valve, thermometer and hop/trub straining screen is not so difficult, and it’s cheaper than buying a new kettle with the upgrades included. Plus it will make your brewing life easier. Just imagine feeding your counterflow chiller by simply opening a valve. No more siphoning boiling wort!
I recommend using a step drill bit for this project, although a hole saw (for the 7⁄8-inch hole) and 1⁄2-inch twist bit will suffice. The step drill will be easier to use and makes perfectly round, clean holes that are mostly free of burrs.
For this project, we’ll be using weldless kettle fittings. This means we’re going to need to drill some holes in the kettle. Drilling metal can be tricky, but it doesn’t have to be difficult as long as you have a few essential tools and follow directions carefully. In fact, once you tackle this project, you can use your confidence in metal drilling skills to modify other equipment. For example, if you don’t have a brewpot to convert, but perhaps have access to a (legally-obtained) used Sanke keg, you can convert the keg into a kettle as well.

The drilling can be difficult, but the fittings are very easy to install. For this project you’ll need a Zymico Weldless Kettle Conversion Kit. There are several models available and all of them will work well for this project. You will also need a Blichmann Weldless Brewometer and a Zymico Bazooka Screen.
Parts and Tools
Weldless Fittings:
•Zymico Weldless Kettle Conversion Kit — there are several models available and all will work for this project
• Blichmann Weldless Brewmometer
• Zymico Bazooka Screen
Measure Twice, Drill Once:

Find the kettle center point and draw a line top to bottom. Make two
drilling marks — one for the thermometer and one for the spigot.
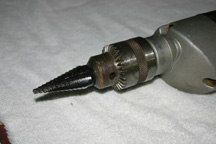
Using a step drill bit for this project ensures perfectly round holes that are mostly free of burrs.
To have the valve and thermometer face 90 degrees from the handles, use a tape measure to find the distance between the kettle’s two handles, divide by 2 to find the half-way point, and mark it with a Sharpie or grease pencil. Draw a line from the mark down to the bottom of the kettle.
Make one mark on the line about 1.5 in. (3.8 cm) up from the bottom of the kettle and another about 7 in. (18 cm) or higher from the bottom (Fig. 2).
Drilling: Aluminum:
For aluminum, the easier of the two materials to work with (by far), common dish detergent is an excellent drill lubricant. Apply a small amount to the areas on the kettles marked for drilling. Also rub some detergent on the drill bits for good measure. It’s a good idea to pre-drill a small pilot hole to get things started (Fig. 3). The smallest hole size on the 7⁄8-inch step drill is 3⁄16 inch, so begin here for the pilot hole. Drill a pilot hole on both marks.
Next, use the step drill to widen the pilot holes to their proper sizes. The bottom hole for the valve should be 7⁄8 inch (Fig. 4).
Use the step drill to widen the pilot holes to their appropriate sizes.
The top hole for the thermometer should be 1⁄2 inch, which is the fifth step on the step drill. Keep drilling until you feel the bit drop down five times. It’s a good idea to check the diameter of the hole every couple of steps to make sure the hole doesn’t get too big — there are no do-overs.

It is a good idea to pre-drill a small hole to get things started, before switching to the step drill bit.
Drilling: Stainless Steel
The general toughness of stainless steel makes it a superior material for a brew kettle. This also makes it difficult to drill. As with aluminum, lubricant is needed to facilitate the drilling process. In this case, use either a commercial cutting oil or something like 3-in-1 oil. It is critical not to get the metal too hot. If it gets too hot, the steel hardens and becomes virtually impossible to drill. Use the oil liberally, and reapply as necessary during the drilling process. When you see the oil evaporate in a small puff of white smoke it’s time to apply more.
Keep the drill on medium or low speed and use lots of pressure. This, along with the lubricant, will help keep the steel at low temperature while drilling. Because stainless steel is so hard, start out with a really small pilot hole (1⁄16-inch or 1⁄8-inch) and work it up to 3⁄16-inch. Be aware that small-diameter bits will easily break under the pressure needed to drill through stainless steel. Go slow.
Once the pilot holes are 3⁄16-inch, lube up the step drill and start drilling. Again, use a medium speed and lots of pressure. Follow the same procedure as above for widening the pilot holes.
From here on out, the project steps are the same for either aluminum or stainless steel.
Smooth Operator:

Once the holes are the right sizes, use a metal file to smooth the edges.
Installing the Ball Valve
Remove the brass nut and rubber gasket from the weldless bulkhead fitting. (Note: the bulkhead comes with two rubber gaskets, but only one is used in installation — the other’s a spare). From the inside, put the bulkhead’s threaded pipe nipple through the bottom hole. The metal washer should be on the inside. On the outside push the rubber gasket over the pipe nipple and then hand-tighten the brass nut until both it and the gasket are flush with the exterior kettle wall (Fig. 6).

Hand tighten the brass nut until it and the gasket are flush with the kettle wall.
Be sure that the milled-out side of the nut faces the gasket. Use an adjustable wrench to hold the nut steady and hand-tighten from the inside. Over-tightening can damage the gasket. Apply some Teflon pipe tape to the exposed threads on the outside and screw in the ball valve (Fig. 7).
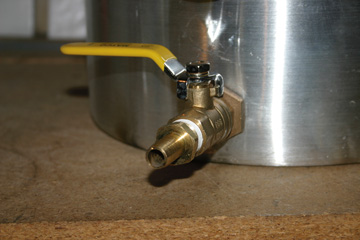
Apply some Teflon tape to the exposed threads and screw in the ball valve.
Installing the Thermometer:
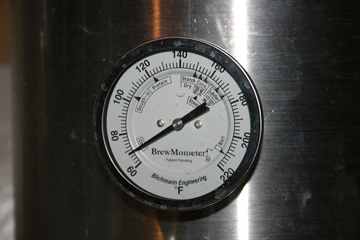
First, calibrate the thermometer following the manufacturer’s instructions. The Blichmann Brewmometer dial reads from 60–220 °F (16–104 °C) with several important brewing temperatures marked, making it ideal for use for both boiling wort and mashing and sparging grain (Fig. 8).
After calibrating, loosen and remove the thermometer nut. From the outside, put the thermometer stem through the hole. Make sure that the rubber o-ring is seated flush against the kettle wall, followed by the metal washer. Hand-tighten the nut on the inside of the kettle. Use an adjustable wrench on both sides of the thermometer simultaneously to tighten the fitting. Do not turn the dial to tighten. Over-tightening can damage the rubber o-ring.
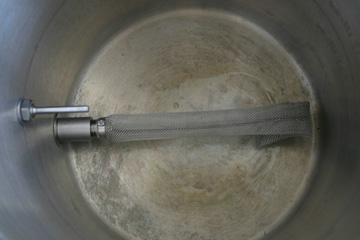
Finally, the Bazooka Screen screws simply into the bulkhead fitting. If the screen is too long, the end can be crimped (Fig. 9).