Sanke Hood Vent
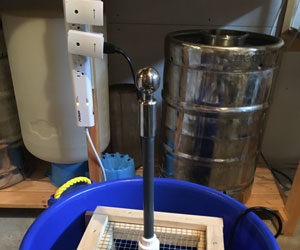
When I looked to get back into brewing several years ago I bought a set of three Sanke kegs intending to build a three-vessel system. They sat for a while waiting on a stand. But along came a two-burner, three-vessel, turnkey system from a guy getting out of the hobby. He had three keggles and also two extra Corny kegs that I picked up in the deal. I started out on propane with that system but then converted the keggles to electric heat. I thought about tinkering around and assembling a gas system with the leftover kegs but somewhere along the way I decided I could make a vent hood out of two them. At the time I was brewing in my driveway, which I didn’t mind so much, but this past winter I mentally committed that being in a temperature-controlled environment in the garage would be a big improvement.
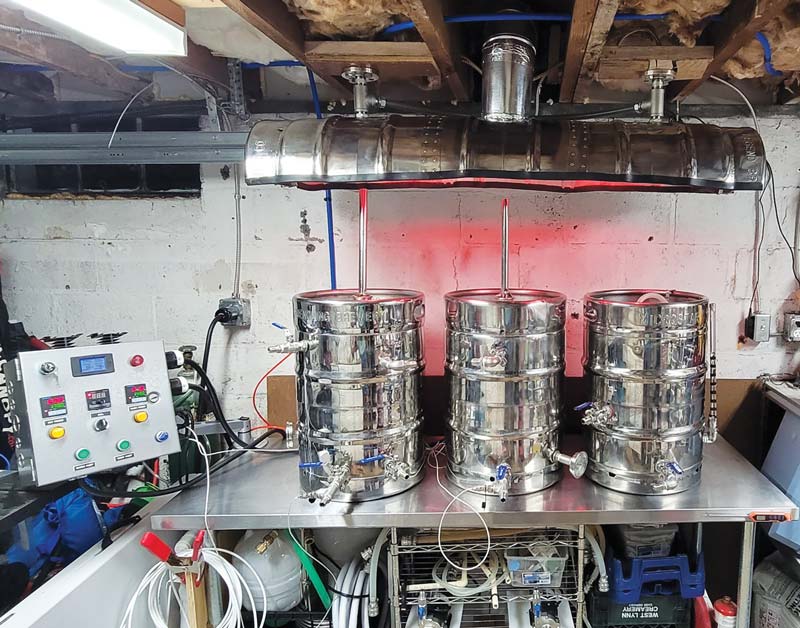
Originally I was planning on strapping the keg pieces together with nuts and bolts. I did have metal shop back in eighth grade but I was never too proud of the coat rack I welded — so welding was off the table. However, I got to wondering about the different ways to attach metal plates together and that’s when I hit on rivets as an option. It turned out to be a fairly involved process but it had a certain steampunk appeal to it. So I studied about rivets, overlapping joints, strapped riveted joints, and last but not least, the double butt strap riveted joint. I had a plan! So let’s get started . . .
This is a lengthier project and will require some time. Don’t rush it. Whenever working with metal, it is always wise to recheck every measurement. Also never operate power tools under the influence of alcohol. Maybe you can pop some rivets while kicking a few back but be sure all the holes are pre-drilled. You may also need some tools you may not have but you may be able to bribe a friend with some brews.
Final note: Please make sure that any kegs that you modify were legally acquired. Just because you paid a deposit or bought them on a website like eBay, doesn’t make them legally yours.

Tools and Materials
- (2) ½-BBL kegs
- Rivets (stainless steel or aluminum)
- Black automobile trim
- (2) Sealed lights
- ½-in. Flexible liquid-tight conduit ~4 ft. (1.2 m)
- 14/2 (with ground) electrical wire
- Ductwork, as needed
- Inline fan (400+ cfm)
- Exhaust vent w/damper
- Cutting wheels (several)
- Flap discs (coarse, medium, and fine)
- Flat felt polishing disc (2)
- 1-in. NPT stainless steel flange
- 1-in. NPT tee
- 1-in. NPT nipple, 4 in. (10 cm) in length
- 1-in. x ¾-in. NPT reducer coupling
- ½-in. flexible conduit barb
- ½-in. x 1-in. bushing
- Round weathertight junction box
- Polishing compounds (black and green)
- Reciprocating saw (metal and wood blades)
- Angle grinder (4.5 in. or 11.4 cm minimum capacity)
- Riveter
- Step bit
- Knockout punch (3⁄4-in. conduit)
- Duct crimpers
- Wire stripper
- Clamps