“Smart” Fermentation: A chamber with a CO2 harvesting system
I started brewing one year ago and enjoy doing small 3.25-gal. (12-L) batches, as it allows more experimentation. Moreover, a 3.25-gal. (12-L) bucket is small enough to fit into my fridge for the cold-crashing phase at the end of fermentation. Nonetheless, after a few batches my flat mates were understandably not too comfortable keeping my “beer stuff” in the fridge for a whole week. My fermenter is indeed pretty small, but it still occupies a large portion of the fridge. Hence, I had to find another way to cold crash. I took up the handcrafting/technological challenge of building my own remotely monitored and controlled fridge with an autonomous system for controlling the temperature.
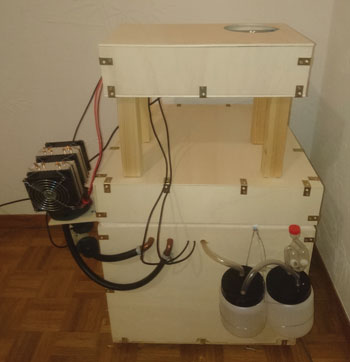
My fermenting chamber consists of a 3.1-in. (8-cm) thick box in polystyrene made waterproof by an inner acrylic Plexiglas® coating. Inside the box the fermentation bucket is plunged in a water bath, with water and beer volumes approximately equal. The box’s size has to be adapted to the fermenter, which in my case fits in a 13.4-in. (34-cm) cube. Adding the 3.1-in. (8-cm) of polystyrene on each side gives the final cubic box a 20-in. (50-cm) long exterior.
The temperature sensor is placed in a test tube and insulated with silicon sealant. The purpose of the test tube is to protect the sensor from moisture, and is extremely simple to clean. The cooling system consists of a small pump that forces the water to flow through a Peltier water chilling system, both the pump and the Peltier system are powered by a 12 V supply. I used a computer power supply unit (PSU).
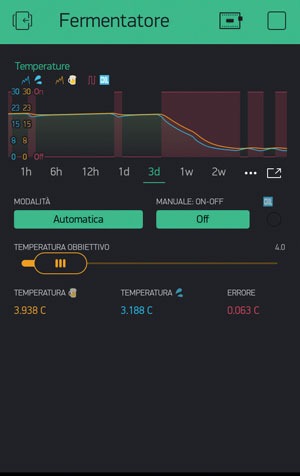
In order to automate the temperature regulation, the thermometer is connected to an Arduino board controlling a relay, which when the beer is too warm, turns on the PSU and hence the cooling system. I avoided using a PID controller, not wanting to deal with tuning coefficients. So I wrote a very simple code for the automatization of the cooling process. First, I performed some preliminary tests turning on and off the cooling system manually and looking at the temperature evolution. As it turned out that the system is very stable and predictable, I came up with an intuitive algorithm that appears to be nonetheless efficient. In order to keep an eye on my beer’s temperature from anywhere, I connected the Arduino to a WiFi module and eventually to an app on my smartphone. This I developed myself using Blynk, a freeware platform for developing apps in this framework. Interactive modules in the app allow me to track the temperature evolution, to set target temperatures and to turn on or off the cooling system. In order to have a backup, the temperature data can be sent to any email address.

Finally, I put in place a CO2 harvesting system and chose the common two-jar system. During cold crash after fermentation, when there is a pressure decrease inside the fermenter, the two-jar system sucks back CO2 instead of oxygen, avoiding oxidation.
Tools and Materials
- 3.1-in. (8-cm) thick polystyrene panels
- Polystyrene cutting device
- Polystyrene-safe glue
- 1.6-in (4-mm) thick
- Plexiglas® panels
- Silicone sealant
- Waterproof DS18B20 digital temperature sensor
- ¾-in. silicone hose
- Small aquarium water pump
- Peltier water cooler
- Cheap/old computer power supply unit
- Arduino Uno
- ESP8266 WiFi board
- Relay
- 2 small jars for CO2 harvesting system
- Test tube
Step by Step

1. Building the box
The goal is to build a polystyrene box large enough to contain your fermenting carboy or bucket plus a similar volume of surrounding water. I used polystyrene panels, which I’ve cut with a polystyrene cutting machine and then glued together with a polystyrene-safe glue.
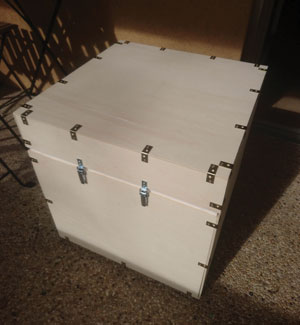
The interior face of the box is coated with thick Plexiglas® panels, made waterproof with silicon applied to the joints. For aesthetic reasons — the fridge is in my flat share’s living room — I covered the box’s exterior faces with thin wood panels.

2. Drill and pass along the hoses and sensor cable
On one face of the box you need to make four holes. Two of these holes are used for the water hoses, one for the blow- off tube, and one for the beer temperature sensor. I decided to drill an additional fifth hole for the water temperature sensor, but it’s not really necessary.
Insert the beer temperature sensor in a test tube and insulate the tube with silicon. Then, drill a hole in your fermenting bucket’s lid of the exact same diameter as the test tube.

3. Installing the water pump and the Peltier module
Connect a water hose to the pump and the other to the Peltier module, employ an additional hose to connect the pump to the Peltier module. Be careful to make the connections as short and insulated as possible — a bit shorter than mine should be optimal.
As you can see in the picture, I didn’t fix the pump, but I purposely just left it hanging to the tubes in order to diminish vibrations. In fact, the fridge’s most noisy parts are by far the Peltier module’s cooling fans.

4. Connecting the cables and power supply
A computer power supply unit (PSU) is used to power the whole fridge. The PSU is extremely practical as it has a 5 V standby supply, which is sufficient to power the Arduino Uno unit even when turned off. The water pump and the Peltier module are connected to the 12 V pins of the PSU, which provide current only when the PSU is on. In order to turn it on, you short together the PowerOn pin and a ground pin, which I achieve with a relay controlled by the Arduino. Finally, connect the temperature sensor and the WiFI module to the Arduino.
5. Programming the Arduino and smartphone app
The algorithm I developed to control the system is rather simple. Let’s think in the following of a target temperature of 64.5 °F (18 °C). Then, if the beer temperature is above 65 °F (18.25 °C) the Arduino turns on the cooling system and keeps it on until the beer reaches 64.5 °F (18 °C), when it’s turned off. At this point, the water — which is the actual substance being cooled down — will be colder than 64.5 °F (18 °C), so after some adjustment time, beer and water will reach a thermal equilibrium of 64 °F (17.75 °C) approximately. Clearly enough, this rudimentary setting — which is sufficiently sophisticated for my small home production — may be ineffective on other builds, and a PID controller might guarantee better performances.
I developed the smartphone app with the very intuitive Blynk framework. The app displays temperature plots, allows me to set the target temperature, and to control the system manually at my whim. All temperature data is stored on the Blynk server and can be exported.

6. CO2 harvester system
The harvesting system goes between the blow-off tube and the airlock, it is composed of two jars. The blow-off tube connects to the cap of the first jar and the airlock is plugged into the cap of the second jar. An additional hose is used to link the two reservoirs, passing through the two caps and reaching the bottom of the jars. Before fermentation starts the first jar is filled with sanitizer, then the CO2 produced by yeast will force the sanitizer to go into the second jar, passing through the linking hose. After fermentation ends the first jar is filled with CO2, which will be sucked back into the fermenter during the cold crashing phase due to the pressure decrease.