Extract Brew Day: A Pictorial Guide
Whether you are just starting with homebrewing, have been brewing for awhile and are curious how others do it or are planning to teach a friend to brew, a picture can be worth a thousand words. If you don’t belong to a brew club or otherwise have the opportunity to sit in on a fellow brewer’s brew day, here’s your chance. In this pictorial guide to an extract brew day, we outline — step by step — one tried and true way to brew beer using malt extract. (Actually, two ways — we include both the “partial boil” method and boiling the full-wort.) Let this outline be your guide to planning, or perhaps refining, your extract brew day.
To get the brew day started, you need two main things: equipment and ingredients.
Brew Day Equipment
REQUIRED
• Kettle (16-qt/16-L minimum)
• Heat Source
• Stirrer
• Thermometer
• Hydrometer
• Racking cane
• Primary fermenter
• Airlock
• Sanitizing agent
OPTIONAL (but recommended)
• Wort chiller
• Racking cane and tubing OR a large funnel
• Hop straining bags
• Measuring cup
• Scissors
• Pliers or channel locks
Most folks start off with a “beginner” equipment kit from a homebrew supplier, so the above required (and some optional) items are almost certainly covered by the kit. The standout exception is generally the kettle, which you will need to buy separately.
Ingredients
• Water
• Malt extract — dried or liquid
• Hops — pellet, plugs or whole leaf
• Yeast — dried or liquid
• Steeping grains (optional)
• Spices/flavorings (optional)
• Irish moss (optional)
Always check that you have the proper ingredients before you begin the brew day.

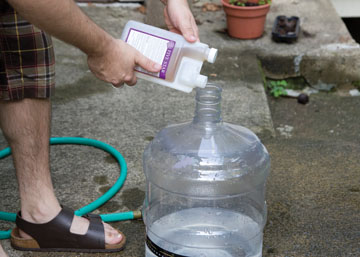
Step 1: Collect and Heat the Water
Each brew day starts with water. If your tap water tastes good to you, then use it. If not, filter the tap water or buy water that is already filtered. The cheapest way to go when buying is to get store-brand filtered water in 3-gallon (11-L) or larger containers.
Collect enough water to account for losses during the boil and for volume left behind in the kettle when the finished, cooled wort is transferred to the fermenter. The target batch volume is 5 gallons (19 L), so you’ll need to start with about 7 gallons (26 L) of water. Some volume will be lost through evaporation during the boil, some will be retained in the grains and hops, and some will be lost when transferring to the fermenter.
Partial Boil


If you are boiling indoors on a stovetop, start with about 2.5 gallons (9.5 L) of water in the kettle. This is called a partial boil. All but the most industrial stovetop burners will struggle to get more than 3 gallons (11 L) of water to boil in a remotely reasonable amount of time. Most beginners will start with a smaller kettle (16 or 20 quarts/15 or 19 L) and a partial boil because it requires less equipment and the smaller kettles are cheaper and easier to source locally.
Full Boil
For outdoor, propane-fueled brewing, start with about 6 gallons (23 L) of water in the kettle. This is called a “full boil.” If you have a little extra cash in your brew gear budget, I highly recommend you acquire an inexpensive turkey fryer setup (approximately $75), which will have a 7- or 8-gallon (26- or 30-L) kettle and a propane burner on a sturdy stand. Of course, the larger boil volume will also necessitate the purchase of a wort chiller. (Do not attempt to use a propane burner indoors; apart from the fire hazard, carbon monoxide is a combustion byproduct. Use propane only in an open, non-enclosed area with adequate ventilation.)
Start heating the water. It will take a while (half an hour at least, and perhaps a good deal longer) to bring the water to a boil.
Step 2: Add the Steeping Grains
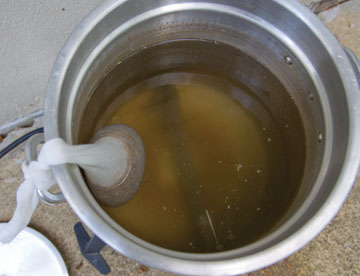
If your kit contains steeping grains, put the grains in a straining bag. If your kit does not call for steeping grains, you can skip to the next section.
Begin steeping the grains when the water temperature reaches approximately 140 °F (60 °C). Remove the steeping grains when the temperature reaches approximately 170 °F (77 °C) or after about 20 minutes, whichever comes first. Leaving the grains in too long (or when the water is too hot) can sometimes cause tannin extraction, which may result in off flavors in your finished beer. (If you do experience astringency, you can also steep the crushed grains in a smaller volume of water, then add the “tea” to the brewpot.)
Step 3: Add the Malt Extract
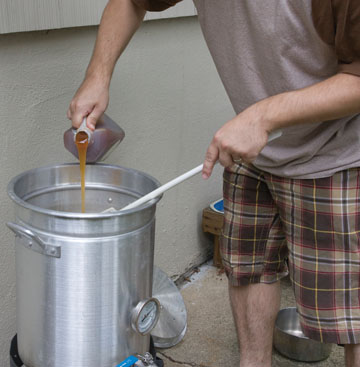
When the water temperature has reached approximately 180 °F (82 °C), begin adding the malt extract. With liquid extract, use a large spoon or stirring rod to stir the water continuously as you pour in the extract. Pay careful attention that it doesn’t pool up on the bottom of the kettle. The direct heat from the burner on the bottom of the kettle can cause the extract to scorch. This is a bigger issue with a partial boil than with full boil. Keep the stirring action going until all the extract is dissolved. If you are using dried malt extract, add the extract slowly, making sure each small addition is dissolved before adding any more. If you add too much at once, the powder can start to clump together and form dough-like balls that resist dissolving. If this happens, don’t fret. You can break up the clumps with a sanitized spoon.
For partial boils, add approximately half of the extract before boiling. The rest will be added near the end of the boil. For full boils, add all of the extract before boiling. Once the extract is added, you have wort.
Step 4: Watch for the Boil-Over!

A few minutes after the wort begins to boil, a thick head of tan foam will develop. When you see this thick, frothy head form, back off on the heat just a bit. Watch carefully, because a boil-over can happen in just a few seconds. If this happens, you’ll end up with a big sticky mess to clean up.
The rising foam action is caused by the coagulation of proteins in the wort. This happens early in the boil, and once past this so-called “hot break” stage, a boil-over is far less likely to happen. The critical period for a boil-over is generally in the first 10 minutes or so of the boil.
Step 5: Add the Hops
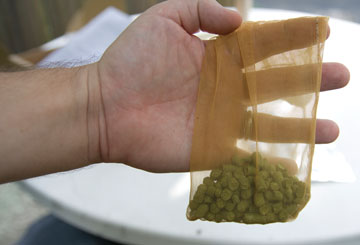
Once the wort is at a rolling, vigorous boil, it’s time to add the bittering hops. A straining bag is not required, but it can make cleanup easier, especially with pellet hops. I prefer to use a straining bag with pellets or plugs, but I like to add whole hops straight to the kettle.
When the bittering hops are in the kettle, that’s the starting point of the 60-minute boil time. Use a wristwatch, clock, or timer to keep track of the length of the boil.
Follow the recipe instructions with regard to the timing of the additions. The timing of hops and other kettle additions are usually specified in a “countdown” style notation, where 60 minutes is the very beginning of the hour-long boil, and 0 minutes (sometimes also called “flameout”) is the very end. Many recipes will call for bittering hops to be added at 60 minutes, flavor hops to be added at 30 minutes, and aroma hops to be added at 15 minutes or less.
Step 6: Add Other Adjunct Ingredients

If any other ingredients are called for in your recipe instructions, add them at the specified time and manner. Spices, adjunct sugars and other flavor additives are generally added towards the end of boil. You may also want to add Irish moss during the last 15 minutes of the boil. This fining agent will aid in clarifying the wort. Use Irish moss at a rate of 1 tsp. per 5 gallobs (19 L) of wort.
Step 7: Add the Rest of the Extract
If you are doing a partial-volume boil, add the remainder of the extract with approximately 5 minutes remaining in the boil. This is just enough time to dissolve and sanitize the extract.
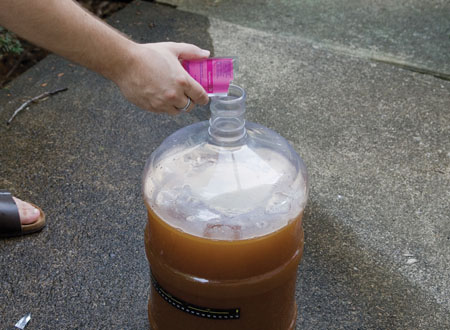
Step 8: Chill the Wort
Once the boil is complete, the wort should be brought down to below 80 °F (27 °C) as soon as possible. Chilling quickly has two main benefits: it reduces the chance of off flavors from dimethyl sulfide (DMS) production, and it causes a more effective “cold break.” A good cold break results in a clearer finished beer.
I recommend a copper coil immersion chiller, which you can either buy or make yourself. It is relatively inexpensive and very effective.
For a partial boil setup, you can also use an ice bath to chill the wort. Fill a large sink with ice and water and lower the kettle in. You’ll need to refresh the ice frequently, and this method will take quite a long time, but it works just fine.
Tip: When using an immersion chiller, I like to save the first 5 gallons (19 L) of the warmest water from the chiller. I use this water later during cleanup.
Step 9: Sanitize!
While the wort is cooling, begin sanitizing the primary fermenter, stopper, airlock, tubing and any other equipment that will come into direct contact with the cooled wort. I prefer StarSan sanitizer, but any food-grade sanitizing agent will work just as well. Just be sure to let the equipment have the requisite amount of contact time with the sanitizer (as specified on the product labeling).
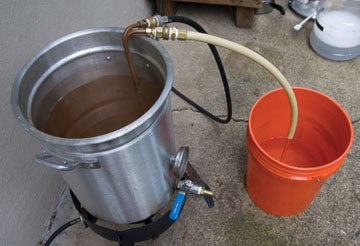
Step 10: Transfer the Wort to the Fermenter
When the wort is at 80 °F (27 °C) or below, transfer it to the primary fermenter. There are at least a few ways to do this. If you are using a bucket as a fermenter, you can simply pick up the kettle and pour in the wort. For carboys, you can also pour from the kettle with the aid of a large-mouth funnel.
You could also use a racking cane and tubing to siphon the wort from the kettle into the fermenter. This a better solution for full-boil setups.
For maximum ease, use a kettle with an attached ball valve to drain the wort. Adding a valve to a brew kettle is inexpensive and simple, and will save a lot of time and effort over the long haul.
Step 11: Aerate and Pitch
With the cooled wort in the fermenter, give the whole thing a good shake for a few minutes. This helps aerate the wort in preparation for the yeast.
Now sanitize the outside of your yeast package (whether it is dried or liquid), and carefully open it. I recommend sanitized scissors to open dry yeast or “smack pack” liquid yeast packaging. Note: Follow the directions of your recipe for preparing liquid yeast, as some types require steps that happen before the brew day starts.
Now simply add the yeast (this is called pitching) to the wort in the fermenter. Soon, the wort will be transformed into beer!
Add the stopper and airlock to the fermenter (or just the airlock if using a bucket) and move it to a cool, dark place for the remainder of the primary fermentation process.
Step 12: Cleanup Time

Cleaning up takes almost as long as all the rest of the brew day processes. It’s not fun, but keeping your gear clean is of primary importance. Use warm water and elbow grease to get the kettle squeaky clean. Soap or detergent is not required and could even leave behind a film that could negatively impact future brew sessions.
Your brew day is complete! Enjoy a homebrew (or perhaps a store-bought libation) and admire your handiwork as you wait for the airlock to begin bubbling, signalling the beginning of visible fermentation — which usually starts 8–24 hours after pitching.


