Build an Open Fermenter: Projects
Originally, all brewing was done in open fermenters, wood, and copper predominated. But for some British brewers, the choice was tanks made of honest slate. Brewers and homebrewers today react in horror at the idea of unprotected fermenters with their entire surface open to contamination. We homebrewers have copied the big boys with closed and ultra-sanitized fermentations in tall metal or glass containers. Yet there is research that says tall is not good for yeast, that pressure is detrimental to yeast health — that long, wide and low fermentation vessels are better.
Sean Brennan, Assistant Brewer at Jolly Pumpkin Artisan ales sanitizes a stainless steel open fermenter that they use for their Belgian style and sour beers.
As we at BYO are always experimental, we’ve decided to adopt the open brewing system for our project, and we’ll base some of our ideas on what a couple of professional brewers do. Arcadia Brewing in Battle Creek, Michigan uses English-style yeast in their open fermenter. Jolly Pumpkin in Dexter, Michigan brews traditional Belgian style and sour ales. Both use stainless steel tanks rather than slate.
An open fermentation in action at Arcadia Brewing Company.
Advice from the pros
Ron Jeffries is the proprietor of Jolly Pumpkin, brewing ales in the Belgian style. His open fermentation system offered the opportunity for expert advice. “The shape of a fermenter has a huge impact on flavor profile,” Ron told BYO. Many breweries worldwide use open fermenters, some you might not expect. “One of my interns was from Germany, his job at Bitburger was to scrub the open fermentation lager tanks.”
We found this interesting as homebrewers normally associate open fermentation with ales, which ferment at warmer temperatures. Of course yeast is a huge contributor to flavor, but using a top-cropping strain is not as critical as one might think.
“Most yeasts don’t top crop; all sorts of yeasts are applicable to open fermentation,” Ron said. He contends that any yeast that worked well in your carboy will work well in open fermentation. He also suggests pitching as you always have, and if starters are your normal procedure stick with it.
“You should use a clean area, one free of pet danders and debris falling from the ceiling. Once the fermentation has started, CO2 should create a fairly protected environment for fermentation,” Ron continued. “If you use a true top-cropping yeast it will form a nice thick crust as CO2 production slows, and the crust will protect your brew from oxygen. There is no magic in learning to run a fermentation in open systems; pitch your yeast and get a vigorous fermentation started as soon as possible.”
Ron says open fermenters require more labor intensive cleaning, “but it makes darn good beer. One could argue open fermentation makes better beer, beer with more flavor.” Only you will know the answer to that, and your personal taste is unique to your palate.
PARTS
1/2” plywood or 1/2–1” MDF 4’x8’ sheet $20.00
Ceramic tiles, approximately 16, plus 2 for breakage @ $0.85 each
Ceramic cutoff wheel for angle grinder $2.25
Wet area construction adhesive; 3 tubes @ $3.25
Aquarium sealant; 2 tubes @ $3.75
Deck screws; 1.5” x #6; 1 box $6.25
Optional: bulkhead fitting of 2 washers, 1 nipple, 1 ball valve, 1 nut or coupling, 2 O-rings
Step By Step
Our idea is to create an open fermenter that is similar to traditional British, German, and Belgian brewing. That is, shallow fermenters of an appropriate capacity.
Begin by determining your willingness to experiment. Are you willing to sacrifice, one gallon or ten? Our fermenter is based on standard homebrew volumes of 5–10 gallons (19–38 L). Recipes require no modification, and a larger fermenter would be incredibly heavy — ours weighs almost 60 pounds (27 kg) empty!
We’ve chosen tiles that are a bit under 12” x 12” (30 cm x 30 cm), a dimension big enough to contain even the most vigorous fermentation, even the type that can blow out the top of your carboy. It’s oversized to account for yeast bloom, the frothy kräusen and a firm top-cropping cap of yeast.Once volumes and vertical height is selected (ours is 12 cubic feet or 30 cubic cm), select tiles with a length and width to create the least cutting of tiles. If you can use whole tiles it would be ideal. Fortunately, tile saws are rentable, or some tile vendors might cut a few for you for a nominal fee.
Once dimensions are known, lay out your tiles and allow 1/8” (3 mm) for a sealing line of food grade (aquarium) caulking. Measure length, width and height, as the next step is to construct a support structure — essentially a box — out of plywood. You’ll have to use at least 3/8” thick plywood to have dimensional rigidity and prevent bowing which would crack the brittle tiles.
The tool list is short: a hand saw, power saw, measuring tools, caulking gun, marking pencils, hammer and glue.
Step One: Build the box.
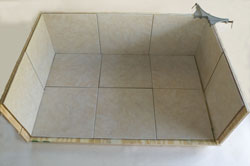
Our box has the following dimensions: a bottom of 37” x 23 7/8”(~94 cm x 60 cm), ends of 24 3/8” x 23 7/8” (~62 cm x 60 cm) and sides of 36” x 23 7/8”(91 cm x 60 cm). Cut these five pieces, or have them cut at your home store.
Step Two: Use food grade adhesive to attach tiles to the side. Lay them out and allow a vertical edge (equaling one tile plus plywood/MDF) of bare wood on the left and right side of the tiles (flush on the top and bottom.) This will become your glue/screw joint where the end piece meets the joining edge of the side piece(s.)

With food grade adhesive, attach the tiles to the plywood.

When building the base, leave a wooden lip around the tiles. You’ll attach screws or nails here.
Step Three: Attach tiles to each side piece with construction adhesive. Your tiles should completely cover the plywood/MDF support. You will attach the side pieces to end pieces in a later step.
Step Four: Dry assemble the sides and ensure that they fit snugly atop the base. I’d suggest cutting the base slightly larger, then marking and cutting to size.
Step Five: Once the ends and sides are firmly attached (it takes hours) seal the joints with food grade silicone, or aquarium-grade silicone (any 100% silicone should be food safe, but use one that has been FDA tested.) When sealing, use a very small tip opening and push the silicone deep into the gap before smoothing the grout. (Tip: keep your finger wet in rubbing alcohol to make a smooth grout line.)
Step Seven: Attach ends to the sides. Pre-drill a pilot hole large enough to prevent end splitting, and use outdoors rated screws. I used 1 1/2” #6 deck screws for their length and thinness. You could also use ring nails. Be anal, use glue or construction adhesive as well.

Attach one end to a side, then screw the remaining end to the first side. Add the second side, turn the unit over and attach sides to the base. When construction is complete, seal all the edges and test for water tightness.
Step eight: Attach tiles to the bottom, but dry fit them first and cut to fit if necessary. (I used a small grinder with a masonry wheel to cut the glazed clay tiles.) Silicone the grout lines, and where the sides meet the bottom.
Allow the silicone to dry, and then protect your investment by sealing and painting any exposed wood.
While our project does not include a drain, one could easily be built in, assuming you wish to build a bulkhead fitting similar to those found in our kettle or mash tun projects (see Summer 2001’s issue of Brew Your Own for instruction). An ordinary hole saw would cut the necessary opening for a stainless steel pipe nipple.
Once the hole is cut, two food-grade O-rings, two stainless steel washers, a stainless steel nut or coupling on the inside and a ball valve on the outside would make this a complete all-purpose fermenter. The rest of us, me included, will just have to siphon.
You’re almost done, you only have to brew a rugged pale ale and select yeast you know, or one that is a true top cropping English yeast to produce your first, richly flavored, open fermented beer.


